|
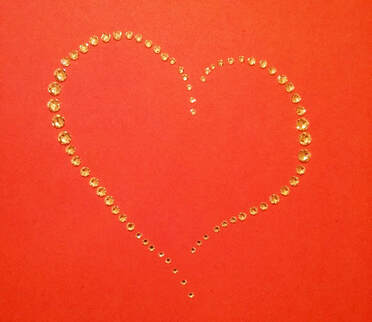
Blinged out tee shirts are a hot fashion trend. Moreover, you’ll find plenty of YouTube videos and blogs describing how to make your own. However, while many DIYers explain the method of attaching rhinestones, many bypass the designing process. We offer a free rhinestone template to create a beautiful, bedazzled shirt. For beginners, using a template is a very convenient tool for showing the placement and quantity of crystalline embellishments. How To Use Our Free Rhinestone Template You can use our free rhinestone template to create a solid heart shape. This free template works with any size rhinestone. The shape will be either smaller or larger depending on your choice of rhinestone size. For example, Preciosa Maxima Rhinestones 20ss measure 4.6 mm. Thus, your finished heart design will extend to about 101 mm by 110 mm (about 4 inches by 4.5 inches). Using size 16ss ( 3.8 mm) will give you a finished design of 83 mm by 91 mm (3.25 by 3.5 inches). Moreover, your finished rhinestone heart will also be larger if you leave space between the rhinestones. To recreate the heart design, simply count the red dots to see how many rhinestones you’ll need. For the pink dots, you have 2 choices. You can use the same size as the red dots or choose one size smaller for a more rounded appearance. Hotfix Vs. Flatback Rhinestones? With this type of rhinestone design, you can use flatback or hotfix rhinestones. Comparatively, using hotfix rhinestones to make an iron on transfer may be a bit easier than gluing flatbacks. If you choose hotfix rhinestones, you’ll also need transfer paper. Rhinestone transfer paper has 2 pieces, a non-sticky opaque piece and a clear sticky sheet. To use transfer paper with this design, print out our template. You may have to enlarge the size so that the dots match the size of the rhinestones. Peel off the clear part of the transfer paper and lay it on top of the template, sticky side up. Place the rhinestones facet-side down in the dots on the sticky part of the transfer paper, filling in the heart shape. To glue flatbacks to fabric, we prefer Gem-Tac for its ease of application. For this method, you use the template as a guide. Begin your design by gluing the rhinestones along a center line, horizontally or vertically. Moreover, you may want to use a ruler to keep your lines straight. If you have a Cricut machine, you can make holes for rhinestone placement. Of course, you’ll want to remove the background dots first. Additionally, you’ll need to convert it into an SVG file format version. Creating Your Rhinestone Design While using a preformed template offers a starting point, you may want to create different designs. You’ll find several ways of design creation from using Cricut machines to computer programs. As you begin your journey with rhinestone design, you can start with a simple method to save on costs. We offer several free rhinestone template designs that you can download. Furthermore, you can read about how to make a simple rhinestone template using a punch tool. For this project, we used Photoshop to convert a simple image into a color dot pattern. Spiral Betty is a free program that can also turn an image into dots. Choose Quality Rhinestones for Your Bling Project Although you don’t need to choose the most expensive rhinestones for your bling project, avoid using cheaply made embellishments. Often, poorly made rhinestones will have color variations for the same hue. They may contain bubbles within their structure giving the embellishment a cloudy appearance. Comparatively, cheaply made rhinestones won’t have much sparkle or shine as compared to higher-end embellishments. For over 10 years, Rhinestones Etc. has been supplying dancers, skaters, and businesses with high-quality crystal rhinestones. We offer super-fast processing times with most orders shipping out the same day. Plus, we offer a large selection Preciosa Rhinestones as well as the cost-effective PriceLess brand. Browse our online store to find the perfect color for your next bling project.
0 Comments
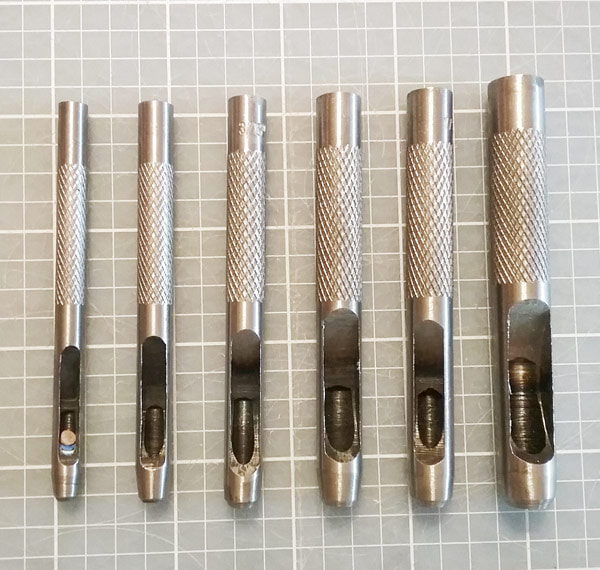
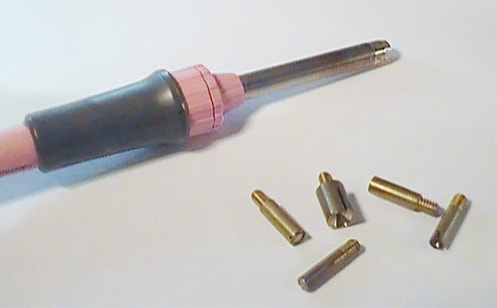
Sometimes when you want a simple answer you find solutions requiring a lot of money. For example, let’s look at how to make rhinestone templates to create bedazzled clothing. Google it and you’ll find instructions using a cutter machine, transfer sheets, backing board, template paper, and computer software. Sounds complicated and expensive. However, you can make templates for under $20. Plus, you can use these templates for glue on rhinestones. You only need a few tools: a metal hollow hole punch set, hammer, and a self-healing paper cutting board. Alternately, you can also use a block of wood instead of the cutting board and save yourself even more money.
Why Use Rhinestone Templates?
Generally, applying rhinestones to clothing occurs in a pattern. You may be creating an object or words using rhinestones. A template helps you to maintain the symmetry and spacing between rhinestone easily. Often, you can find pictures or symbols by searching through embroidery or pattern books. Dover Publishing contains a wide variety of pattern design books. Additionally, we offer several free rhinestone templates that you can download.
Word Templates
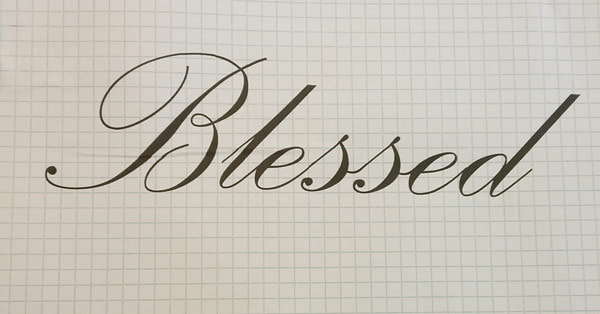
Tee shirts with your message emblazoned on them are trendy. Blinged out clothing is both chic and in style. But, have you priced bedazzled clothing? It’s expensive! Yet, you can make your own when easily by using a template. Word processing programs make creating word templates super easy. Plus, you can choose from a variety of fonts and letter sizes. Moreover, you can print your word on a piece of graph paper to help with the spacing of the rhinestones.
Animal and Symbol Templates Furthermore, you can make more than just word templates. Let’s say you want to add a bird, heart, or dragon to a tee shirt. You can find drawings of many of these objects online for free. Simply search online for free vector line drawings. Additionally, children’s coloring books or stencils are more great sources. Once you’ve got your copy, you simply punch evenly spaced holes in the outline of your image. First, place the copy of the image on your cutting board and position a punch tool. Then, tap the top of the punch tool several times with the hammer. Continue making holes around the perimeter, spacing the holes as needed. Next, take your template and lay it flat on your shirt. You can use a piece of chalk to mark the position of rhinestones or simply lay rhinestones inside the holes. Remove the template and make any necessary adjustments to the spacing and placement of the rhinestones. Then, you’re ready to glue them into place. Frequently Asked Questions About Rhinestones Often, our customers ask us the same types of questions. We’ve put together our most commonly asked ones.
Which Type Of Rhinestones Should I Use For My Project?
For years, many consumers have used Swarovski Rhinestones for their projects. Known for the production of quality embellishments, it was the brand to buy. Unfortunately, several months ago, the company began a restructuring project that would take them out of the retail market. However, the Preciosa brand has a far longer crystal making tradition than Swarovski. Preciosa draws upon over 470 years of glassmaking tradition from independent artisans. In 1948, these separate factories merged into one company. Plus, many other lesser-known manufacturers produce crystal, glass, or acrylic rhinestones. In particular, the Asian markets produce both MC and DMC rhinestones in glass and crystal with different price points. Quality and grading vary among manufacturers, so when in doubt, check online reviews. If possible, try to obtain a sample.
What Is The Best Rhinestone Adhesive?
Undoubtedly, the most popular method of attaching rhinestones to clothing is with glue. This process for gluing rhinestones to fabric is fairly simply resulting in a stunning result. Moreover, you can choose from several types of adhesives:
All these adhesives are washable and dry clear. However, some are easier to work with than others. While many consumers like E6000, this glue tends to be gloppy. Our preferred glue for adhering rhinestones to fabric is Gem-Tac.
How Many Rhinestones Will I Need?
Comparatively, the number of rhinestones you need for your project depends upon both the size of the design and rhinestones. Furthermore, manufacturers use a unique type of measurement to designate rhinestone sizes. Generally, a larger number next to the “ss” classification is a bigger rhinestone. Likewise, the smaller the number, the tinier the rhinestone. Moreover, the spacing will also determine your quantity. Ultimately, you’ll need more rhinestones to cover an area than a straight line or scattered pattern.
Where Can I Buy Quality Rhinestones?
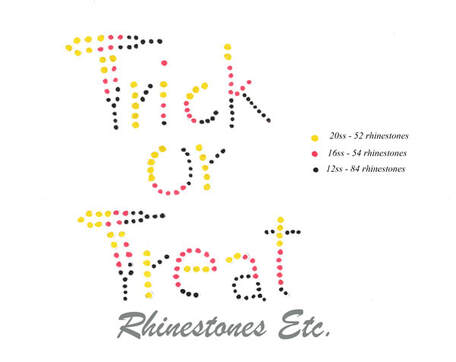
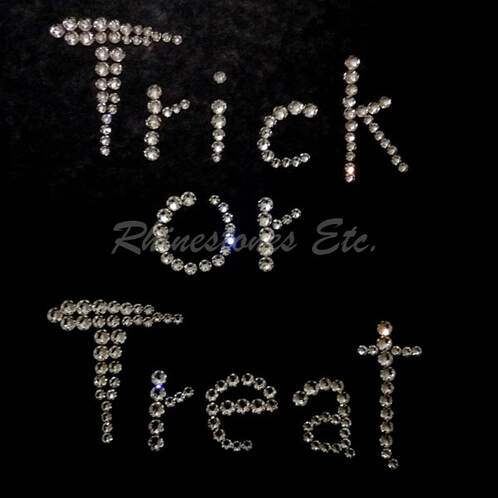
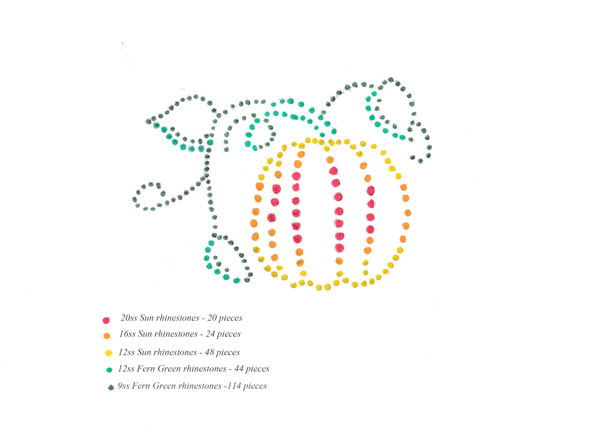
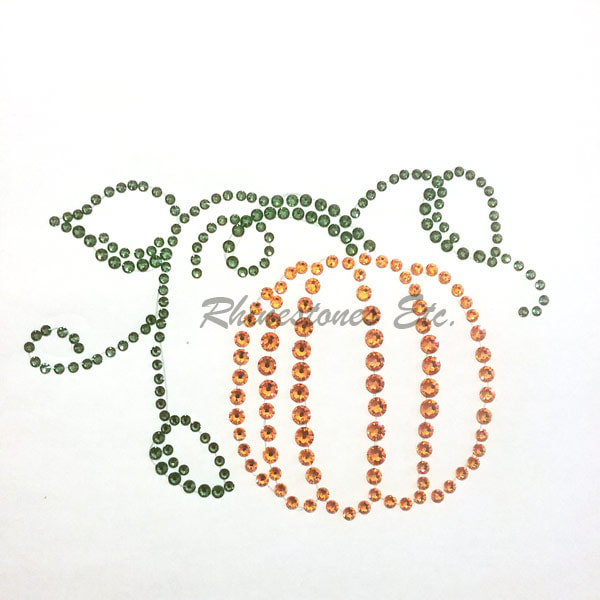
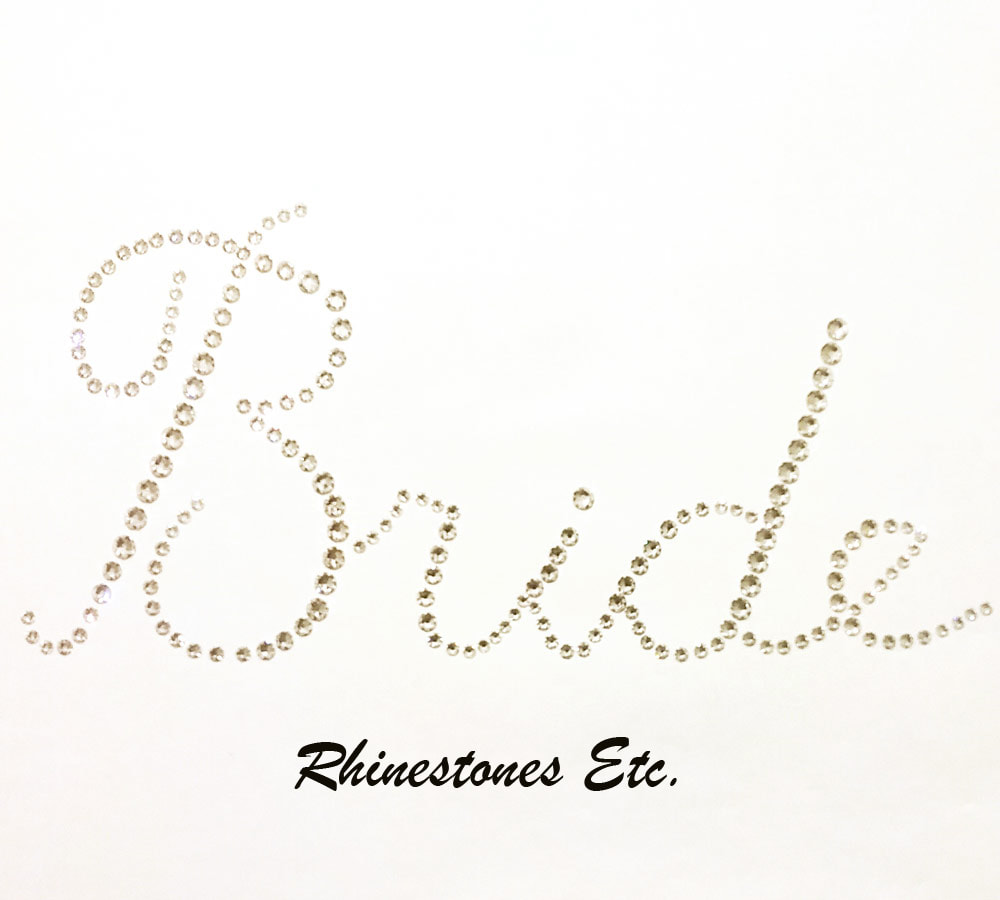
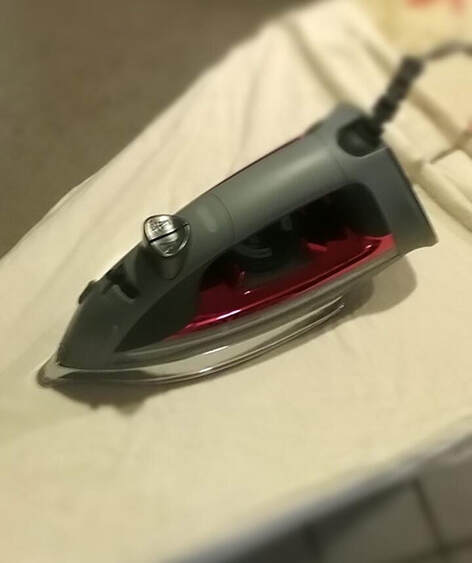
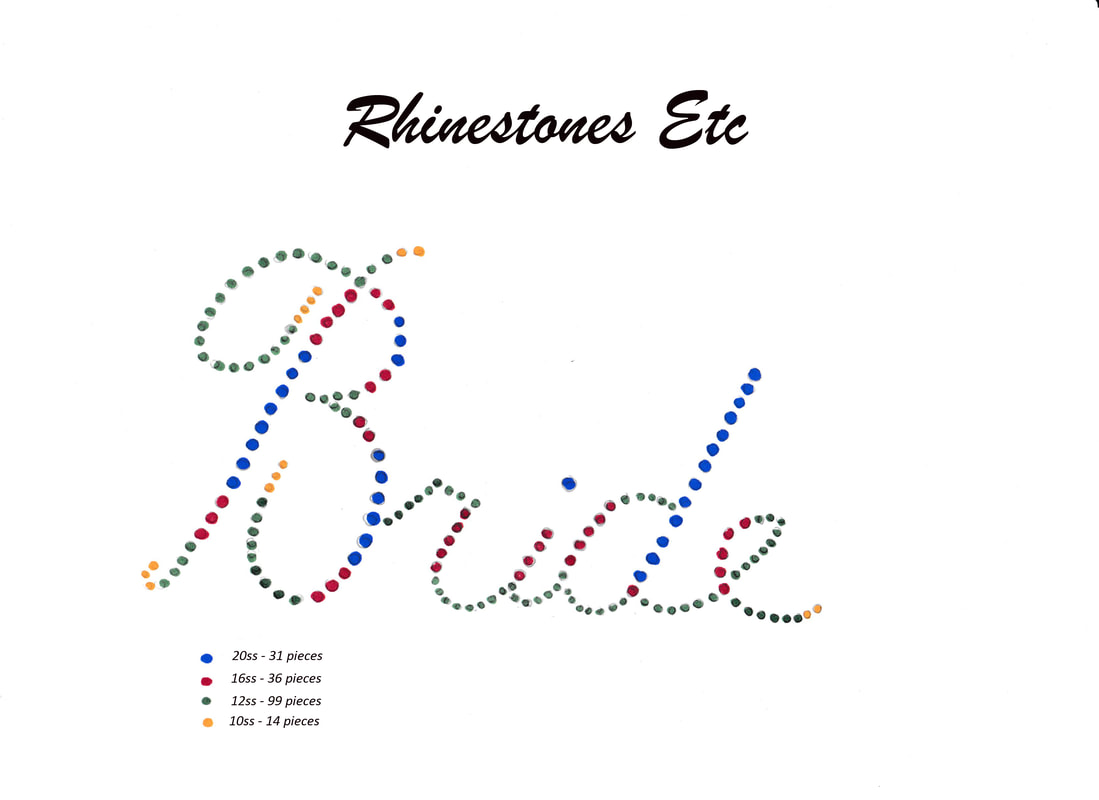
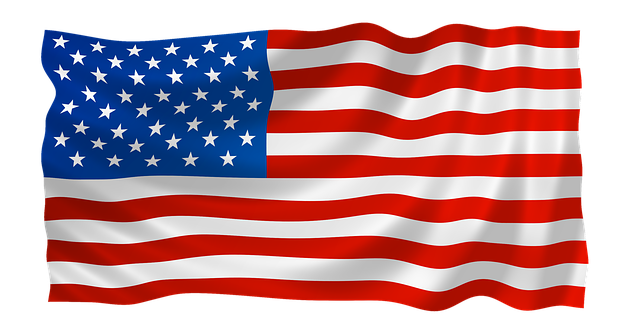
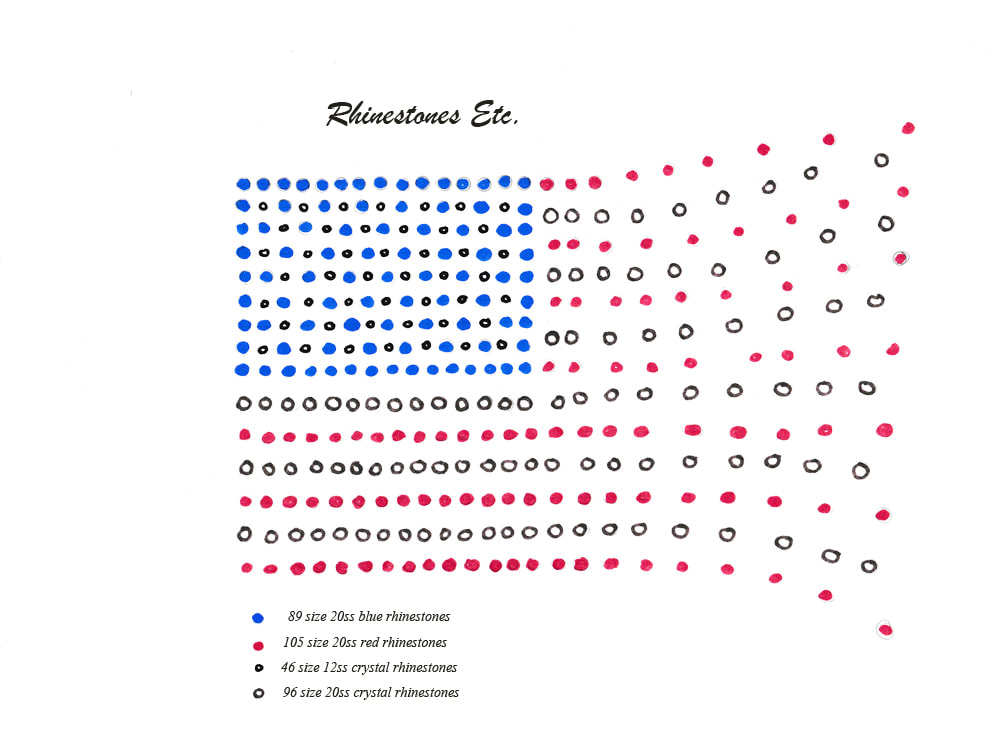
Rhinestones Etc. wants to be your source for bling. Since 2011, we’ve been offering fast processing times, outstanding customer service, and competitive pricing for quality embellishment products. Visit our online store to view our inventory. Kids and adults alike love Halloween for a chance to dress up and pretend to be someone else. Children especially love to go door to door trick or treating to collect lots of delicious candy. While adults love to throw costume parties to celebrate too. Our Trick or Treat Halloween rhinestone template makes it easy to bling out a t-shirt in celebration of Halloween. Pick you your favorite color tee shirt. Download the rhinestone template. Then follow our instructions below to bling out your shirt at a fraction of the cost of retail. A Brief History of Halloween Most people know that Halloween originated with a Celtic pagan festival. Participants would dress up in costume to ward off ghosts. But how and when did the iconic saying “Trick or treat” enter into American culture? Unfortunately, the coining of the phrase is unknown. What is known is that Charles M. Schulz used the phase trick or treating in a 1951 Peanuts comic strip. Moreover, in 1952, Disney produced a cartoon entitled “Trick or Treat” featuring Donald Duck with Huey, Dewey, and Louie. This cartoon short visualized for children how to trick or treat. With these two influencers, the term became cemented into our culture. How to Use the Trick or Treat Halloween Rhinestone Template It’s so easy to bling out your tee shirt using our template. First, download the template here. You’ll be able to see the exact position and the sizes of the rhinestones we used. Of course, prewash your shirt before you start to attach rhinestones. Next, decide whether you want to use glue on (flat back) rhinestones or hot fix. If you choose glue on rhinestones, you’ll need a quality adhesive like Gem-Tac. Whichever glue you decide on, make sure it is safe gluing embellishments to fabric, dries clear and is washable. On the other hand, if you choose to use hot fix rhinestones, transfer paper can make embellishing super easy. Transfer paper has 2 pieces, a clear piece sticky on one side and an opaque non-sticky piece. How to Use Flat Back Rhinestones with the Template After prewashing your shirt, lay it out as flat as possible. Then, using the template as a guide, place the rhinestones as indicated. Removing 1 rhinestone at a time, place a drop of glue slightly smaller than the rhinestone in its place. Gently press the rhinestone into the glue drop. Some of the glue should seep out from the sides of the rhinestone. This is very important as this creates a seal that helps prevent the rhinestones from falling off. When you’ve finished gluing all the rhinestones, let the glue dry on a flat surface for 24 hours. Make a Rhinestone Transfer with Hot Fix Rhinestones Once you’ve downloaded the template, place it on your work surface. You may want to place a piece of wax paper on top of the template. This will keep the sticky part of the transfer paper from sticking to the template. Lay the rhinestones out on the template (or wax paper) according to the template, facet side up. Then remove the opaque piece of transfer paper and lay the sticky, clear piece on top of the rhinestones. When you’re ready to embellish your shirt, heat a non-steam iron to its hottest setting. Lay the transfer on your shirt. Press down on the rhinestone transfer for 10-15 seconds. Pick the iron up and press down on another part of the transfer. Do not slide the iron as this may move the rhinestones. After heating all parts of the transfer, remove the sticky part and let cool. Halloween Rhinestone Template Download to Bling Our Your Shirt So, what are you waiting for? Get started blinging out your shirt with our Halloween rhinestone template by downloading your today. And if you need rhinestones, check out the discount pricing offered by Rhinestones Etc. Selling online for over 10 years, we ship fast and have excellent customer service. Browse our online store and find your color for your next bling project! With the harvesting of pumpkins falling in the fall, this fruit has become an iconic image of autumn. Moreover, you can proclaim your love for pumpkins by blinging out a shirt during this season. Our pumpkin rhinestone template makes embellishing a shirt with rhinestones easy. Steps to Create A Bedazzled Shirt 1. Download Our Free Rhinestone Template First, download our rhinestone template. Our template shows the position, size, and quantity of the rhinestones you’ll need. You can use it exactly as is or experiment with different sizes or colors. 2. Prewash Your Garment Typically, clothing manufacturers treat garments with chemicals to protect them during transportation. Sometimes, these chemicals can prevent rhinestone glues from making a good bond. Additionally, some fibers tend to shrink when you wash them. Thus, it’s important you pre-wash and dry your shirt before you begin your bling project. 3. Choose Your Rhinestone Type Finally, pick the brand and what kind of rhinestone you want to use, hot fix or flat back. You’ll find many manufacturers making both kinds. Either are suitable although you use different techniques for each one. Hot fix rhinestones have glue already on them and need heat to activate the glue. Flat backs require an adhesive like Gem-Tac or E6000. 4. Lay Your Garment Flat Make sure you lay your garment as flat as possible on your work surface. If the shirt material is thin, you may want to put wax paper between the layers. This will keep the glue from seeping through layers and sticking together. Hot Fix Rhinestones Probably the easiest way to bedazzle a shirt is to create a rhinestone iron on. In addition to our template, you’ll need transfer paper and hot fix rhinestones. Transfer paper has a clear sticky piece and an opaque non-sticky piece. After downloading the rhinestone template, position a piece of wax paper over the template before laying out the rhinestones. This step will keep the transfer paper from sticking to the template. Then, lay the rhinestones on the template as indicated, facet side up. Separate your transfer paper and lay the sticky side on top of the rhinestones. Gently press on the transfer paper to ensure all the rhinestones stick to it. Then, simply lift the sticky piece of transfer paper and you’ve created a rhinestone iron on. When you’re ready to embellish your shirt, heat an iron to its highest setting. Hot fix rhinestone manufacturers don’t recommend steam irons because the steam and the steam vents interfere with glue activation. Next, lay your shirt out flat and position your rhinestone transfer on your shirt. Press down with the iron and hold for about 12-18 seconds. Lift the iron straight up and repeat on another part of the transfer. Do not slide the iron as this may move the rhinestones. Once you’ve activated the glue on all the rhinestones, allow a few minutes for the rhinestones to cool. Then, simply peel off your transfer paper. Flat Back Rhinestones Alternatively, you can also use non-hot fix or flat back rhinestones. This type of embellishment requires an adhesive. Your local craft store will have different types of popular rhinestone glues:
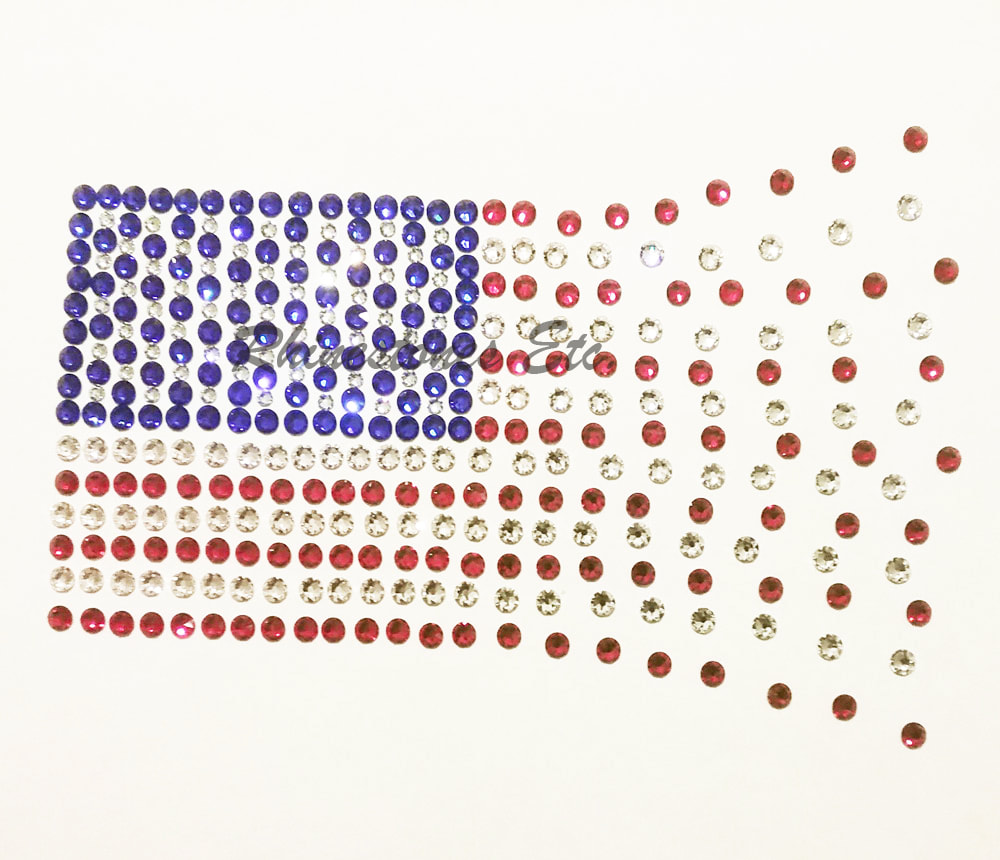
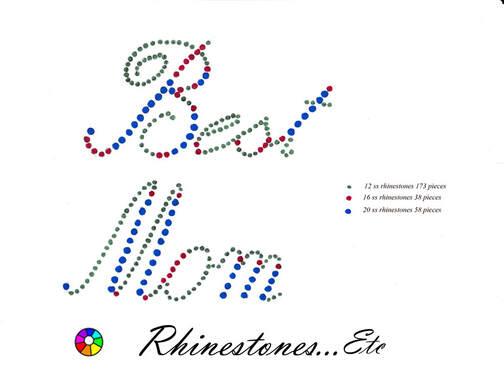
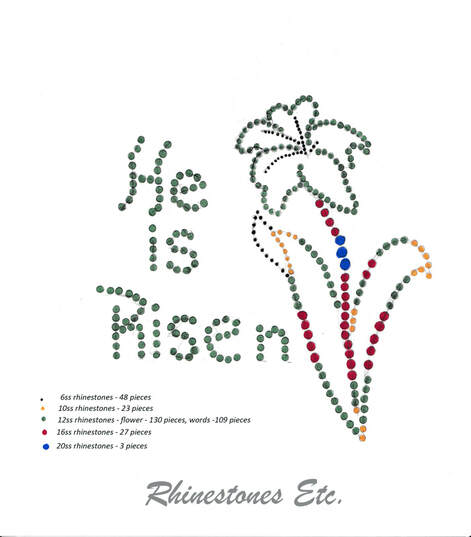
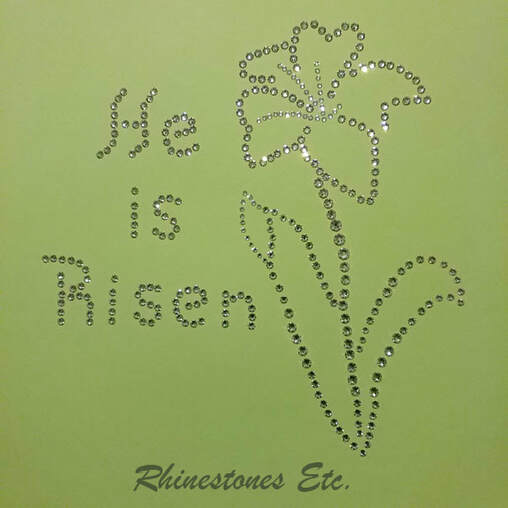
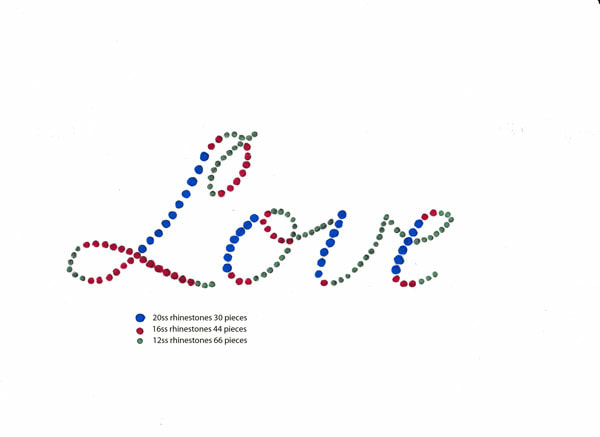
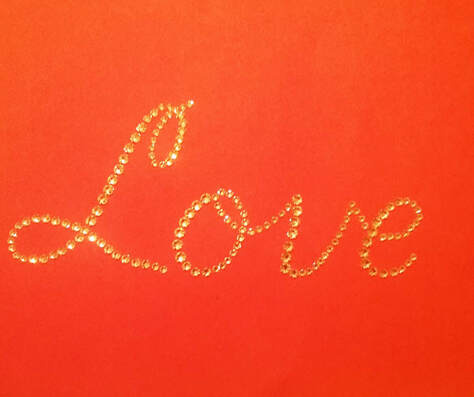
Just make sure your adhesive dries clear, is washable, and is suitable for your type of embellishment. For example, a popular glue is E-6000. However, the manufacturer doesn’t recommend this adhesive for use with acrylic rhinestones. Moreover, this glue can be difficult to work with on fabric. First, download and print out the template. You can use an awl or punch set with a piece of wood to mark the placement of stones. Next, lay your shirt as flat as possible and position the template in the middle. Then, you can choose one of two methods. Either lay the stones in the holes or use chalk to mark the placement. Before gluing, you can adjust the rhinestone spacing to be closer or farther apart. When you’re ready to glue, place a glue drop slightly smaller than the rhinestone on the shirt. Gently press the embellishment into the glue. Some of the glue should seep out from the sides. This is very important as it forms a seal that helps prevent the rhinestone from peeling off. Once you’ve glued on all the rhinestones, allow them to dry flat for 24 hours. Download Our Pumpkin Rhinestones Template Creating your rhinestone design is easy with our downloadable free rhinestone template. Simply click here to begin your bling project. If you have any questions about how to use the template, you can contactus here. And if you’re looking for fast and friendly service on your rhinestone purchase, shop Rhinestones Etc. We have a huge selection of crystal rhinestones at competitive prices. Plus, most of our orders ship within 24 hours. Browse our online store to find your size and color! While your wedding day is a big event to plan, you also have some smaller events to organize. There’s the bridesmaid luncheon, bachelorette party, and rehearsal dinner. And for each of these events, you need something to wear. What better way to announce to the world the upcoming event than by wearing a blinged-out “bride” shirt. Perhaps you’ve seen these shirts in major retailers. Generally, they are expensive and made with cheaper rhinestones without much sparkle. However, you can make your own using our rhinestone template and your choice of rhinestones. How to Use Our Rhinestone Template Simply go to our website and download the template. Our design has all the size rhinestones listed so you know exactly what you need and how many. Moreover, you can experiment by using all the same size or different sizes. Generally, these bride shirts use crystal rhinestones, but you can choose any color you want. Next, decide on whether you want to use hot fix or flat back (glue-on) rhinestones. Hot fix rhinestones have glue already on them while flat backs require glue. Both of these types of rhinestones work great for this type of project. Even if you’ve never undertaken this type of project before, you can do this easily with our instructions. Finally, always make sure to pre-wash your garment before adding rhinestones. Using Hot Fix Rhinestones To start with, you’ll need some transfer paper if you’re going to use hot fix rhinestones. Peel the opaque piece off of the transfer paper and put it aside. Lay the clear paper, sticky side up on top of the template. Now lay the rhinestones, facet side down, on the sticky paper, placing the rhinestones as indicated. Once you have all the rhinestones placed, you can iron it on to your t-shirt. Heat your iron to the hottest setting without steam. Lay your shirt flat on the ironing boards. Position the rhinestone transfer on the shirt, the flat side of the rhinestone touching the shirt. With the iron, press down on rhinestone transfer, holding for 12-17 seconds. Lift the iron up and if necessary, press down on another part of the transfer. DO NOT slide the iron as this may dislodge and move the rhinestones. Once you’ve done this for the entire transfer, allow to cool completely. Then peel off the clear sticky part and you have your finished shirt. Flat Back Rhinestones On the other hand, flat back rhinestones require an adhesive. You can find several at your local craft store. My favorite fabric glue for rhinestones is Gem-Tac. It dries clear, is washable and is easy to apply. The technique for flat back rhinestones is different. First, lay the shirt as flat as possible on your work surface. Using the template as a guide, lay all the rhinestones on the shirt. Then, one at a time, pick up a rhinestone placing a drop of glue in its place. Next, gently press the rhinestone into the glue drop, allowing some of the glue to seep out the sides. This “extra” glue forms a seal which helps protect the rhinestones from peeling off. Continue removing one rhinestone at a time and gluing into place until your design is complete. Allow to dry flat for 24 hours. You’ve just saved yourself some money by making your own blinged-out bride shirt. Best of all, our rhinestone template is free! And if you need rhinestones, check out Rhinestones Etc. competitive pricing on rhinestones! We have excellent customer service and want your complete satisfaction with each purchase. Browse our online store to find your color! July 4th is just around the corner with the promise of picnics and fireworks. A celebration of the United States independence, we take pride in draping red, white and blue bunting across our porch. Why not show your pride for your country with a blinged-out rhinestone design t-shirt? You can wear your American pride on a t-shirt using our free rhinestone template download of the American Flag. Rhinestone templates make it easy to rhinestone, even if you have never rhinestoned anything before. Just copy the pattern onto your favorite shirt. Of course, the best thing is that our rhinestone template is free! History of the American Flag Legend has it that Betsy Ross sewed the first American Flag. Back in 1776, she received a visit from George Washington regarding the design of the flag. He presented her with the basic layout but, Betsy allegedly finalized the design. She argued for stars with five points because they were easier to cut out with a single snip. But what you might not know is that it wasn’t until 1912 that the specific layout was determined by law. Consequently, flags made before this time show different arrangements of the stars and stripes. In fact, an Act passed in 1794 allowed for 15 stripes rather than the current 13. How to use our Rhinestones Template Download First, download our free rhinestone template here. As you can see, the template gives the size and quantity of the rhinestones used. However, feel free to experiment with the rhinestone design and substitute different sizes or spacing. Next, pre-wash your garment before you start to rhinestone. Once washed and dry, lay the shirt on a flat surface to work on. Using our template as a guide, lay out the rhinestones on the shirt. Once you are satisfied with the arrangement of rhinestones, you can start gluing. My favorite glue for fabrics is Gem-Tac for its ease of use. Pick up one of the rhinestones off your design and put a drop of glue in its place. You want to use a drop slightly smaller than the rhinestone. When you gently press the rhinestone into the glue drop, some of the glue should ooze from the sides. The creates a seal which helps prevent the rhinestone from peeling off. Continue gluing in this manner until your design is complete. You can also use hot fix rhinestones and transfer paper if you prefer. Simply lay out the design on the sticky side of the transfer paper, facet side down. Once you finished laying your design out, iron it on to your shirt. Either way, our free rhinestone template download makes it so easy! Where to Buy Rhinestones to Use with your Free Rhinestone Template Need some rhinestones to get you started? Rhinestones Etc. has been selling Rhinestones online for over 10 years. With fast processing times, we get your embellishments to your door quickly. Throughout all of history, in every civilization, mothers have been honored. And with good reason. Who knows how to kiss the pain away, hugs you when you’re frightened by a thunderstorm? And what better way to honor your mother than to use our free rhinestone template to bling out a shirt for her. History of Mother’s Day According to The History Channel, the beginnings of the holiday had its origins stretching back to the 19th century. At that time, Ann Reeves Jarvis helped form clubs that taught women how to care for their children. Additionally, in 1868 Jarvis helped unify a split country by organizing Mother’s Friendship Day. On this day, mothers of both confederate and union soldiers gathered as a sign of unity. No doubt inspired by her mother, Anna Jarvis, campaigned and worked tirelessly to have national recognition of Mothers. Finally, in 1914, President Woodrow Wilson signed a measure officially establishing the second Sunday in May as Mother’s Day. Rhinestone Template to Celebrate Your Mother You can celebrate your mother by honoring her with a blinged-out t-shirt! Download our free template that proclaims your mother “Best Mom”. The template has a listing of all the rhinestone sizes and quantities you need to bling out her shirt. First, download our template here. Then, pick out her favorite color tee shirt. Next, wash and dry the shirt before you start to glue on the rhinestones. Decide what color rhinestones you like, whether you like the crystal or some other color. How to Bling-Out Your Shirt Certainly, you can use either hot fix rhinestones or flat back rhinestones. Each has a different way of adherence and is generally a matter of preference. To begin with, there is glue on the bottom hot fix rhinestones. You can lay them out on hot fix transfer paper thus making a rhinestone iron on. When ready to adhere, simply position the iron-on on the shirt. With an iron set to the high setting without steam, press down on the transfer paper for 12-18 seconds. Lift the iron up to heat another section. Do not slide as this may dislodge some of the stones. Or if your wish, you can use a hot fix tool. Lay out the pattern first, then remove one rhinestone at a time to hear with the tool. Unlike hot fix rhinestones, you need glue for flat back rhinestones. Gem-Tac is my favorite as it dries clear, is washable and easy to apply. When using flat back rhinestones, lay the rhinestones on the shirt in the indicated pattern. Now, pick up a rhinestone and place a drop of glue slightly smaller than the rhinestone in its spot. Gently press the rhinestone into the glue drop. Similarly, continue gluing until all the rhinestones are adhered. Let dry flat for 24 hours. Mother’s Day Rhinestone Template So, what are you waiting for? Download our free rhinestone template now. If you need rhinestones, check out the prices at Rhinestones Etc. We have competitive pricing on rhinestones and great customer service. Selling online for over 10 years, we know rhinestones. There are templates for almost everything imaginable: documents, web design, craft making and sewing to name a few. And why not? Templates make whatever you are working on so much easier to complete. Of course, the same is true when working with rhinestones. Moreover, a template will show you what size rhinestones to use and how many. In addition, a rhinestone template will show you the placement of the rhinestones. For the upcoming Easter holiday, you will want our free rhinestone template download to bling out a shirt. The Lily: Our Easter Rhinestone Design The Easter lily is mentioned a few times in the Bible both in the Old and New Testaments. Additionally, legend has it that lilies grew where Jesus’s sweat and tears fell when he was crucified. Lastly, with its pure white flowers symbolizing purity, it’s no wonder the flower has become so popular at Easter. Swedish naturalist Carl Peter Thunberg discovered the Easter Lily in Japan in 1777. From there, it eventually made its way to Philadelphia in the US. It was here that it became popular as an Easter bloom. Today, Easter lilies are one of the most popular potted plants in the U.S., ranking with poinsettias, mums and azaleas. Free Rhinestone Template Download for you Now you can proudly wear a rhinestone Easter Lily with the words “He is Risen”. Simply download our rhinestone template from our website. Even more, the template is color coded so that you can easily see the size and the quantity of rhinestones. You can follow the template exactly or experiment with different sizes and colors. Buy your t-shirt and wash and dry it before starting your rhinestones project. When you are ready to begin, lay the shirt on a flat surface to work. Next, decide whether you want to use flat back or hot fix rhinestones. While hot fix rhinestones are slightly more expensive, they have glue already on them. You can stick hot fix rhinestones to transfer paper making an easy iron-on rhinestone design. Lay the iron-on design on your shirt on a flat surface. Then using an iron set to its highest setting without steam, press down on the design to activate the glue. On the other hand, if you choose to use flat back (non-hot fix rhinestones), you will want to lay the design out on your shirt first. Then picking up one rhinestone at a time, place a drop of glue where the rhinestone was. Gently press the rhinestone into the glue. Finally, allow to dry flat for 24 hours. Where to buy loose rhinestones Do you need rhinestones to make your rhinestone Easter shirt? Rhinestones Etc. has competitive pricing and great customer service. Selling online for over 10 years, we know rhinestones. Browse our online store to find quality rhinestones. Very often, we use the word “love” to describe a variety of things we care about. For example, I love chocolate (well, who doesn’t), or I love that outfit. We also use it to describe human relationships, as in “I love you”. Not far off is Valentine’s Day, the holiday to celebrate love. One way to celebrate is to wear a blinged out t-shirt emblazoned with the word “love” on it. Our downloadable rhinestone template makes it easy to make your very own rhinestone t-shirt. Even if you have never blinged out anything before, you can easily make this shirt. How to Use Our Rhinestone Template First, download the template. Just click here to do so. The template tells the size and quantity of the rhinestones you will need. Decide on a rhinestone color. You can use crystal on any colored shirt or try another color such as red or black on a contrasting color. Next, decide whether you want to use hot fix rhinestones or flat back (glue-on) rhinestones. Both are easy to use and are a matter of preference. If you choose hot fix rhinestones, you will need either a hot fix tool or transfer paper. Glue on rhinestones will require an adhesive. How to Make a Hot Fix Transfer Hot fix rhinestones already have glue on them. Using transfer paper with them makes the process super easy. Lay out the rhinestones facet side up according to the pattern. Peel the transfer paper from its backing and gently place the sticky side on top of the rhinestones. Gently press down so that the rhinestones stick to the transfer paper. Position the rhinestone transfer on your t-shirt. Heat up your iron to the hottest setting without steam. When hot, gently press down on the transfer holding for about 15 seconds. Pick up the iron and reposition the iron to another part of the rhinestone transfer. Repeat this process until all the rhinestones have been heated. DO NOT slide the iron as this may dislodge and move the rhinestones. Allow to cool for a few minutes and then remove the transfer paper. Your shirt is now finished. An alternative is to use a hot fix tool. As with the glue on method, lay out the rhinestones on the shirt and remove one rhinestone at a time to heat. How to Use the Rhinestone Template with Glue-On Rhinestones Flat back rhinestones require the use of an adhesive. My favorite glue for fabrics is Gem-Tac. It is perfect for gluing rhinestones to fabric, dries clear, is washable and is easy to apply. Place the rhinestones on your shirt according to the template. Then, when you are ready to glue, pick up one rhinestone off the shirt. Squeeze a drop of glue just slightly smaller than the rhinestone in its place. Press the rhinestone into the glue drop. Some of the glue should seep out from the edges. This is necessary to form a seal which helps to keep the rhinestone from peeling off. Continue gluing in this manner until all the rhinestones have been glued in place. While hot fix rhinestone glue dries quickly, adhesives for flat back need to dry flat for 24 hours. Additionally, our finished rhinestone transfer measures 7.75 inches by 3 inches. Combine it with our heart template for even more bling! Wear it on Valentine’s day or whenever you feel like showing your love. Need rhinestones to bling out your shirt? Rhinestones Etc. has discount prices and great customer service! Browse our online store to find your perfect hue.
Valentine’s Day is observed February 14 and is a celebration of love. A perfect way to celebrate is to wear a t-shirt with a brilliant rhinestone heart. It’s easy to make one of your own with our rhinestone template. Grab yourself a shirt and download the heart template. First, A Brief History of Valentine’s Day But as the original Valentine was a martyr how did he become associated with this day? And how did the traditional heart shape come to symbolize love as it bears little resemblance to the human heart? As with many things steeped in history, there is some legend and mystery surrounding this day. St Valentine was a priest martyred in Rome during Claudius’ reign in the first century. Claudius had outlawed marriages believing the institution was weakening his army. Valentine continued to marry couples in secret and was arrested and put to death for his disobedience. Fast forward to the 13th and 14th centuries when nature-minded European nobility began noticing bird mating season occurring in February. Some began sending love notes during this bird-mating season and as time passed, the tradition caught on. Later on, February 14th became the day associated with sending these love notes. Similarly, the use of the heart shape on Valentine’s Day is also steeped in speculation. Some Middle Ages art work provides some clues. Documenti d’amore, a poem by Francesco Barberino, written in the early 1300’s contains an illustration of a cupid throwing heart shapes. Then in the early 15th century, the tapestry “Le don du Coeur” depicted a man holding a small red heart. Soon the heart shape was adopted as a symbol of romance and courtly love. How to use our rhinestone template There are two different ways to apply the rhinestones. First, you can use hot fix rhinestones and transfer paper. Lay the rhinestones out on wax paper (or some other non-stick surface.) Place the sticky part of the transfer paper over the rhinestones. Gently press down so the rhinestones stick to the paper. Set the transfer paper with rhinestones on your shirt and use an iron to adhere. Or you can glue them on using an adhesive. Start by laying the rhinestones out according to the template. Remove one rhinestone from the design. Squeeze a drop of glue slightly smaller than the rhinestone in that spot. Using a wax tipped tool or tweezers, press the rhinestone into the glue drop. Continue gluing in this manner. Allow to dry flat for 24 hours. However, you choose to celebrate Valentine’s Day, you can’t go wrong with a blinged out rhinestone shirt. A heart is easy to replicate with rhinestones and our heart template makes it even easier. You can follow the rhinestone template exactly or you can experiment with different rhinestone sizes and colors. Finished rhinestone heart measure approximately 4 x 4 inches. Simply download the heart template to get started. Need rhinestones to make your blinged out shirt? Rhinestones Etc. has discount prices and excellent customer service! Browse our online store to find the perfect crystalline product for your bling project.
|
KarenI have been adding bling for over 20 years. Through my projects, I hope you find inspiration. Categories
All
Archives
July 2024
|
Home About Policies Return Shipping
Contact Us Size Chart Privacy Products Reviews
Copyright 2024 Rhinestones Etc. All rights reserved.
Contact Us Size Chart Privacy Products Reviews
Copyright 2024 Rhinestones Etc. All rights reserved.









 RSS Feed