 I often look for inspiration in nature. My imagination was sparked when I was looking through a book on space and saw a picture of the Milky Way Galaxy. For this project you need: tank 36 – Gold 4mm round metal studs 19 - Gold 8 mm star metal studs Hot fix tool or iron 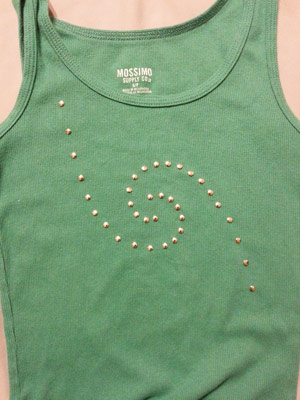 Always prewash your garment before starting to remove any chemical finish. If the material your shirt is made from is thin, place a piece of wax paper between the layers of the garment to prevent glue from seeping through to the backside. Begin by laying out the round metal studs in a spiral shape. The center of the spiral has the metal studs slightly closer together and further apart as you go out from the center. After checking the spacing and layout, place the star metal studs randomly in between the spiral shape. 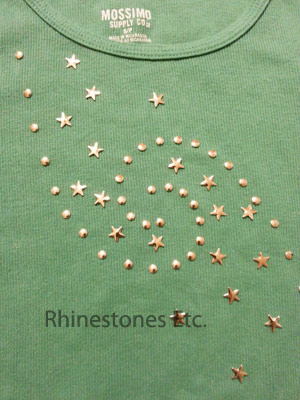 If using an iron to adhere, place a sheet of white paper over the design to prevent scorching. Using the highest setting without steam, gently press down for 10-15 seconds. Do not slide iron over the design as this may move your studs but pick iron straight up and place on another part of the design, gently pressing and holding for 10-15 seconds. Repeat until the entire design is done.
Beautiful and easy! Wash on a low temperature and line dry. Metal studs are available from: www.RhinestonesEtc.com Do you want to be notified of upcoming sales, new clearance, contests and giveaways? Would you like our free guide to rhinestoning? Subscribe to our newsletter by clicking here.
0 Comments
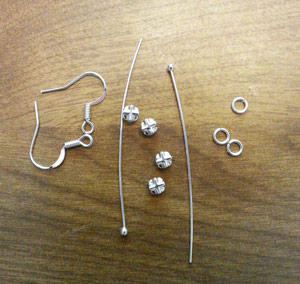 Last time I made rhinestones dangle earrings using Rose Montees, I used flexible wire to secure the Rose Montees. For these earrings, I wanted more rhinestones with a more linear look. For this project I used: 2 silver headpins Ear wires 2-6mm Silver jump rings 8 - 16ss Swarovski Crystal Rose Montees Pliers: Round Nose, Needle Nose and Side Cutters Gem Tac 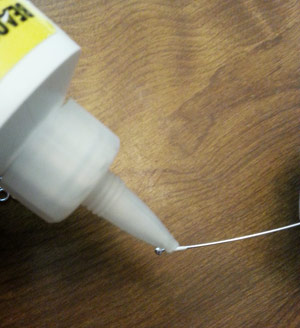 To secure the rose montees and prevent the rose montees from flipping to the backside, lay a line of Gem Tac glue along the bottom of the headpin. Slide 4 rose montees onto the head pin, rhinestones all facing the same way, until flush with the bottom ball and allow to dry completely. Repeat for the other head pin. 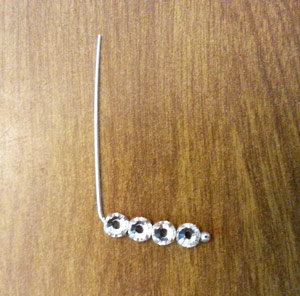 Once the glue is completely dry, take your needle nose pliers. Place the pliers up against the rose montee at a spot on your pliers that is about 1.5 mm thick and using you finger, bend the head pin over the pliers to a 90 degree angle. Grab the wire with the rounded pliers and again using your fingers wrap the wire around the pliers creating your loop. 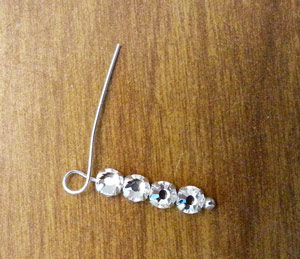 Holding the loop secure with the needle nose pliers, wrap the remaining wire around the bottom of the loop several times. Cut the remaining wire with your side cutters and tuck in the end of the wire.  Using a jump ring, attach the line of rhinestones to your ear wires. Another pair of beautiful sparkling earrings! Swarovski Crystal Rose Montees are available at: www.RhinestonesEtc.com Do you want to be notified of upcoming sales, new clearance, contests and giveaways? Would you like our free guide to rhinestoning? Subscribe to our newsletter by clicking here. I found this youtube video from Beaducation very helpful in showing how to make the loop: https://www.youtube.com/watch?v=bQO4tSoNaRc 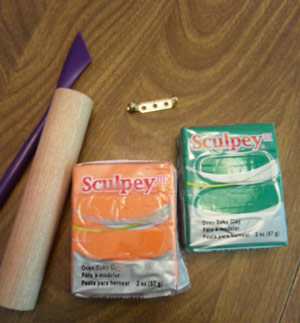 When I was in high school, I had a friend who crocheted. When a holiday rolled around, she always had a crocheted pin in the shape of something to do with that holiday. For example, for St. Patrick’s Day, she made me a shamrock. So in honor of my friend, I am introducing the holiday pin collection. For this craft you need: 19 Sun 12ss Swarovski Elements Rhinestones 4 Fern Green 12ss Swarovski Elements Rhinestones Orange Sculpey clay Green Sculpey clay Rolling pin Cutting tool Pin Sobo brand glue Cookie cutter or template in the shape of a pumpkin 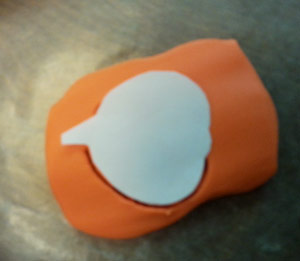 Roll the orange clay out to ¼ of an inch thickness. Using the cookie cutter or template, cut out a pumpkin. Roll out the green clay also to ¼ of an inch thickness and cut out a stem and leaf shape. Press the stem onto the pumpkin and place on a sheet of white paper on a cookie sheet. Bake in a preheated 275 degree oven for 15 minutes. Allow to cool. 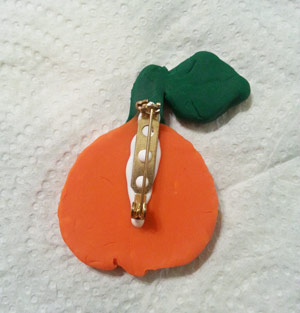 When cool, glue the fern green and sun rhinestones onto the front of the pumpkin pin and then glue the pin onto the back using the Sobo glue. Allow to dry. 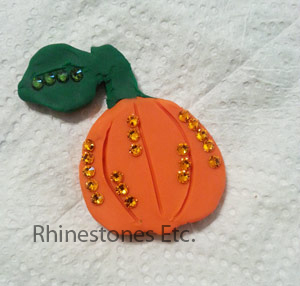 A gorgeous, sparkly pumpkin to celebrate the fall season is now yours to wear!
Swarovski Rhinestones are available from : www.Rhinestones Etc.com Do you want to be notified of upcoming sales, new clearance, contests and giveaways? Would you like our free guide to rhinestoning? Subscribe to our newsletter by clicking here. |
KarenI have been adding bling for over 20 years. Through my projects, I hope you find inspiration. Categories
All
Archives
July 2024
|

 RSS Feed
Home About Policies Return Shipping
Contact Us Size Chart Privacy Products Reviews
Copyright 2024 Rhinestones Etc. All rights reserved.
Contact Us Size Chart Privacy Products Reviews
Copyright 2024 Rhinestones Etc. All rights reserved.