|
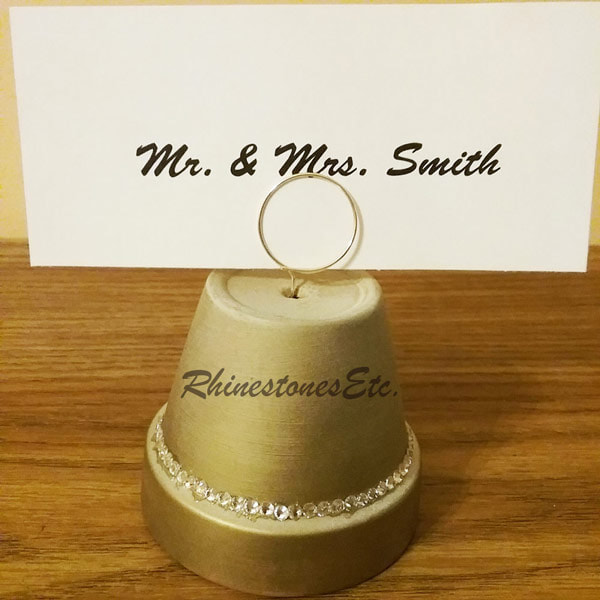
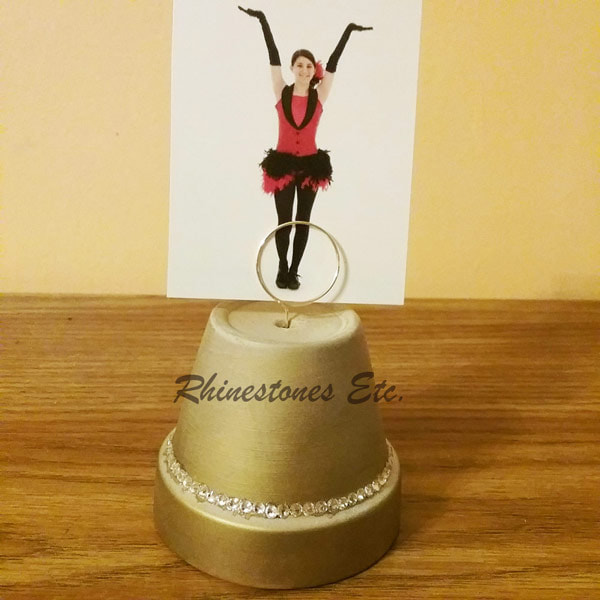
If you’ve recently gotten engaged, you’ll soon begin planning for your wedding. And although it may seem like it’s so far off into the distance, time has a way of moving fast. Thus, it’s never to early to start working on ideas to make your day special. Typically, weddings are expensive, and many brides and grooms make some things themselves to save on costs. There are a ton of websites and blogs dedicated to the DIYer planning a wedding. You can make your own decorations, favors, and table settings. My DIY place card holders are simple to make and can double as picture holders. For this project I used: A terra cotta pot about 2.75 inches in diameter Metallic gold spray paint Clear acrylic sealer Gold wire (use a smaller gauge for a sturdier, thicker wire - I used 18 gauge) 12ss crystal rhinestones Gem-tac or E6000 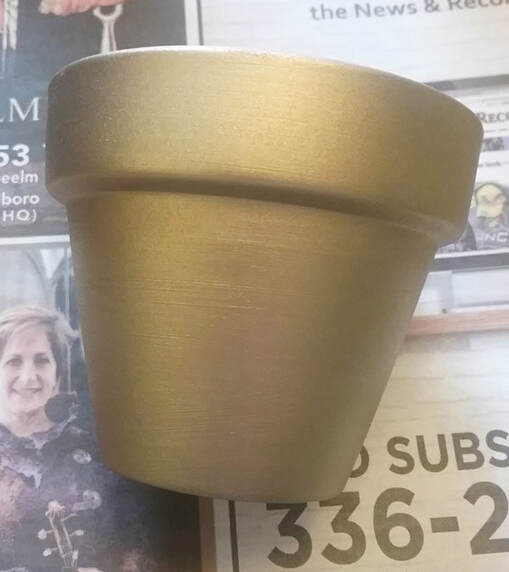 How to make a DIY Place Card Holder Begin by spray painting the terra cotta pot with metallic gold paint. Be sure to paint in a well-ventilated area. Once it is completely dry, spray it with a coat of clear acrylic sealant. Allow the sealant to dry completely as well. Measure and cut a piece of gold wire about 16 inches long. Bend one end into a circle about 1 inch in diameter. 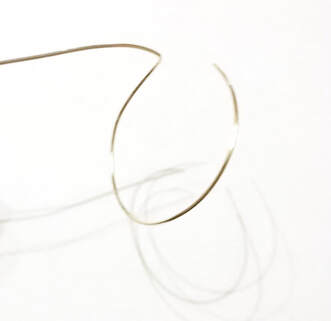 This will go on the inside and help to keep the wire standing upright. Place this in the hole of the pot with the unbent end sticking out. 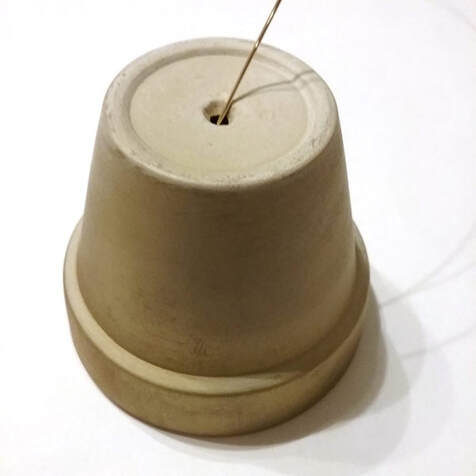 Now take a highlighter or some other household item about ¾ of an inch in diameter. Bend the top part of the wire around the highlighter to achieve a loop. Continue bending the wire around the highlighter several times until you run out of wire. 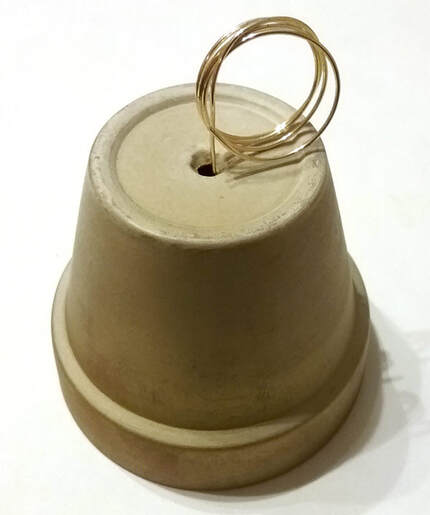 Which Glues are Best to Use? Next, we’re going to glue crystal 12ss rhinestones around the pot to add some sparkle. You can use either Gem-Tac or E6000. I prefer E6000 for this type of project because I can use less glue and still create a secure bond. However, many crafters do not like E6000 because of the toxicity warnings. Always use in a well-ventilated area and follow the manufacturer’s instructions. Gem-Tac is safe to use and works equally well. With this said, it can sometimes leave glue blobs on this type of project. There are other glue alternatives you can use, but I have not tested them. Just make sure the glue is safe for the type of rhinestone you are using. For example, some glues are not for use with acrylic rhinestones. Next, make sure the glue dries clear. Finally, make sure it creates a good bond to the surface you are gluing. Nothing is worse than having rhinestones peel off from your project. I chose to glue rhinestones around the bottom ledge of the pot. This makes it easy to keep a nice even line. Once you’ve glued rhinestones around completely, leave to dry for 24 hours.
Simple and Easy to Make DIY Place Card Holders Now that you’ve got the basic idea, you can personalize this DIY place card holder to match your wedding colors. You can change the color of the paint or rhinestones to compliment the table setting. Then again, you may want to try using smaller terra cotta pots. Finally, if you need to buy rhinestones to make this project, come by and visit Rhinestones Etc. We have a large selection of rhinestones at competitive prices. Browse our online store to find your color!
0 Comments
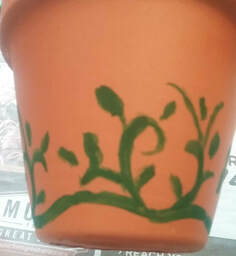
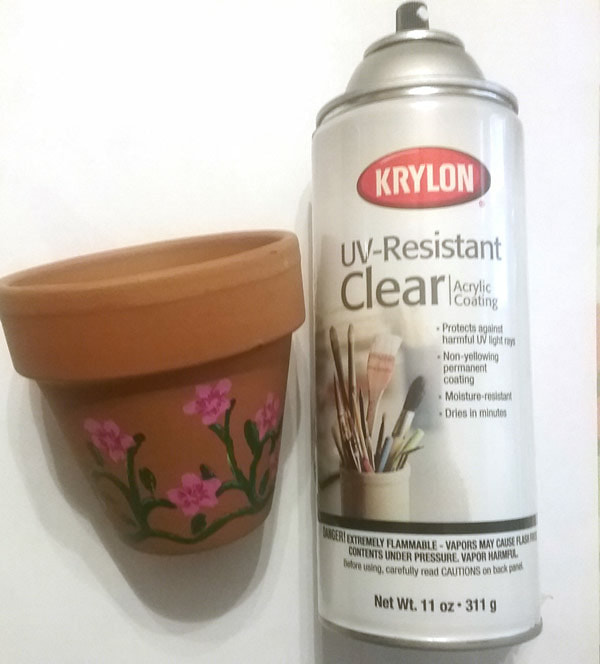
You’ve seen your first robin and the trees are beginning to bud. Daffodils are poking their heads up out of the ground and the air is getting warmer. Spring is not far away. And one of the biggest holidays of the springtime is Easter. While generally not as big as a holiday for gift giving as Christmas is, sometimes you do need a gift. Giving a DIY Easter gift brings that extra touch of personalization that a store bought gift can’t. For this project I used: A 3-inch diameter terra cotta pot Craft paint and paint brush Gel pens 12ss rhinestones E6000 Wax tipped tool or tweezers Krylon Acrylic Sealant 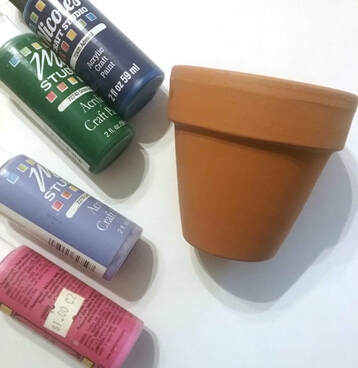 How to Start your DIY Easter gift Even if you feel you are not artistic, this is an easy project. Don’t be intimidated by the painting aspect. The first thing I did was to paint the stems and leaves with green craft paint. Just paint a wavy line along the bottom and then stems that curl up from there. For the leaves, paint small green ovals shapes. Next, paint 5 small oval shapes in a circle to make the flowers. Allow to dry.
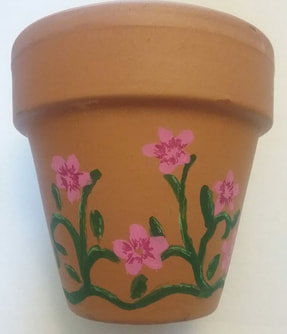
Highlight areas of the stems and leaves with a light green gel pen. Pick a darker color gel pen to accentuate the inside of the flowers. Then, use a lighter color to accentuate the edge of the flower petals. Finally, spray these areas with a sealant like Krylon matte acrylic finish. Let dry.
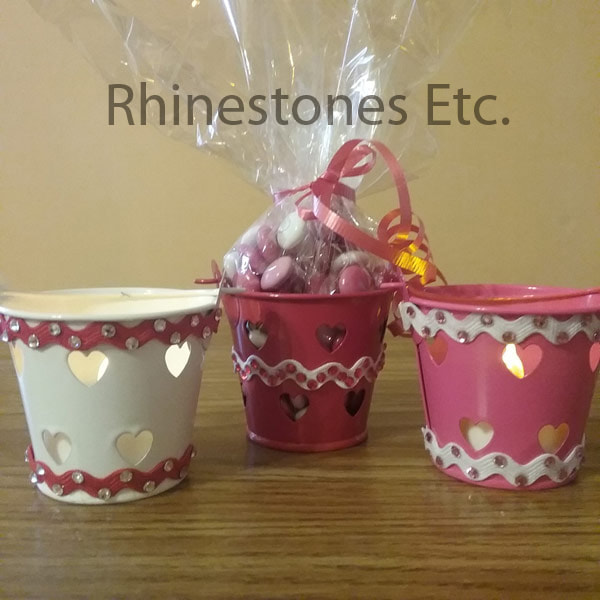
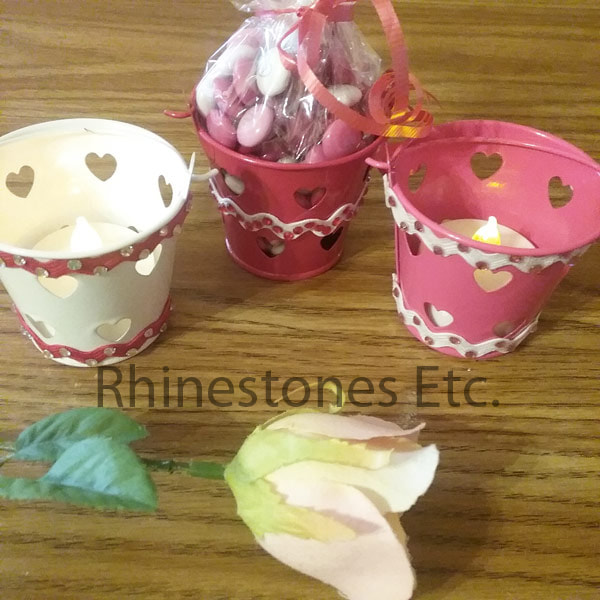
Gluing rhinestones to the terra cotta pot Pretty already as is, adding rhinestones will make this gift extra special! Squeeze a small amount of E6000 over a paper plate. Using a toothpick, scrape up a small amount of glue and apply it to the center of a flower. Now, using your wax tipped tool or tweezers, pick up a rhinestone and gently press it into the glue drop. For this project, I alternately used light rose and fuchsia color 12ss rhinestones. Once all the rhinestones have been glued, let dry for 24 hours. Fill the pot with dirt and your favorite springtime flowers. For an added touch, tie a piece of ribbon or lace around the top. This is such a cute idea, you may have to make one for yourself as well! Inexpensive and easy to make, this DIY Easter gift would also make a wonderful Mother’s Day or housewarming gift. 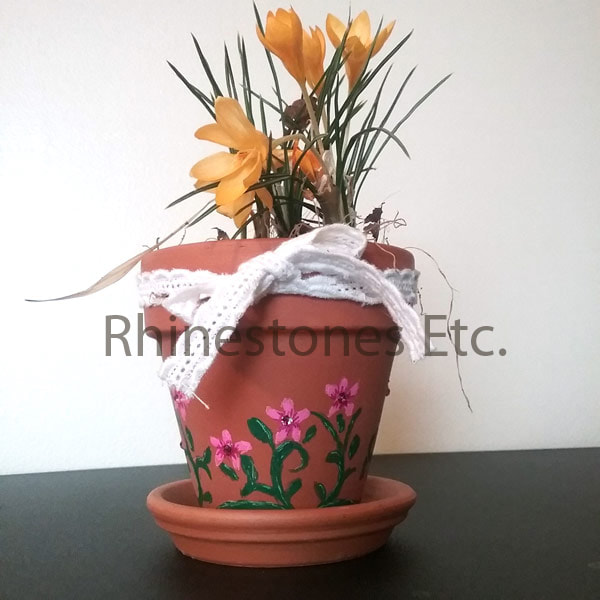 Do you need rhinestones to get you started on your project? Rhinestones Etc. has discount prices on rhinestones and excellent customer service! And now get free shipping off your first purchase! Simply click the link above to get your coupon code! Valentine’s Day is just around the corner. Perhaps you are having a party with some of your children’s friends, or maybe you’ve got bring something to hand out at your child’s school. These cute little buckets embellished with rhinestones and easy to make. Plus, they are an inexpensive DIY Valentine gift. This makes a great gift for children filled with small candies. Additionally, place a battery- operated votive candle inside for a unique table setting. Either one of these would also make great wedding favors. 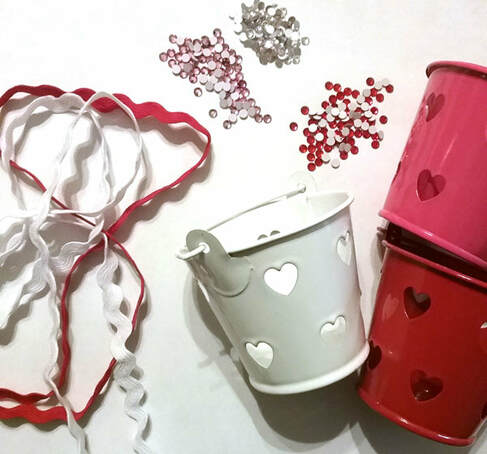 I picked these buckets up on clearance a few years ago at my local craft store. However, colored buckets without the heart cutouts are available at Amazon for about 50 cents each.(https://www.amazon.com/Juvale-2-Inch-Small-Metal-Buckets/dp/B076D6XQKD/ref=sr_1_1?ie=UTF8&qid=1547210452&sr=8-1&keywords=craft+2+inch+diameter+metal+buckets). The rick rack trim I picked up at Walmart for $1 for each color. Most likely you can buy this in bulk for cheaper. Another idea is to use lace as trim instead of rick rack. Depending on the brand of rhinestones and the design, rhinestones may cost you between $2 and $5 per bucket. Then total cost may run you between $3.50 - $8.00 per bucket. How to DIY Valentine Gift Glue the trim to the buckets. You can glue the trim along the top and bottom edges or along the middle. For this project, I used Gem-Tac. Gem-Tac dries clear and is easy to apply. Although not specifically recommended for metal, it does adhere fabric to metal nicely. And the rhinestones will be applied to the trim which is fabric. If you decide to apply rhinestones directly to the metal, I recommend using E6000 for a stronger bond. 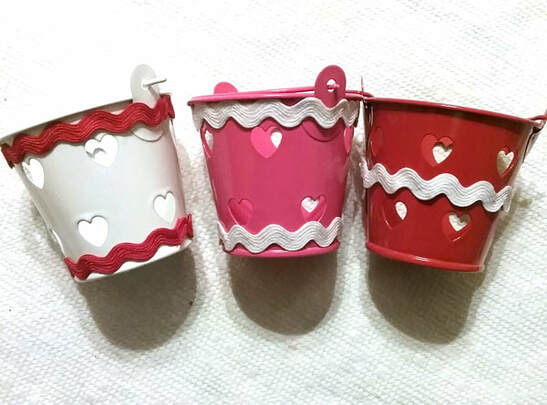 Once dry, glue 12ss rhinestone along the trim, again using a color contrasting to the trim but complimentary to the bucket color. Place a drop of glue slightly smaller that the rhinestone on the trim. Using a wax tipped tool or tweezers, pick up a rhinestone and gently press it onto the glue drop. Allow to dry for 24 hours. To make a sweet treat, wrap candies in plastic wrap and tie with curling ribbon. Pop in a battery- operated tea light for a table setting (do not use real tealight candles as the flame will scorch the inside of the bucket). Both variations make great party favors.
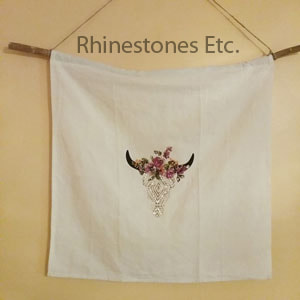
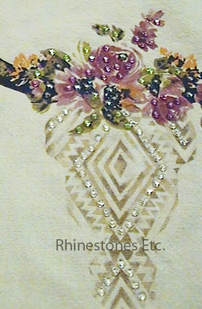
So, go ahead and throw a party for Valentine’s Day. Make this easy, inexpensive DIY Valentine gift hand out in celebration of love. Need rhinestones to get started on your Valentine's Day gift? Rhinestones Etc. has discount pricing and excellent customer service. And now get free shipping on your first purchase! Click on the button above to get your coupon code! As you walk through your house, you notice an area that’s a bit drab. It has a blah kind of feeling. You want to give the area a new feeling and to make a statement. A new coat of paint is an option as is a new wall hanging. However, there is another option, one that will make light dance and your room dazzle: flat back rhinestones. These can be incorporated into any interior design project to make a room sparkle. 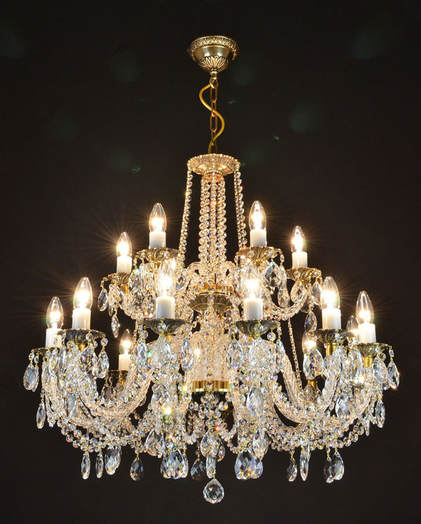 The Earliest Use of Rhinestones in Interior Design Rhinestones have been used for centuries in interior design. The earliest is the use of crystal is in chandeliers in the 16th century. Because the crystal was so expensive to manufacture, only the very rich were able to afford them. In the 18th century, methods were devised to make crystal more cheaply thus making chandeliers more affordable. During this time also, Daniel Swarovski started producing cut stones for ornate crystal chandeliers. Even today, the Swarovski name is known for its excellence in crystal manufacturing. Today, chandeliers are hung to produce a distinct feeling of elegance. Step into any room with a chandelier and you step into a room that feels opulent and luxurious. Light passing through the crystals, refract to produce a rainbow of colors that dance in the room. But, why stop at chandeliers? 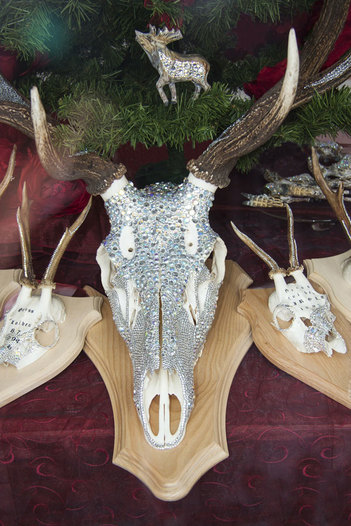 Ideas for Easy Projects There are many easy rhinestone projects in interior design that a beginner can do and achieve good results. Also, flat back rhinestones can be glued to a variety of surfaces: wood, metal, fabric, paper. For example, flat back rhinestones can be glued to frames, including picture and mirror, lampshades or wall hangings. Glue some rhinestones to pillows for your couch. Add a bit of sparkle to your table by embellishing a pair of candlesticks with rhinestones. How about deer antlers? Now that makes a bold statement. Never glued rhinestones before? It’s easier than you think. Mainly, you just have to be sure you have the right glue to for the surface you are working with. You can read up on rhinestone adhesives here. Finally, if you really want an extravagant touch, Swarovski even makes wallpaper with rhinestones attached to it. Hang it on a wall for a dramatic flair. Since the price is a bit steep for this interior design idea, why not glue rhinestones onto wallpaper yourself?
Use your flat back rhinestones and creativity to create the perfect living space for you. Utilize your surfaces with sparky rhinestones to customize your interior! Need rhinestones to get started on your interior design project? Rhinestones Etc. has competitive prices and great customer service!
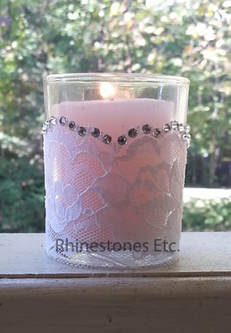
Usually, glitz and glamour are a fundamental part of a wedding. Yet, achieving a magical atmosphere often comes with a hefty price. However, by DIYing a portion of your accessories, you can save yourself a bundle. For a dazzling display of light, add rhinestones to your dress, shoes, invitations, and cake topper. We’ve got some great blinged out wedding suggestions so you can sparkle on your special day. 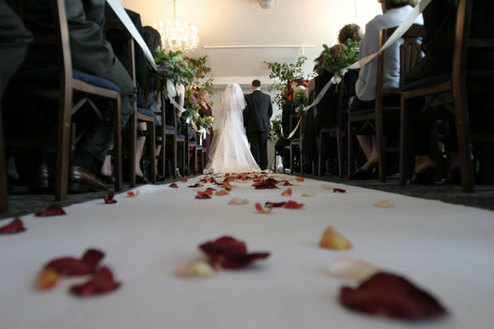 Blinged Out Wedding Dress and Shoes Most couples have a budget to work within when planning their wedding. However, one place a bride wants to splurge a bit is with her dress. Every bride wants to know she looks stunning and she has the perfect wedding dress. Yet, elaborately embellished wedding gowns may cost several thousand dollars. Instead, you can attach rhinestones to a plain dress and spend a lot less. Many simple, but elegant gowns are available for a few hundred dollars. Rhinestones, depending on the manufacturer, size, and quantity, may cost you an additional $10-$100. Another place to save money is to rhinestone your shoes. Why spend a lot of money on an expensive pair of shoes you’ll only wear once? Once again, buy yourself a plain pair and plan to add rhinestones. It’s easy to glue rhinestones! First, make sure the manufacturer recommends using their adhesive for your project. Also, remember to let a bit of adhesive seep out around the edges of the rhinestone when gluing. This makes a seal that helps to keep the crystal firmly attached. You can read more about gluing rhinestones here. 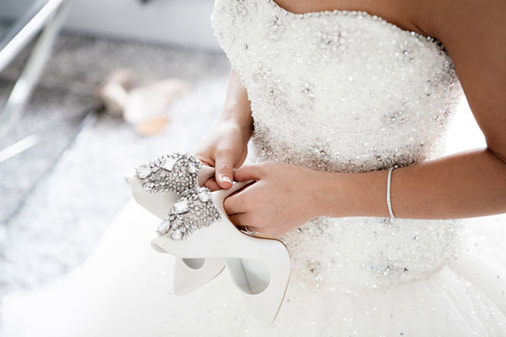 Rhinestones Nails Usually, many brides will get a manicure for their wedding day. Between pictures and guests wanting to see your ring, you want your hands to look great. While a French Manicure is pretty, adding rhinestones gives you extra twinkle and shimmer. Plus, you don’t need a professional nail technician to add rhinestones to your nails. 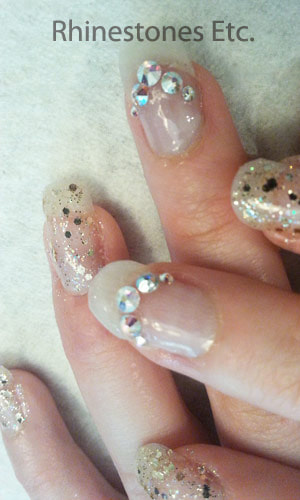 Other ideas To Create a Blinged Out Wedding Often, the wedding cake is the centerpiece at the reception. Certainly, you can make your cake even more impressive with a sparkly cake topper. Begin by searching the internet to find a free downloadable template or design one yourself. Cut the shape out of heavy-duty material using scissors or an X-Acto knife. Then, glue small rhinestones to your topper design. 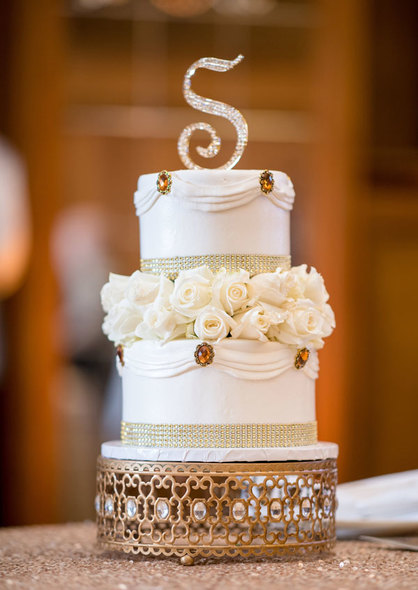 Additionally, you can embellish toasting glasses, wedding favors, or table centerpieces. For example, a votive candle holder covered with rhinestones makes a nice favor. Moreover, you can add a little bling to invitations, menus, and seating cards.
Of course, these are just a few ideas to make your wedding sparkle. Rhinestones are extremely versatile allowing plenty of creativity. Be inventive and see what other ideas you can come up with to make the wedding of your dreams. Ultimately, you’ll need rhinestones to create a blinged out wedding. Rhinestones Etc. has been selling quality embellishments since 2011. With fast shipping, competitive pricing, and great customer service, we want to be your source for bling!
Sometimes, when you use crafting items differently than their intended purpose, the result is something unexpectedly beautiful. Embossing powder is generally used for card making and heated after applied to give it a nice glossy look. I liked the fine particle sparkle of the power and used it in this DIY Christmas tree ornament. Due to its painted pattern, this project is a little more difficult than most of my previous DIY ornaments. However, don’t let the difficulty of it intimidate you as try to create your own easy pattern. For this project I used: 1 green ornament Metallic Silver acrylic craft paint Silver embossing powder Peridot 12ss rhinestones Paint brush Wax tipped tool or tweezers 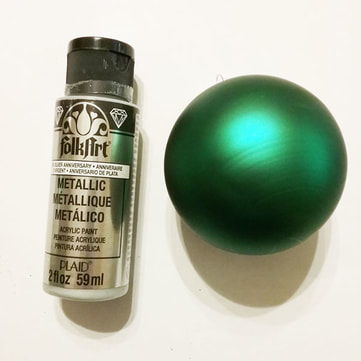 How to Make a Christmas Tree ornament Pick out a design you wish to paint on the ornament. It may be useful if you can find a template or pattern to copy. Using the metallic silver paint, paint your design on the ornament once section at a time. While the paint is still wet, sprinkle the embossing powder over the painted areas. Brush off the excess powder. Continue painting and sprinkling embossing power until your design is complete. If possible, hang you ornament to dry. Generally, embossing powder is heated to produce a glossing look. However, I left the power unheated as I liked the grainy look on the shiny ornament. 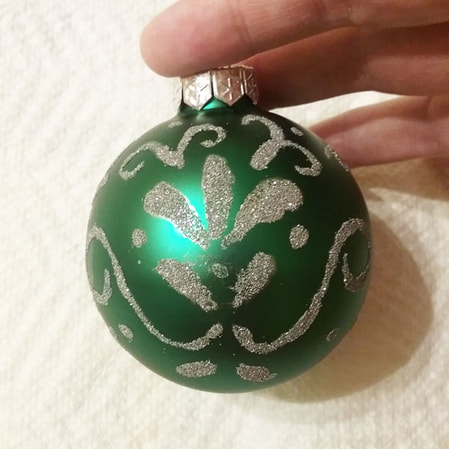 Gluing Rhinestones to the Ornament Next, I glue Peridot 12ss rhinestones within my design to add extra sparkle. Either E6000 or Gem Tac works well for this project. Because I could use slightly less adhesive and because of the strong bond, I chose to use E6000. Gem Tac tends to leave glue marks once it dries on the ornament. Use a toothpick to apply E6000 to the ornament. Then using a wax tipped tool or tweezers, pick up a rhinestone and gently press it into the glue. Keep on gluing rhinestones, accentuating the painted/embossed areas. Allow to dry for 24 hours. 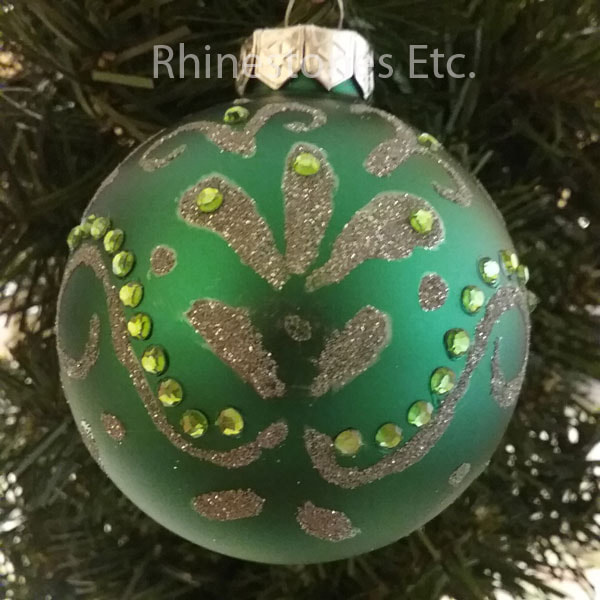 Need rhinestones to get started making your own sparkly ornaments? Rhinestones Etc. has a large selection of rhinestones and competitive prices! “Silver and gold Silver and gold Mean so much more When I see Silver And gold decorations On ev'ry Christmas tree” -Burl Ives It’s that time again, when Christmas lyrics resound in our head. The lyrics from this Christmas carol pairs silver and gold together, two colors that look spectacular on a Christmas tree. And what’s not to love about these super easy DIY silver and gold ornaments? Read on for the instructions! For this project I used: 1 gold round ornament Silver ribbon about ¼ of an inch wide Gem Tac Wax tipped tool or tweezers Black diamond 12ss rhinestones 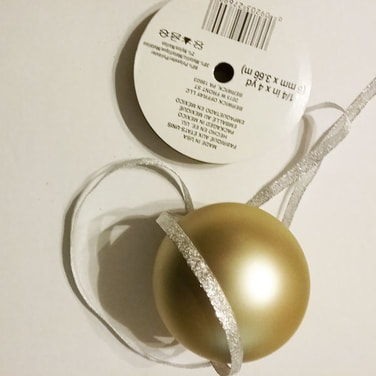 How to make a Silver and Gold Ornament Begin by taking off the top metal loop of the ornament. 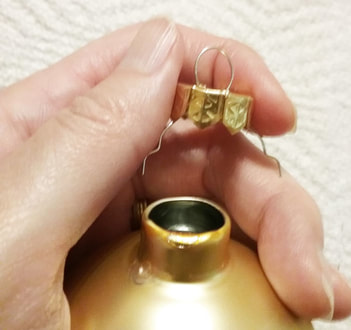 Cut three pieces of ribbon the circumference of the ornament. For my ornament, I cut three pieces 8 inches in length. Using Gem tac, glue one piece of ribbon from the top to the bottom and back to the top of the ornament. Glue the second piece so that the ornament is broken into quarters. Then. glue the third piece in between the other two pieces of ribbon so that the ribbon divides your ornament into 8 equal sections. 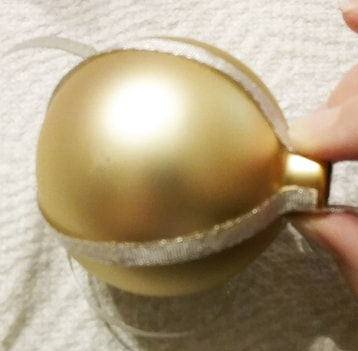 Let dry completely. How to Glue Rhinestones to the Ornament To glue the rhinestones on, place a drop of glue slightly smaller than the rhinestone on the ribbon. 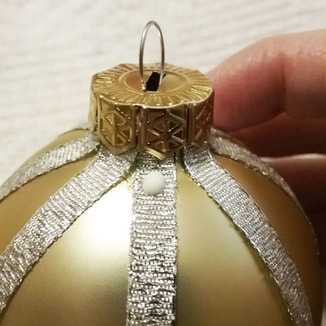 Using the wax tipped tool or tweezers, pick up a rhinestone and gently press it into the glue drop. Continue gluing rhinestones along the ribbon, spacing the rhinestones about ¼ of an inch apart. Allow to dry for 24 hours. When completely dry, replace the metal loop on top of the ornament. 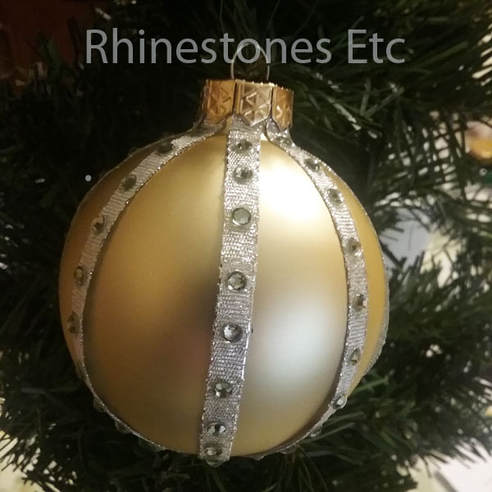 Fun and easy to make, these sparkly DIY gold and silver ornaments will dazzle on your tree. Experiment with different color ribbons or ornaments for your own bold and sparkly look. Need some rhinestones for your project? Rhinestones Etc has a large selection of rhinestones, with fast shipping and great customer service!
There is something about lace that gives a touch of elegance. Delicate and wispy, lace transforms ordinary into distinction. This red ornament is nice and glittery. But add lace and rhinestones and the ornament becomes exquisite. Simple to make, anyone can make these beautiful DIY Christmas ornaments. For this project I used: 1 red glittery red ornament (purchased at Target) White lace 12ss red rhinestones Gem Tac Wax tipped tool or tweezers 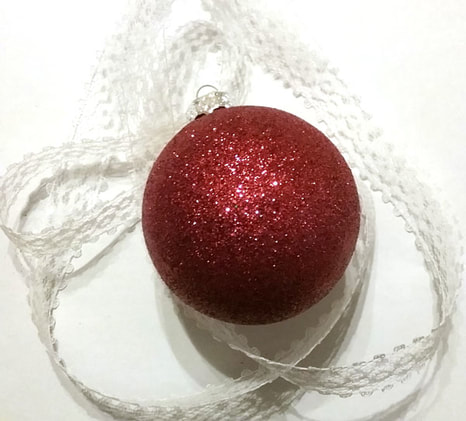 How to make Rhinestone and Lace Christmas Ornaments Cut 2 pieces of lace the circumference of the ornament. Smaller width lace tends to work better. and I used ¾ of an inch lace. Remove the top silver part of the ornament. 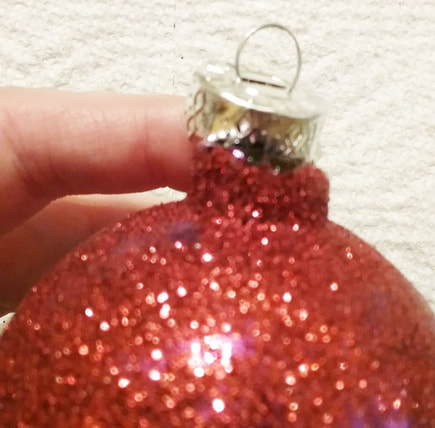 Gem Tac is a popular adhesive for bonding fabrics and embellishments. It works great on gluing the lace to the ornament. Glue one strip of lace starting at the top, going down to the bottom and back up to the top. On the opposite side, glue on other piece of lace. Let dry completely. Place the top back on the ornament. Gluing on the Rhinestones Now to glue on the rhinestones. Place a drop of glue, slightly smaller than the rhinestones. Using the tweezers or wax tipped tool, pick up a rhinestone and gently press it into the glue drop. The glue should seep slightly out from the edges. Continue gluing until your rhinestone is embellished. Allow to dry for 24 hours. 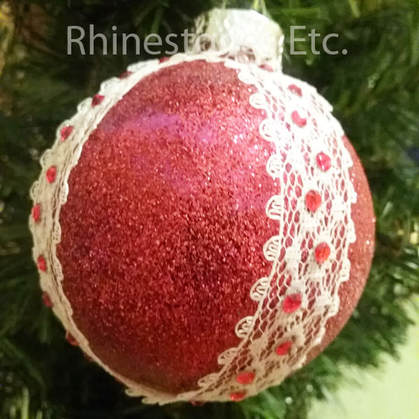 These DIY Christmas ornaments are truly something special. The addition of lace and rhinestones truly enhance this ornament. So easy to make, have some on hand to give as gifts, for an ornament exchange or for your own tree. Create a bunch and have your very own rhinestone themed tree. Get started today on making them as Christmas is not too far away. Need some bling supplies? Rhinestones Etc. has great prices and excellent customer service. Altoid mints come in a cute little tin. The latest crafting rage is to recycle these tins into cute scenes or children’s travel play sets. There are many mediums to choose from to cover your tin: paper, fabric and/or clay. I wanted an altered tin that was both beautiful and practical. When I travel, I never have a place to carry an extra pair of earrings. So, I set out to make a jewelry carrier out of my Altoid tin. For this project I used: Altoid tin Metallic gold oven baked clay Raw sienna color oven baked clay Modge podge Clear glitter 12ss and 20ss Dorado rhinestones Gem tac Scrap material 8.5 x 5.5 inches 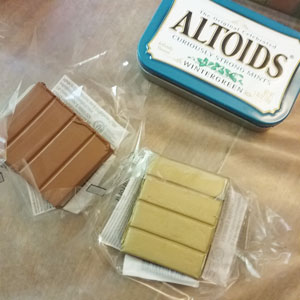 How to Make an Altered Altoid Tin Mix the gold with raw sienna until you get a rustic bronze color. Cover the lid and sides with a thin layer of clay making sure you can still open and close the lid. Using the gold clay, roll out some vines and position these on the lid. Shape some small leaves and place these along the leaves.  Finger prints can be problematic and distract from the beauty of the case. Therefore, simply brush the clay surface with a 50/50 mixture of alcohol and water with a paint brush. The alcohol “melts” the clay and smooths the surface. Bake in a 275-degree oven for 15 minutes then remove and let cool. After the clay is cool, brush the vines and leaves with modge podge. Sprinkle the clear glitter on and let dry. Fold the scrap material right sides together. Sew up the 2 longer edges of the 3 open edges. Turn inside out. Sew lengthwise evenly spaced so that you have 3 pockets. Stuff each pocket with pillow stuffing. 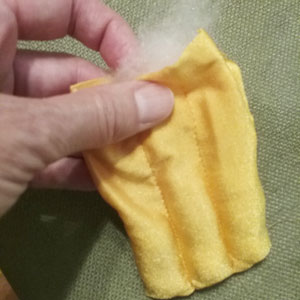 Once stuffed, turn the remaining edges to the inside and stitch the ends together. Place inside the tin. Glue several 20ss Dorado rhinestones scattered along the top of the tin using Gem Tac. Squeeze a drop of glue slightly smaller than the rhinestone. Using a tweezer or wax tipped tool, pick up a rhinestone and gently press it into the glue drop. Glue alternating 12ss and 20ss Dorado rhinestones along the side edge of the lid, spacing about 1/4 inch apart. Lastly, let the finished case dry for 24 hours without any further handling. 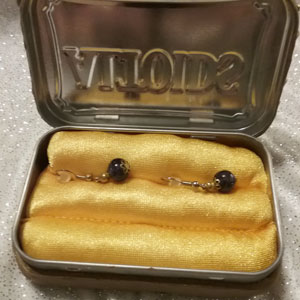 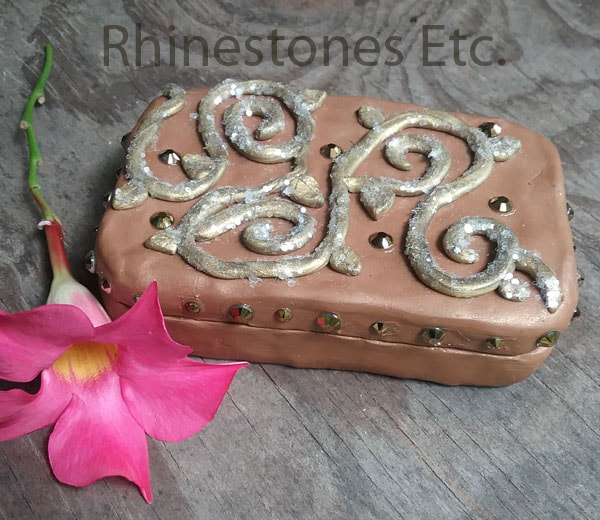 Tins are fun to recycle and gluing on rhinestones adds to the fun. You can experiment with different styles and designs to come up with the perfect altered Altoid tin for you. Finally, these tins are the perfect way to store and safely carrying jewelry on a trip.
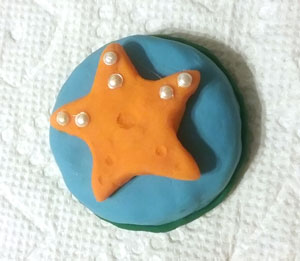
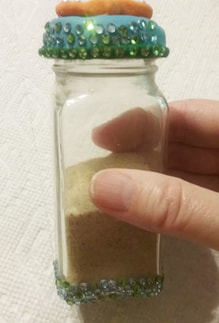
This project was inspired by my Mother in Law who loved to travel and collected sand in small bottles from the many places she visited. Instead of putting the sand in an ordinary bottle, you can upcycle and embellish a small bottle to reflect the theme of your vacation. The theme of my bottle is my favorite destination spot: the beach. For this project I used: 1 small old bottle (mine is an old spice bottle) Sculpey clay 10ss flat back pearls 12ss peridot and aquamarine flat back rhinestones Wax tipped tool or tweezers E6000 Sand from your vacation spot 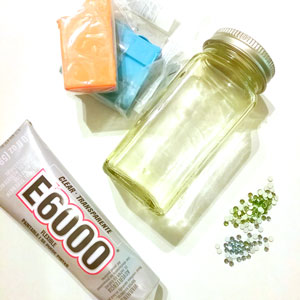 How to upcycle an old bottle Thoroughly clean and dry your bottle that you will upcycle. I enlisted the help of my daughter with the clay components as she is much more talented than I am. First, cover the lid with clay.  Since our theme was the beach, she created a star fish to put on top. 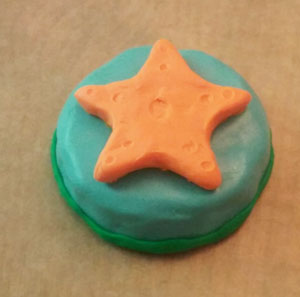 Then she created some beach themed components to place inside the bottle: a little crab and anchor. 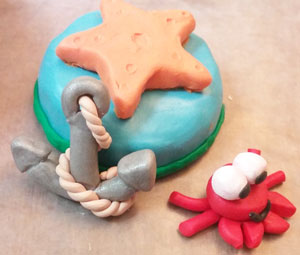 Place your components and lid on cookie sheet lined with white paper. Bake in the oven according to the clay manufacturer’s instructions (we did 275 degrees for 15 minutes). When done baking, remove from the oven and allow to cool. Glue a 16ss flat back pearl to the middle of the starfish and 2 10ss flat back pearls on each of the arms. Place a drop of glue slightly smaller than the pearl and using a wax tipped tool or tweezer, pick up a pearl and gently press it into the glue drop. I used both green and blue rhinestones mixed to give the bottle an ocean feel. I glued rhinestones along the bottom of the bottle and then along the side of the cap. The adhesive I like to use when gluing rhinestones to glass is E6000. Many people don’t like to use it because of the warnings; however, it is a very strong adhesive and recommended for use in gluing rhinestones to glass. Use in a well-ventilated area and always follow the manufacturer’s instructions. Allow to dry for 24 hours.
Add the sand from your favorite vacation spot and then place the crab and anchor on the sand. 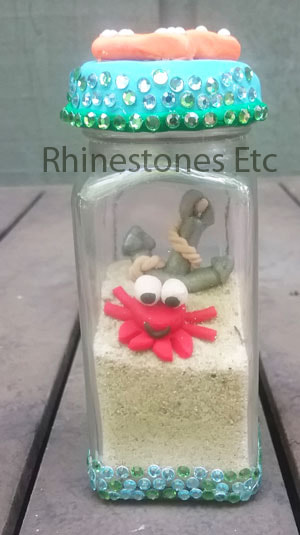 Your vacation is now immortalized in a one of a kind upcycle bottle! Why not create one each time you go on vacation and start a collection? Use it to decorate any space and each time you walk by you’ll see it and remember the fun time you had.
Rhinestones and wax tipped tool are available from: www.RhinestonesEt.com |
KarenI have been adding bling for over 20 years. Through my projects, I hope you find inspiration. Categories
All
Archives
July 2024
|


 RSS Feed
Home About Policies Return Shipping
Contact Us Size Chart Privacy Products Reviews
Copyright 2024 Rhinestones Etc. All rights reserved.
Contact Us Size Chart Privacy Products Reviews
Copyright 2024 Rhinestones Etc. All rights reserved.