|
Bangle, tennis, charm, cuff, chain, or wrap are just some of the names of popular styles of bracelets. No matter which kind you love to wear, sparkly rhinestones can make your jewelry stand out. Although buying rhinestone jewelry can be expensive, you can make some beautiful pieces. For example, this rhinestone bracelet is easy to make and looks great. Bracelets Are an Important Accessory People have been wearing bracelets since ancient times, although the reasons for wearing them have changed. Sometimes, individuals wore these wrist accessories as amulets for protection or as a symbol of status and power. Today, women wear bracelets for several reasons:
However, buying beautiful jewelry can be a budget buster. Instead, you can make your jewelry for a lot less. Moreover, instead of throwing out that old pair of jeans, you can recycle part of them into a fashionable accessory. Instructions For Our Rhinestone Bracelet For this rhinestone bracelet project you’ll need the following supplies: Old pair of jeans Sewing machine Needle and gold thread Buttons of various sizes and colors Assorted 30ss rhinestones E6000 Ribbon clamps Jewelry pliers 4- 4 mm jump rings Toggle clasp 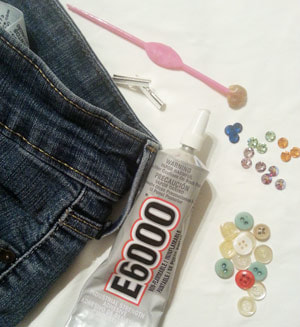 I began by cutting a piece of denim 7 inches long by 1.5 inches from an old pair of jeans. Of course, you can adjust the length depending on the size of your wrist. However, remember to make adjustments for the additional length of your clasp. You’ll want the long side to run the length of the leg and the short side across the leg. Using gold thread, stay stitch about ½ inch from the edge of your piece around the entire piece of denim. Then, gently pull one thread at a time from the piece on the length to achieve the fringe look. 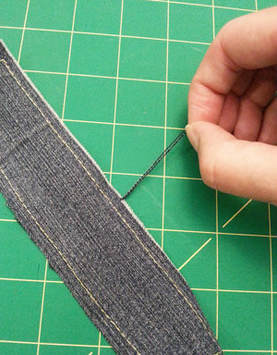 Continue doing so until you are about 1/8 of an inch from the stitching. Pick out some buttons from your assortments and stitch them onto the denim. You can follow a pattern or randomly place them. 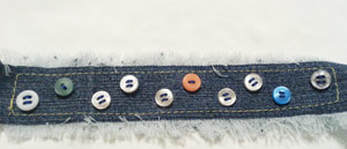 Once you have stitched all your buttons on, you are ready to glue on your rhinestones. Depending on the look you want to achieve, you can match or contrast the color of the buttons with rhinestones. Place a drop of glue slightly smaller than the rhinestone on the surface of the button. For this project, I used E6000, however, you can choose a different glue. You can read about gluing rhinestones to various surfaces here. 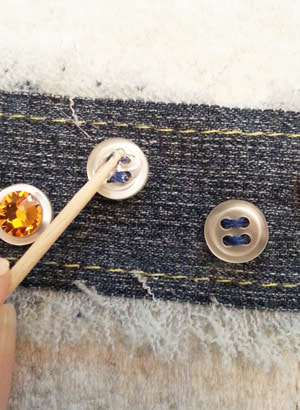 Using a wax tipped tool or tweezers, pick up your rhinestones and gently press it into the glue. Continue gluing rhinestones to buttons and when finished, allow to dry flat for 24 hours. Once dry, place a ribbon clamp on the short side of the bracelet. Using jewelry pliers, squeeze the clamp together. Repeat on the other side. 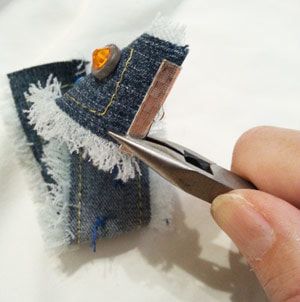 Then, using your jump rings, add your toggle clasp. Now you have a beautiful rhinestone bracelet to accessorize any outfit. Make a few using different rhinestone colors to match every outfit! 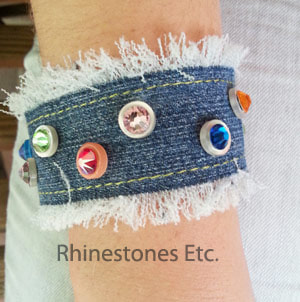 FAQ About Making Rhinestone Jewelry
Ready to make some jewelry but still have some questions? Below, we answer a few frequently asked questions. Can I Eliminate the Buttons and Glue the Rhinestones to Denim? Absolutely! You can glue rhinestones directly to denim and other types of fabric. What’s the Best Glue to Use? Generally, you’ll find many rhinestone glues at your local craft store. While most are multi-purpose, some do form stronger bonds on certain surfaces than others. Always check the manufacturer's guidelines before beginning any rhinestone project. Will Smaller Rhinestones Work Too? Yes. Just remember, the larger the rhinestone, the flashier the shine. Also, a beginner crafter may sometimes have difficulty working with smaller stones. Where Can I Buy Rhinestones? Since 2011, Rhinestones Etc. has been selling quality rhinestones. We have super-fast processing times, great customer service, and a huge selection of rhinestones. Browse our online store for a variety of colors, sizes, and quantities.
0 Comments
How to make wire and rhinestone earrings Dare to be captivating at your next party! These do it yourself earrings are fresh and simple to make and add a boldness to your look. For this project I used: 12 gauge black wire Needle nose jewelry pliers 2 Ear wires E6000 2 16ss Fuchsia rhinestones 2 30ss Fuchsia rhinestones 2- 4 mm jump rings 2-8 mm jump rings 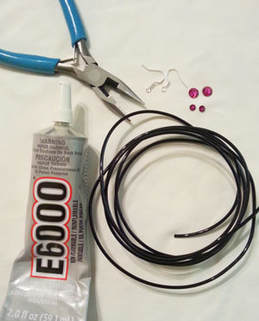 Cut a two pieces of wire 4.5 inches long. Carefully bend the pieces into ‘S’ shapes using jewelry needle nose pliers. 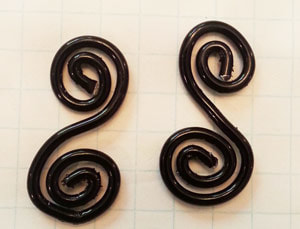 Jewelry makers will use a steel bench block for hammering wires to flatten them which I do not have. I used a DIY hack which worked for my purpose. I took 2 hammers, using the head of one as the bench block on which I gently hammered the wire to flatten it. 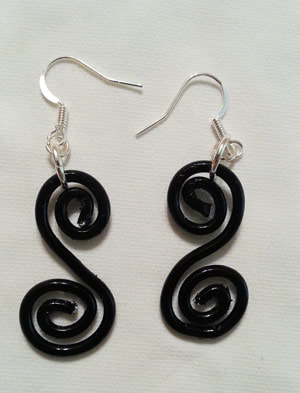 Attach the 8 mm jump ring to the flattened wire. Then use the 4 mm jump ring to attach the larger jump ring to the ear wires. Place a small drop of E6000 in the center of the top swirl. Using a wax tipped tool or tweezers, pick up a 16ss Fuchsia rhinestone and place it into the glue drop, gently pressing down. Repeat the process for the other earring. Place a drop of E6000 in the lower swirl and place a 30ss Fuchsia rhinestone in the glue, gently pressing down. Repeat for the other earring. Let dry flat for 24 hours. 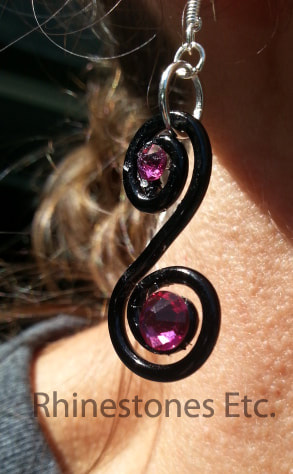 Bold, yet feminine and easy to make, do it yourself jewelry adds your own special touch of uniqueness to your style.
Rhinestones and wax tipped tool are available at: www.RhinestonesEtc.com Need help? Not sure where to begin? Download our guide to Gluing Rhinestones without Panic here. |
KarenI have been adding bling for over 20 years. Through my projects, I hope you find inspiration. Categories
All
Archives
July 2024
|

 RSS Feed
Home About Policies Return Shipping
Contact Us Size Chart Privacy Products Reviews
Copyright 2024 Rhinestones Etc. All rights reserved.
Contact Us Size Chart Privacy Products Reviews
Copyright 2024 Rhinestones Etc. All rights reserved.