|
July 4th is just around the corner with the promise of picnics and fireworks. A celebration of the United States independence, we take pride in draping red, white and blue bunting across our porch. Why not show your pride for your country with a blinged-out rhinestone design t-shirt? You can wear your American pride on a t-shirt using our free rhinestone template download of the American Flag. Rhinestone templates make it easy to rhinestone, even if you have never rhinestoned anything before. Just copy the pattern onto your favorite shirt. Of course, the best thing is that our rhinestone template is free!  History of the American Flag Legend has it that Betsy Ross sewed the first American Flag. Back in 1776, she received a visit from George Washington regarding the design of the flag. He presented her with the basic layout but, Betsy allegedly finalized the design. She argued for stars with five points because they were easier to cut out with a single snip. But what you might not know is that it wasn’t until 1912 that the specific layout was determined by law. Consequently, flags made before this time show different arrangements of the stars and stripes. In fact, an Act passed in 1794 allowed for 15 stripes rather than the current 13. 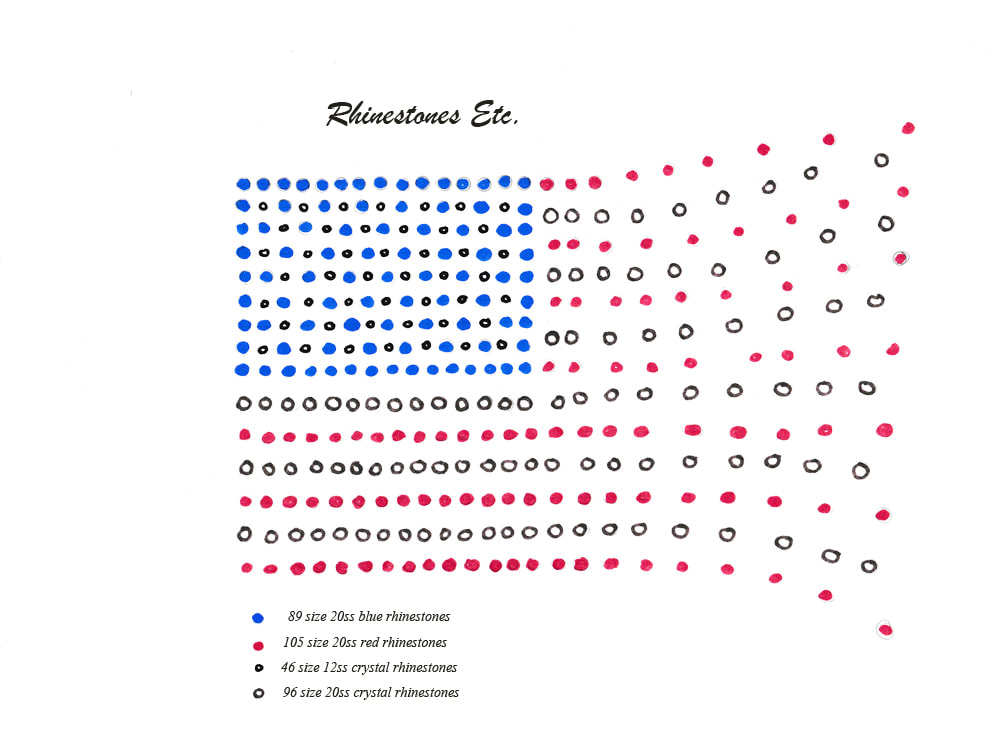 How to use our Rhinestones Template Download First, download our free rhinestone template here. As you can see, the template gives the size and quantity of the rhinestones used. However, feel free to experiment with the rhinestone design and substitute different sizes or spacing. Next, pre-wash your garment before you start to rhinestone. Once washed and dry, lay the shirt on a flat surface to work on. Using our template as a guide, lay out the rhinestones on the shirt. Once you are satisfied with the arrangement of rhinestones, you can start gluing. My favorite glue for fabrics is Gem-Tac for its ease of use. Pick up one of the rhinestones off your design and put a drop of glue in its place. You want to use a drop slightly smaller than the rhinestone. When you gently press the rhinestone into the glue drop, some of the glue should ooze from the sides. The creates a seal which helps prevent the rhinestone from peeling off. Continue gluing in this manner until your design is complete. You can also use hot fix rhinestones and transfer paper if you prefer. Simply lay out the design on the sticky side of the transfer paper, facet side down. Once you finished laying your design out, iron it on to your shirt. Either way, our free rhinestone template download makes it so easy! 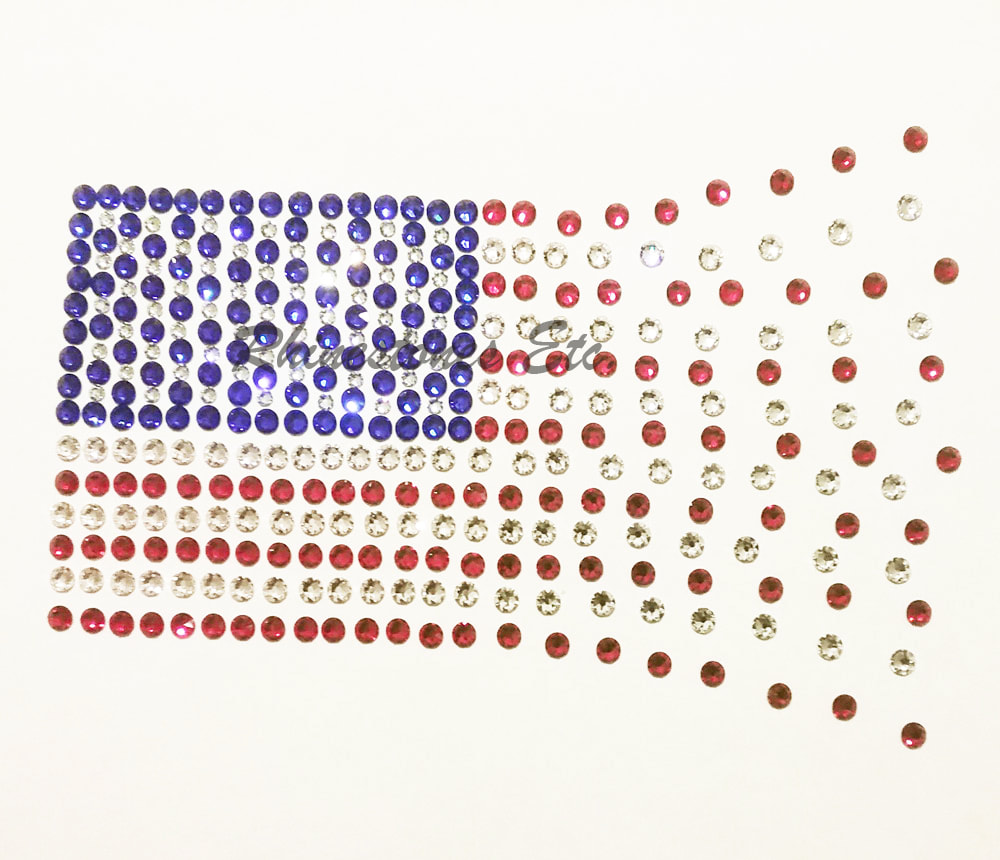 Where to Buy Rhinestones to Use with your Free Rhinestone Template Need some rhinestones to get you started? Rhinestones Etc. has been selling Rhinestones online for over 10 years. With fast processing times, we get your embellishments to your door quickly.
0 Comments
Are you new to creating blinged out projects? If so, you may have noticed that rhinestones have a unique unit of measurement. You may have seen sizes listed as 6ss, 12ss, 20ss, or 30ss. While you are familiar with inches and millimeters, “ss” is an unfamiliar unit of measurement. Since you don’t understand this term, you have no idea whether the rhinestone is large or small. Is there a way to translate rhinestone sizes into something recognizable? 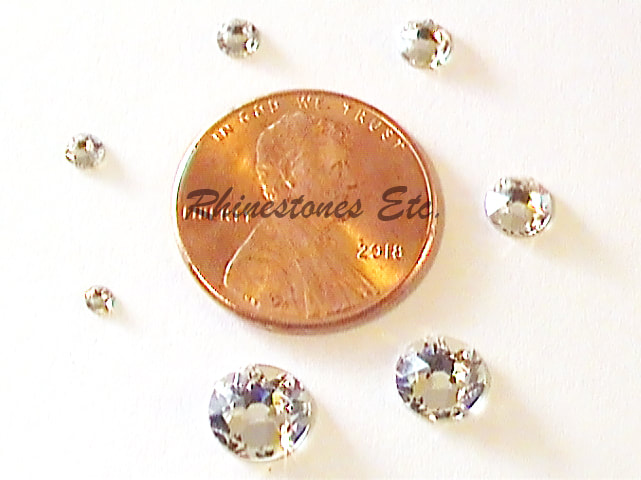
The History of Rhinestone Sizes To understand the term “ss”, we must go back in history to when rhinestones were a natural resource. Originally, gem hunters collected a unique type of quartz found only along the banks of the Rhine River. During formation, lead mixed with silicon and oxygen to give this type of quartz glittering properties. Finders of these sparkling stones grouped them by dropping them into different size holes. These gem hunters assigned a number to each hole with smaller stones having smaller numbers. So, whichever hole number the quartz fit into became the stone size. Later, stone size became abbreviated to “ss” As years passed, this natural resource became depleted and manufacturers developed processes to replicate this glittering quartz. Today, rhinestone manufacturers continue to use stone size as the unit of measurement to describe rhinestone sizes 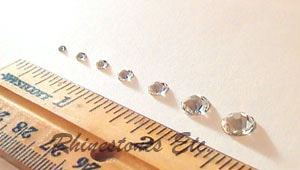
Choosing the Perfect Rhinestone Size Typically, most rhinestone retailers offer a rhinestone size chart with the accompanying millimeter length. This enables you to check the stone size against a ruler. Generally, the larger the number, the bigger the rhinestone. So, a 6ss embellishment will be much smaller than a 34ss one. Sometimes, your bling project can help guide you in choosing a size. For example, you’ll probably choose a smaller rhinestone when gluing rhinestones on fingernails. Some manufacturers offer tiny rhinestone sizes like 5ss, perfect for adding a bit of sparkle. On the other hand, you may want to use a large size for a dance costume. Generally, popular sizes include 16ss, 20ss, and 30ss. Yet, choosing a rhinestone is a personal preference and there are no wrong choices. Furthermore, you don’t have to stick with only one size. Scatter patterns are a trendy and stylish way to use rhinestones on clothing, especially for skating and dance costumes. Additionally, if your design has curves or lettering, you may find using several sizes work better. Rhinestone Size and Sparkle Will a bigger rhinestone sparkle more than a smaller one? Generally, the material, the number of facets, and their arrangement affect sparkle the most. Typically, rhinestones made from crystal sparkle more than both acrylic and glass rhinestones. Additionally, manufacturers cut facets at different angles. This determines how light penetrates and exits the rhinestone to create scintillation and sparkle. Of course, larger rhinestones will also have larger facets to reflect light to the viewer. Usually, higher quality rhinestone manufacturers use crystal. Generally, crystal is a form of glass with an additional ingredient. In the past, manufacturers used lead oxide. With health concerns, today many rhinestone companies use barium, zinc, or potassium oxide instead. Crystal is stronger and denser than glass allowing greater precision in facet cutting. Buying High Quality Crystal Rhinestones Today, crafters bling out many types of objects including clothing, shoes, sunglasses, purses, and tumblers. By adding rhinestones, you create visual interest with texture, sparkle, and color. Once you understand the unit of measurement, it’s easier to choose the perfect size for your project. When shopping for high quality crystal rhinestones, trust Rhinestones Etc. Since 2011. We offer competitive pricing, fast processing times, and great customer service. Browse our online store to find the right color and size rhinestones for your bling project. Macramé is that craft using knotting techniques and some type of cord. Chiefly, common types of cord include cotton, linen, jute, leather or yard. Moreover, the craft is ancient, probably dating back to around 500 BC where the Persians and Syrians used it. From there it spread to other Arab countries, and then finally Western Europe. Today, macramé has become fashionable in jewelry making, mainly bracelets. To make a macramé bracelet, the crafter mainly uses square knots, weaving beads in between. Fancier bracelets use pave beads, which are beads covered in rhinestones. This tutorial shows you how to make a macramé bracelet with beads that is quick and easy. 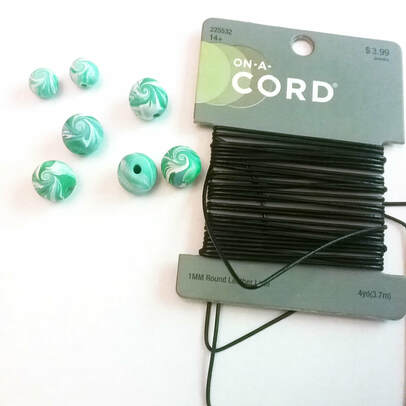 How to Make a Macramé bracelet For this project you need: Cord in the following lengths: 2 ft, 4 ft, and 2 ft Beads - 5 size 12mm and 2 size 6mm Glue If you have a macramé board, insert one of the 2 ft pieces of cord in the slot. You'll want to leave about 8 inches hanging behind the board. Or you can use a clipboard as I did or simply tape the piece of cord to the table. Take the 4 ft cord and find the center by folding it in half. Place the center of this cord underneath the cord attached to your macramé board. If you are using a clipboard, or have taped the cord to the table, start about 8 inches down. Now you will begin making your square knots. 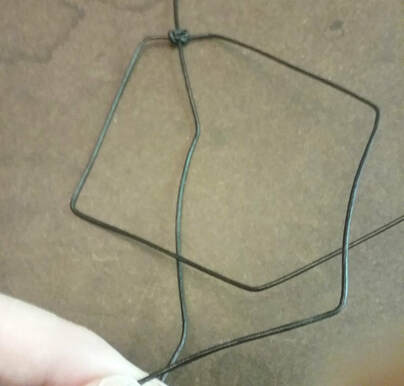 Take the left piece and cross it over the center cord. 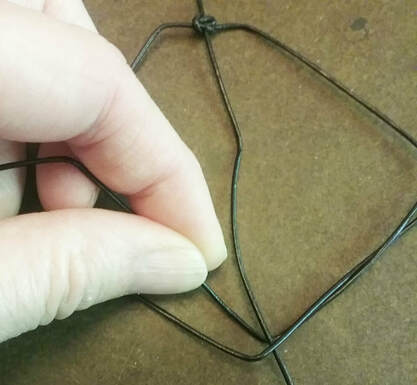 Take the right piece and thread the end underneath both the left and center cords. Now, pull it up on through the left corner between the center cord and left cord. Pull to tighten. Repeat starting with the right cord crossing over the center cord. Then take the left cord, thread it underneath both right and center cords. Again, pulling it up, this time on the right corner between the center and right cord. You now have one square knot. 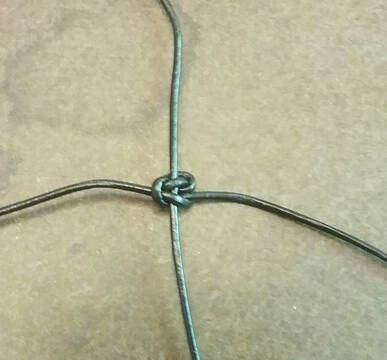 How to Add Beads to Your Macramé Bracelet Continue making square knots until you have 3 square knots. Take a bead and thread it through the center cord. 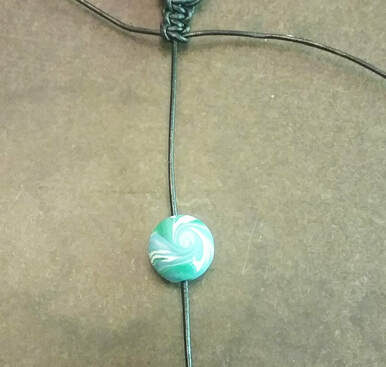 Slide to the bead so that it is up against the square knots. Make your next square knot around the bead. Again, continue knotting until you have made 3 knots. Slide another bead on and continue knotting. You can make your bracelet as long as you want, with most bracelets measuring 7 ½ inches. Seal the ends of the left and right cords using super glue, E6000 or some other super strong glue. Allow to dry. Snip the ends of the left and right cords close to the knots. Your bracelet should now look like this: 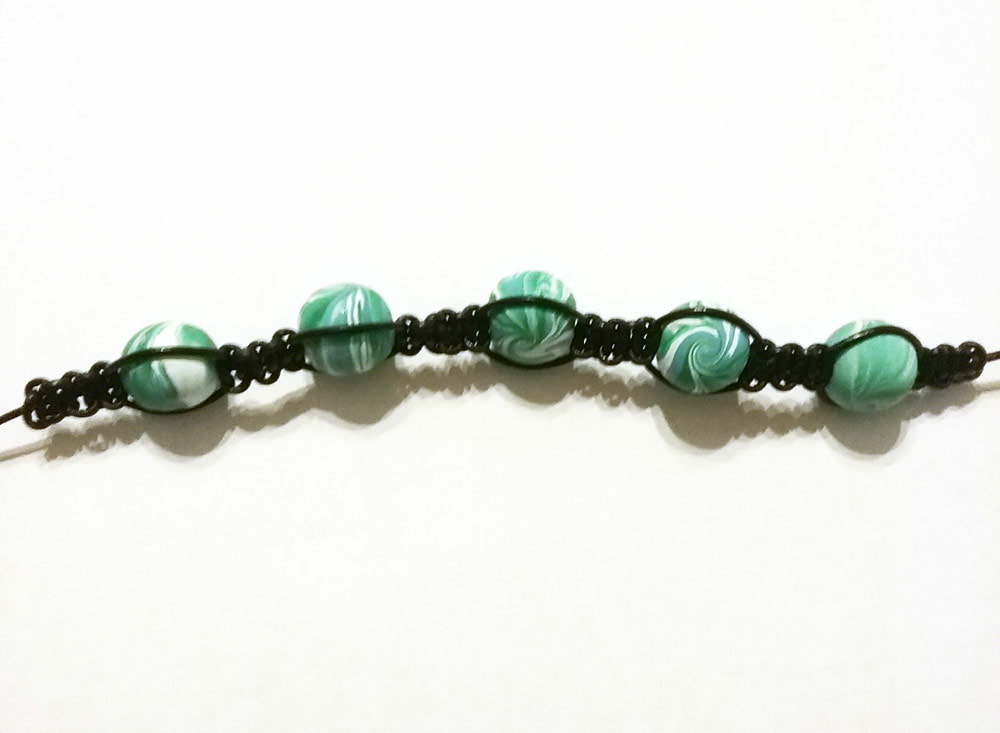 Form a circle out of your bracelet. One end of the center cord should face up and the other down. 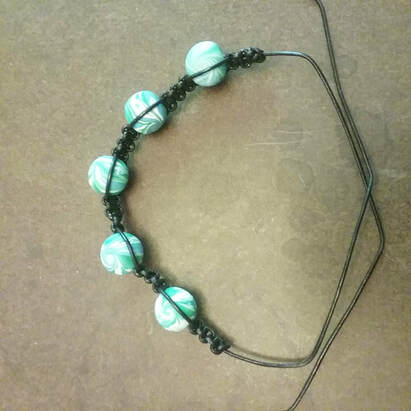 You are now going to make the sliding clasp also using square knots. Take the remaining piece of 2 ft cord and fold it in half to find the center. Place the center underneath both center cords so that one end faces left and the other right. In the same manner as before, make 5 square knots. 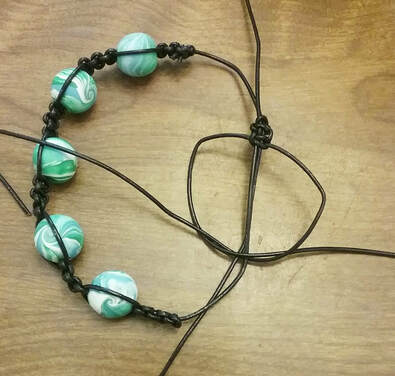 Once you’ve made your 5 square knots, seal the ends of the knotting cord with glue. When dry, snip the ends of the cord close to the knots. Thread one of the 6mm beads onto the top center cord. Next, tie a knot about 2-3 inches away from the sliding clasp. 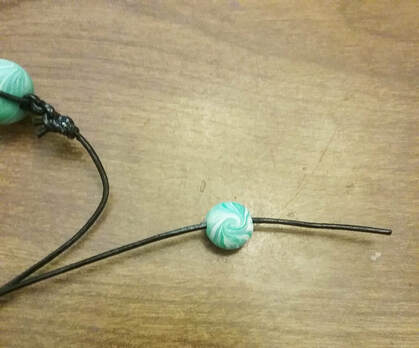 Do the same for the bottom center cord. Seal the ends of the cord with glue and let dry. Snip the ends of the cord close to the knot.  Your finished Macramé Bracelet with Beads These bracelets are easy and fun to make and look fabulous! You can experiment with more beads and fewer knots or different size beads and different types of cord. Try adding pave beads for some sparkle! Each macramé bracelet with beads will be a unique and fashionable piece of jewelry. Do you need some beads to start your macramé bracelet? Rhinestones Etc. has been selling rhinestones online for over 10 years with discount pricing and quality customer service. In addition to our stock of rhinestones, pearls, and metal trim, we now carry pave and clay beads. |
KarenI have been adding bling for over 20 years. Through my projects, I hope you find inspiration. Categories
All
Archives
July 2024
|

 RSS Feed
Home About Policies Return Shipping
Contact Us Size Chart Privacy Products Reviews
Copyright 2024 Rhinestones Etc. All rights reserved.
Contact Us Size Chart Privacy Products Reviews
Copyright 2024 Rhinestones Etc. All rights reserved.