
Presenting a dance routine at competition begins with the choreography and ends with the costume. Yet, not just any dance outfit will do. The dancer’s costume must unite with the music theme. Often the look of the costume includes the addition of embellishments like rhinestones. Let’s explore how to rhinestone a dance costume with ease. Why You Should Add Bling to a Dance Outfit As an art form, dance communicates ideas and experiences through movement. It incorporates both visual and sound elements to invoke a mood. Moreover, the dancer’s costume is an important aspect of conveying the tone of the piece. Typically, humans are opinionated beings. As your dancer takes the stage, the judges will subconsciously rate her on her look. So, paying attention to details, like eye-catching elements, is very important. And adding rhinestones to your daughter’s costume also makes her feel beautiful and gives her confidence. When she feels beautiful, it shows in her dance. Often, competitive dance costumes can be quite expensive especially if you buy one with rhinestones already on it. Occasionally, the quality of rhinestones already on dancewear can also be of lower quality. However, you can save money by buying and applying rhinestones to the costume yourself. The Best Way to Apply Rhinestones to Fabric Sometimes, deciding where to place rhinestones on a dance costume is easy. The dance dress may have straps you can accentuate. Fabric or color changes on the costume can present another area to bling out. Often, it can be helpful to lay rhinestones on the costume to see the spacing and effect. If you need to, you can mark the placement of the stones using a washable sewing marker. Then, simply glue the rhinestones on according to your marks. When you're ready to begin, gather your tools and lay your costume out as flat as possible. Your choice of glue should be safe for rhinestones, washable, and clear when dry. A wax tipped tool is also very helpful. If you’re gluing to a sheer fabric like chiffon, place a piece of wax paper between the layers of fabric. This will keep the layers from gluing together. Begin by placing a drop of glue slightly smaller than the size of the rhinestone on the fabric. Pick up a rhinestone using your wax tipped tool, and pressing it into the glue drop. Some of the glue should seep out from the edges. This is very important as it forms a seal and helps to keep the rhinestone from peeling off. Once you’ve glued all the rhinestones to your costume, you need to allow it to dry flat for 24 hours. 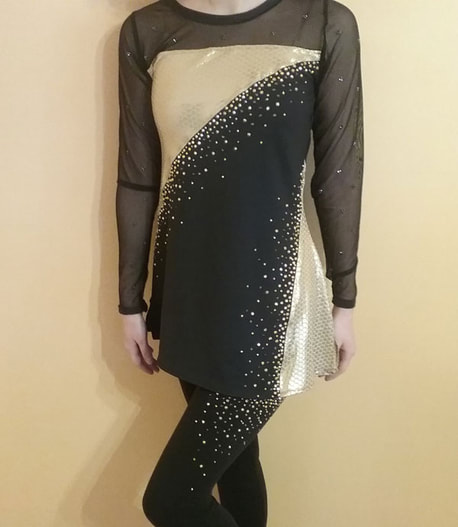
FAQs About How to Rhinestone a Dance Costume Rhinestones add that final detail you need to separate you from other dancers. Their eye-catching sparkle and scintillation turn a nice costume into a stunning one. Below, we’ve answered a few more questions related to how to rhinestone a dance costume. Please drop us a note here if you have any others. Which Is the Best Size to Use? Rhinestone sizes have a unique system that dates back centuries. Thankfully, most retailers include the millimeter size alongside the ”ss” or stone size. Generally, the most popular sizes for dance costumes are 20ss and 30ss. However, smaller sizes can work equally as well. Mostly, your choice of stone will come down to your budget and the look you want to achieve. For example, a larger rhinestone will cover a bigger area so you’ll need less. Yet, bigger rhinestones are also more expensive than smaller ones. What Color Should I Pick? Color theory principles can guide your options for choosing a rhinestone color. For example, using complementary colors will provide contrasts and make both hues appear more vibrant. Other times, you may want a more subdued look by blending similar shades. Then again, if you aren’t confident in choosing a color, you can pick something neutral. Crystal is a clear stone and Crystal AB is a clear stone with a rainbow coating. Either will complement any shade imaginable. Yet, color is a personal choice reflecting the individualism of the dancer and the mood of the piece. The aim is to create a unified look. How about Creating Bedazzling Clothing? The technique of how to rhinestone a dance costume is the same for other garments. Now you can bling out shoes, dresses, and accessories. Bedazzling your clothes can breathe new life into dull, dated outfits.
When you’re looking for a source for quality rhinestones, choose Rhinestones Etc. We have great customer service and super fast processing times. Most orders ship the same day!
0 Comments
If you’ve been following my blogs, you know I love jewelry. However, I can’t afford to buy most of the pieces I love as there are way too many of them. Recently, I’ve unleashed a new love for rings and this DIY ring is a variation on a previous blog tutorial. Sometimes working with wire can take a little practice, so don’t get discouraged. I usually have to try the ring twice before I am happy with the finished project. For this project I used: 22 gauge silver wire Jewelry pliers (needle nose, wire cutters) Highlighter Pencil 2 Crystal AB 16ss Rose Montee 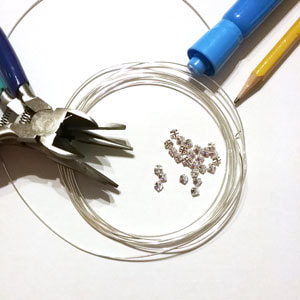 How to Make a DIY Ring Begin by cutting a piece of 22 gauge wire 12 inches in length. Take your highlighter (or any other household item the equals the circumference on your finger). Wrap the wire around the highlighter twice. 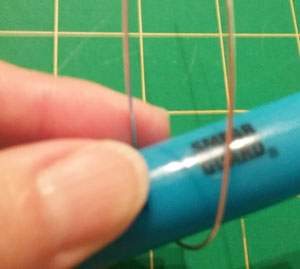 Once you’ve wrapped it twice, remove it from the highlighter. Then take a pencil and bend the wire into a loop. 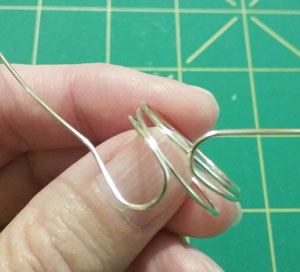 Slide a Crystal AB 16ss Rose Montee onto the end of each wire and slide to the curve in the wire. 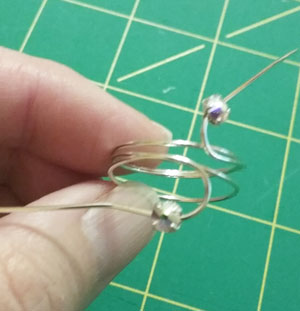 Using your jewelry pliers, bend the end of the wire to begin wrapping the ends around the base of the ring, without losing the loop shape holding the Rose Montees. 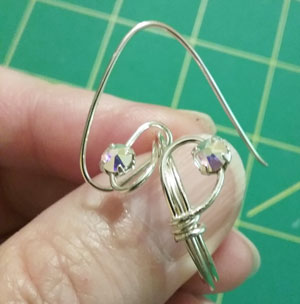 Continue wrapping, tightening the coils as you go. Wrap the wire about 3 or 4 times around and cut the end if necessary. Squeeze the ends with the pliers, tucking them in. Repeat for the other side. 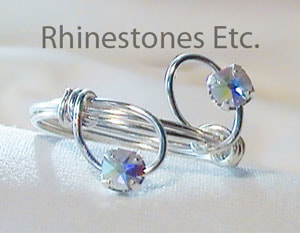 Try different variations of size of the Rose Montees and wrapping techniques to create new and beautiful jewelry. Once you’ve made a few DIY rings, you’ll get the hang of it and see how easy and pretty they turn out.
Rose Montees are available from: www.RhinestonesEtc.com Staying abreast with all the latest fashion trends is costly. You want to look fresh and trendy while staying within your budget. That's where DIY comes in handy. With an embellished t-shirt, you can be fashionable without going over budget. For this project I used: 1 plain t shirt (an inexpensive craft store t shirt) Sewing machine Silver star metal studs Hot fix tool or iron 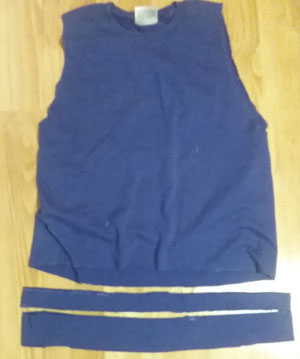 How to make an embellished t shirt. Begin by cutting the sleeves off at the seam. Cut the seam off the bottom of the shirt and then cut 2 pieces off the bottom 1 inch wide. You can adjust how short you want the shirt to be by cutting more or less of the bottom off. Cut 2 inches off the short end one of the strips and then sew the ends together (you are making the loop smaller). Cut the other strip in half. Take the 2 smaller strips and fold them in half and mark the middle. Stitch the 2 shorter ends together forming a loop. Using a medium length zig zag stitch or serger, stitch one of these strips, right sides together, to the armhole stretching to so that the halfway mark matches the shoulder seam and back to the starting point. You are tightening up the armhole as you sew the facing on. 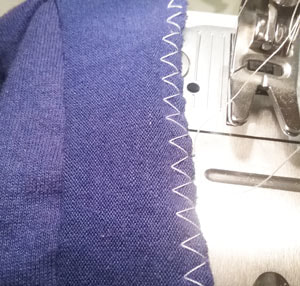 Do the same for the other armhole. Take the longer strip and again mark the middle. Beginning at the side, use the same zig zag stitch sew to the bottom of the shirt, stretching to match the middle with the other side of the shirt and back to the starting point. Here you are tightening up the waist. Press all seams towards the outside edges. 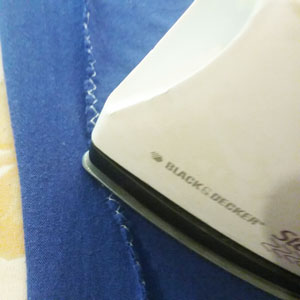 Fold the raw edge of the facing to the inside of the shirt. Using a double needle (which allows for stretch in the material), topstitch the facing. Do the same for the bottom of the shirt. 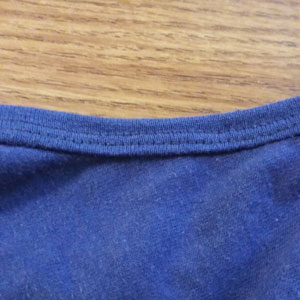 For this shirt, we chose to go with an initial for the design. I laid out silver metal studs in the form of the letter “S”. Using a hot fix tool or hot iron without steam, press down on the metal studs for 12-15 seconds. If your shirt is thin, you may want to place a piece of wax paper in the inside of the shirt to prevent the glue from adhering the sides together. Allow to cool. 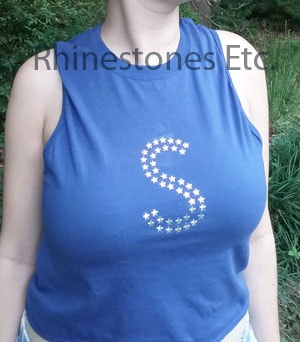 Inexpensive but easy to make. An embellished t-shirt is an easy way to stay trendy while keeping your wallet happy.
Hot fix metal studs are available from: www.RhnestonesEtc.com |
KarenI have been adding bling for over 20 years. Through my projects, I hope you find inspiration. Categories
All
Archives
July 2024
|

 RSS Feed
Home About Policies Return Shipping
Contact Us Size Chart Privacy Products Reviews
Copyright 2024 Rhinestones Etc. All rights reserved.
Contact Us Size Chart Privacy Products Reviews
Copyright 2024 Rhinestones Etc. All rights reserved.