
In recent times, sporting nail bling has become an important fashion story. For example, Jennifer Lopez, Cardi B, and Selena Gomez have all made the news for their blinged out nail crystals. While this may seem like a modern trend, rhinestones on nails have a long and ancient tradition. Ancient Civilizations and Nail Art As early as 3200 B.C., humans were coloring their nails. However, it was the ancient Babylonian men, not the women, who colored their nails. Before going off to battle, warriors painted their nails with kohl. Around the same time, other ancient cultures began experimenting with dyeing nails. In Egypt, both men and women and men colored their nails. The famous queens Nefertiti and Cleopatra loved to paint their nails red. Furthermore, Cleopatra also wore fake nails made of porcelain powder. On the Asian continent, Indian women dyed various body parts, including fingernails, with henna. Typically, many historians credit the Chinese with the invention of the first nail polish. Chinese women soaked their nails in egg white, gelatin, beeswax, and flowers to color their nails. The upper-class women also elevated decorated nails to a new level of art by wearing highly ornamented protectors. Typically, artisans made nail guards from gold or silver and adorned them with precious gemstones. During the Dark Ages, manicures fell out of favor even among the aristocrats. A renewed interest in presenting well-taken care of fingers began again around the 1750s. Practitioners specializing in manicures began to open up shops. No longer seen as a status symbol, people across social classes kept their nails clean and neatly trimmed. Moreover, manicure sets became an essential part of households. Modern Nail Art Includes Rhinestones on Nails Modern nail designs began with the invention of nail polish by Northam Warren in 1917. As the years progressed, inventors improved upon the original product to produce a variety of new glossy colors. Additionally, as demand grew, so did new products for styling. Moreover, throughout the following decades, women began experimenting with nail color. Although new exciting colors became available, many opted for a monochromatic look. When the early 1980s began, some nail technicians began treating nails as more of an art canvas. One particular Olympic sprinter, Florence Griffith Joyner, became known for her multi-colored crystal nails. In the following years, women continued to express their creative freedom through nail art. Today, rhinestones on nails continue to be a trendy fashion element. From a hint of sparkle to opulent glitter, technicians can add different colors, sizes, or shapes to create your look. It’s the perfect way to accessorize and show off your unique style. FAQs About Rhinestones on Nails Are you ready to make a fashion statement by creating stunning blinged out nails? Many nail salons offer this service, but you can also create your own nail art at home. Below, we answer a few commonly asked questions about using nail crystals. Is it Easy To Create Crystal Nails? Yes! You’ll need either nail glue or a resin adhesive that cures like a gel polish to adhere rhinestones to nails. It’s easy and requires a few supplies, depending on your method. If you choose to use nail glue, you’ll need a top coat to apply around the edges of the crystal. While if you opt for a gel adhesive, you’ll need a UV light to cure the adhesive. Can I Use Gel Nail Polish? You can add rhinestones to gel nail polish without the use of an additional adhesive. Moreover, applying rhinestones with gel nail polish is also super simple. However, you will need a UV nail lamp to cure the polish. Inexpensive UV nail lights start at about $10. What Is the Best Type of Rhinestone to Use on Nails? Today, you can find resin, acrylic, glass, and crystal rhinestones. Each rhinestone type begins with different components and manufacturing processes. Consequently, you’ll find a wide range of pricing and facet arrangement between brands. For ultimate sparkle, choose a crystal rhinestone with a minimum of 10 facets. Where Can I Buy Quality Rhinestones? Since 2011, Rhinestones Etc. has been supplying rhinestones to dance studios, DIYers, and small business owners. We want to be your source for sparkling nail art supplies. Visit our online store to discover our competitive pricing. Plus, we have fast shipping and great customer service.
0 Comments
From the red carpet to the runway, glamorous, rhinestones nails are a hot trend fashion item. Brightly painted fingernails with sparkling rhinestones are hard to miss. And now, crystal dust has taken nail art in a whole new direction. Made up of thousands of sparkling crystals, it’s easy to apply so you can get professional results at home. Depending on the manufacturer, crystal dust goes by different names: Crystalpixie, Faerie, or Dust.
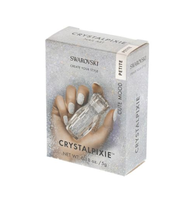
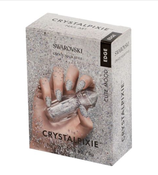
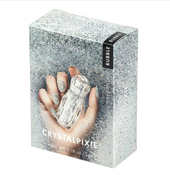
Brand Names of Crystal Dust To Create Rhinestone Nails Always on the cutting edge of innovation, Swarovski has 3 lines of Crystalpixie available in different colors and textures. First, Petite is well known for the smooth, round profiles of its very fine Swarovski crystals. Available in over 15 colors, there’s a color to match your mood. Next, Edge is comprised of tiny pointed chatons to create a glam-punk nail art look. Made of slightly coarser and more angular Swarovski crystals, Edge features the double–cone cut. Edge is available in 9 colors. Finally, the newest line of crystal dust by Swarovski is Bubble. Comprised of uncut crystal balls in three sizes, it creates a bubbly effect. It’s available in 6 colors. (Update: Swarovski no longer has this product line). 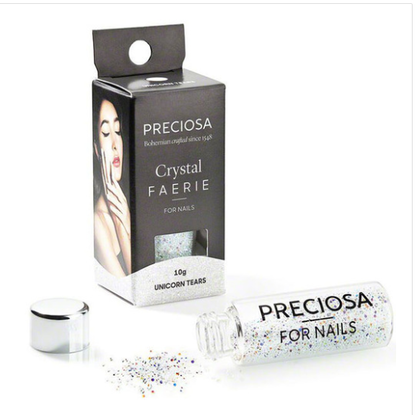 Preciosa, another well-known rhinestone manufacturer, has a less extensive line called Faerie. A combination of both double-cone cut crystals and crystal balls gives their nail dust sparkle. Despite their tiny dimensions, each piece has been individually sized, shaped and polished to ensure maximum sparkle. Faerie is available in 4 sparkling colors to dazzle your nails. Finally, Valentino Beauty Pure makes V Sugar. Manufactured with double-cone cut crystals and crystal balls, V sugar is available in 5 sparkling colors. (Note: Since Valentine Beauty no longer has this product line). 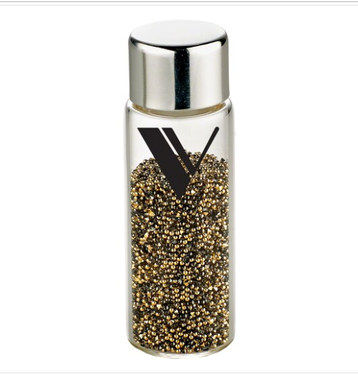 How to Apply You can achieve professional-looking results at home using any of the crystal dust products. Do one nail or all of them. Moreover, you can mix and match textures with the Swarovski line. You can even have some nails sparkle with rhinestones and others with crystal dust. Crystal dust is easy to apply. While your nail polish or gel is wet, sprinkle the product over your nail. You can also use nail glue if you prefer. Be sure to have a tray underneath to catch any stray dust that doesn’t stick to your nail. This “extra” can go back into the bottle to use another day. Let the glue or nail polish to dry completely. You Can Create Beautiful Rhinestone Nails For rhinestone nails, browse the inventory at Rhinestones Etc. We have loose rhinestone colors and sizes available for your nail design. Plus, we ship fast and have great customer service. Moreover, we are an affiliate seller for our wholesaler Rhinestones Unlimited who carries the crystal dust products. If you have any questions, you can contact us here. Sparkly nails - because you deserve to look glamorous. Women love to paint their nails to coordinate with their outfit. From acrylic nails to French manicures, nicely polished fingertips make a statement. Today, rhinestone nails are the latest fashion trend in nail art. Manufacturers produce an array of colors, shapes and designs to meet different tastes. Whether a single rhinestone or an abundance of light catching crystals, rhinestone nails are exceptionally chic. A Brief History of Nail Art Even in ancient times, people decorated their nails. As far back as 5000 B.C., women in India were dying their nails with henna. Much later on in America, Mary E. Cobb opened the first nail salon in 1878 in New York City. Although nail polishes weren’t in widespread use, a trimmed, buffed appearance was fashionable. Then in 1916, Northam Warren introduced a liquid nail polish. Although this nail polish was more of a tint and relatively transparent, it seized the attention of American women. Admittedly, Revlon rocked the fashion world when they marketed the first nail enamel in 1932. Inspired by automobile paint, Revlon’s product coated nails with a hard enamel rather than staining it. Now women could sport new colors like delicate pinks or bold reds. Today, adhesives provide a never-before-achieved level of intricacy to nail art and manicure designs. The use of rhinestones adds a touch of unprecedented elegance and sophistication. With products such Crystalpixie, Faerie for Nails, or V Sugar it’s easy to coat an entire nail in glittery crystals.  DIY Rhinestone Nails If you want a nail art for that special occasion, you may want to use a professional manicurist. However, with a little practice, you can achieve brilliant sparkling nails yourself. Remember to always use high quality nail polish/gel to avoid chipping. After applying the topcoat, pour the pixie, faerie or sugar on the wet surface. Gently press the crystals to imbed into the topcoat. You may want to protect the design by applying a top coat to the edges only. Never apply a topcoat over the entire nail as this will compromise the brilliance of the crystals. On the other hand, if you want to apply individual rhinestones to your nails, you’ll need nail glue. After applying polish and topcoat, use a toothpick to apply a small amount of nail glue to your nail. Using a wax tipped tool, pick up a rhinestone and gently press it into the nail glue. Use a small detailing brush to apply a top coat around the edges of the rhinestone. Do not apply the top coat over the top of the rhinestone, as this will dull its brilliance. 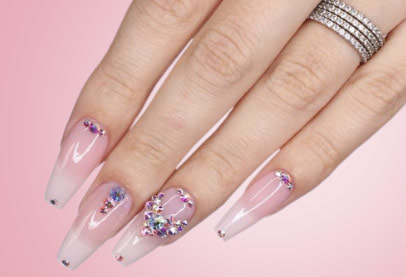 Where to Buy Supplies for Nail Art Rhinestones Etc. is now an affiliate seller for Rhinestones Unlimited. This means we have access to all the newest rhinestone products for nails. You can access all the latest crystals for nails at this link: https://rhinestonesu.com/crystalsfornails/?afmc=76 Additionally, Rhinestones Etc. continues to sell loose rhinestones in smaller quantities for nail design. Whatever your preference for rhinestone nail art, we have the product for you. Nail designs with rhinestones are the new current rage. Beautifully polished nails embellished with dazzling rhinestones are sure to make a fashion statement. But have you checked out those salon prices? Yikes, definitely not in your budget! However, you’d still like to have the look of rhinestone nails for that upcoming party. But the question is, can you do it yourself? Supplies Needed for Rhinestone Nails Yes, you can for both regular nail polish and gel, although the methods are slightly different. For regular nail polish, you will need nail glue and a quality top coat. While using gel nail polish will require an LED light. Prices run anywhere from $10-$40 on Amazon. Of course, you’ll need some good quality rhinestones. Some nail technicians like to use flatback rhinestones while other use pointed back. Moreover, you can choose from a variety of rhinestone sizes and colors. 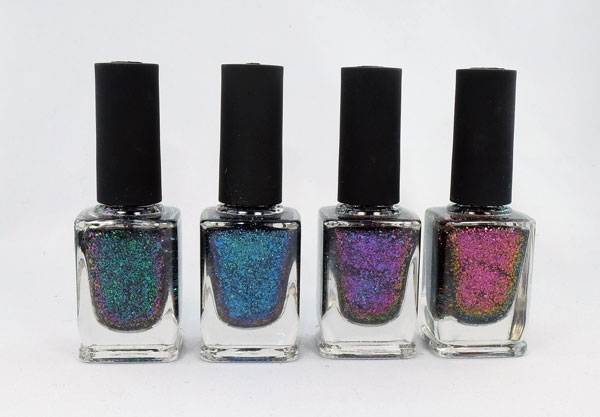 How to Apply Rhinestones to Nails with Regular Nail Polish Let’s start with how to attach rhinestone to your nails with regular nail polish. First, make sure you use a good quality nail polish. Unfortunately, if you use a cheaper brand, the polish may chip causing the rhinestone to fall off. Furthermore, this can occur even if you glued it correctly. Begin by applying a base coat and then your favorite color and allow to dry completely between coats. With a toothpick, apply a small amount of nail glue to the nail where you want to place the rhinestone. Using a wax tipped tool or tweezer, pick up a rhinestone and gently press it into the nail glue. Next, using a small detailing brush, apply a top coat around the edges of the rhinestone. Do not apply the top coat over the top of the rhinestone, only the edges. This helps seal the rhinestone so that it doesn’t peel off. 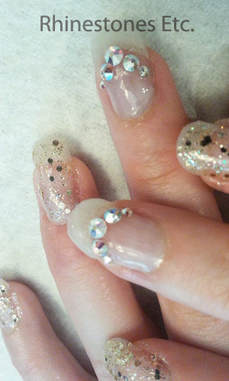 Using Gel Nail Polish to Attach Rhinestones Now let’s go over the method of creating rhinestone nails with gel polish. Apply the gel foundation and cure under your LED light. Then apply the gel color again curing under the LED light. In the area where you are applying the rhinestone, roughen lightly with an emery board. Wipe nails clean with rubbing alcohol using a lint free wipe. Next, apply a gel top coat over the entire nail. Pick up a rhinestone using a wax tipped tool or tweezers and apply the rhinestones to the nail. Then, cure under the LED light. Finally, using a small detailing brush, apply the gel top coat around the edges of the rhinestone. When you are finished, cure under the LED light one final time. With a little practice, you’ll be creating fabulous designs on your nails suitable for every occasion. Plus, you won’t pay those high prices at the nail salon. Practice enough times and you’ll be creating your very professional own one-of-a kind nail designs. Want to get started on your nail designs right away? Buy quality rhinestones from Rhinestones Etc. You’ve got that special occasion coming up and you want everything to be just right. Need the perfect nails to match your dress or just to add some eye-catching sparkle? Follow our easy steps for DIY nails with rhinestones. Steps For DIY Nails with Rhinestones First, you’ll need to gather a few supplies:
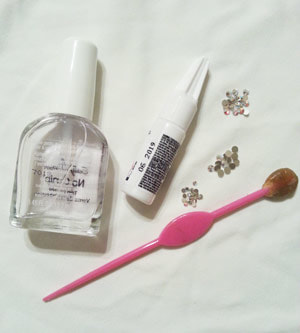 Always, begin with clean, unpolished nails. Furthermore, use a good, chip-free nail polish as a base coat. If you choose to use a cheaper product, the polish may chip underneath the rhinestone. Thus, you may lose your rhinestone even if you use strong nail glue.  Apply your base coat allowing it to dry completely. When the nail polish is completely dry, place a drop of nail glue on your nail. You may want to use a toothpick to apply the glue to the nail. The nail glue I used was the glue thin and watery making it difficult to apply directly from the bottle. 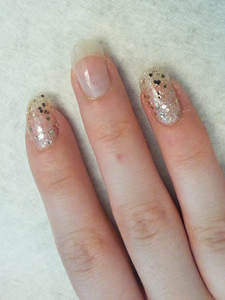 Then, using a wax-tipped tool, pick up a rhinestone and gently press it into the glue. Continue applying glue and rhinestones until you finish your design. After you have finished applying the rhinestones, allow the glue to dry. 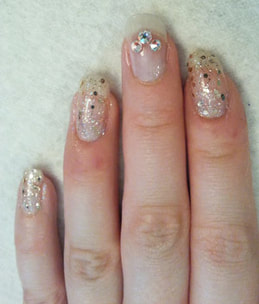 Now, you’ll need to use a top coat to seal the edges to help prevent the rhinestones from peeling off. You may want to use a small detailing brush to do this. Apply the top coat just around all the edges of the rhinestones. Avoid applying the top coat over the top of the rhinestones as this may dull them. Allow to dry. 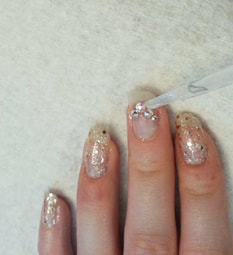 Simple and easy to do, yet, the results are stunning. You will look like a nail pro without even trying!  |
KarenI have been adding bling for over 20 years. Through my projects, I hope you find inspiration. Categories
All
Archives
July 2024
|

 RSS Feed
Home About Policies Return Shipping
Contact Us Size Chart Privacy Products Reviews
Copyright 2024 Rhinestones Etc. All rights reserved.
Contact Us Size Chart Privacy Products Reviews
Copyright 2024 Rhinestones Etc. All rights reserved.