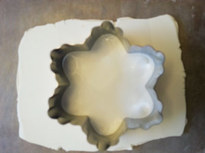
 Want to make a Christmas ornament worthy of Tiffany’s? This snowflake ornament is sure to be the envy of your friends. For this project I used: White Sculpey clay Snowflake shaped cookie cutter approximately 2.75 inches wide 10mm x 8 mm oval clay cutter Gem tac glue 7- 20ss and 36 - 16ss crystal Swarovski Rhinestones Flat back Jute twine or ribbon for stringing Clear glitter Tweezer or wax tipped tool 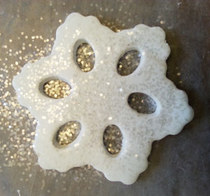 Roll out Sculpey clay to ¼ of an inch thickness. Using the snowflake shaped cookie cutter, cut out shape. Then, using the oval shaped cutter, cut ovals out of the middle of the clay snowflake. Sprinkle the clear glitter on clay snowflake. Place on a cookie sheet that has been lined with white paper. Bake in a preheated 275 degree oven for 15 minutes. Remove from oven and allow to cool. 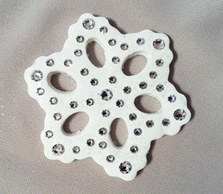 Using Gem Tac glue, place a drop of glue slightly larger than your rhinestone on the clay snowflake. Using a tweezer or wax tipped tool, place a rhinestone in the glue and gently press down allowing glue to cover the edges of the rhinestone. Continue until your snowflake is adorned with rhinestones. 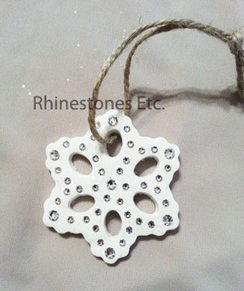 Allow glue to dry for 24 hours then add a piece of jute twine. Keep it for yourself or give it to someone special!
Swarovski Elements Rhinestones are available from: www.RhinestonesEtc.com Do you want to be notified of upcoming sales, new clearance, contests and giveaways? Would you like our free guide to rhinestoning? Subscribe to our newsletter by clicking here.
0 Comments
Looking for a unique piece of jewelry that screams you? For this project I used: 6 Crystal AB 16ss Swarovski Elements Rose Montees Jewelry Wire (20 gauge) Jewelry Pliers (needle nose, wire cutter and round) Gem Tac 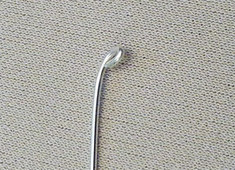 Cut a piece of wire about 8 inches long. On one end, fold the end down to make a very small loop. Begin to bend the wire in a circular pattern making it a little larger as you circle around. Once you get to the desired size, slip your Swarovski Rose Montees into place and secure with a bit of Gem Tac . Let dry for 24 hours. 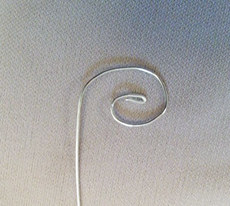 Once dry, you need to make the loop for the pendant. Using your needle nose pliers, bend the free end of the pendant at a 90 degree angle. Grab the wire with the rounded pliers and again using your fingers wrap the wire around the pliers creating your loop. Holding the loop secure with the needle nose pliers, wrap the remaining wire around the bottom of the loop several times. Cut the remaining wire with your side cutters and tuck in the end of the wire. 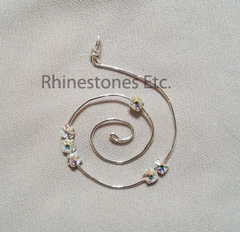 String a chain through and you have a unique one of a kind rhinestones pendant. Use a tighter loop and attach to ear wires for earrings. Experiment and try different shapes.
Crystal AB 16ss Swarovski Elements Rose Montees are available from: www.RhinestonesEtc.com Do you want to be notified of upcoming sales, new clearance, contests and giveaways? Would you like our free guide to rhinestoning? Subscribe to our newsletter by clicking here. Like timeless classic clothing, rhinestones never seem to go out of fashion. People love to bling shoes, hats, pocketbooks, and clothing. Moreover, blinged out tee shirts embellished with words or symbols are a powerful form of self-expression. Learn how to make rhinestone iron on transfers to express your personality and individualism. How to Make Rhinestone Iron On Transfers The technique to make a rhinestone transfer design requires a few simple supplies:
Rhinestone transfer paper may come in a roll or sheets. Some companies may call it rhinestone transfer tape. It consists of a top sticky clear piece and a bottom opaque non-sticky piece. You may also want to use a template. We offer several free printable rhinestone templates or you can make your own. Additionally, you can get rhinestone pattern ideas from embroidery or children’s coloring books. In creating this particular rhinestone transfer, I used an embroidery design to create a rhinestone initial. First, place a sheet of wax paper over your template to keep the transfer paper from sticking. Following the lines of the template, lay out your rhinestones facet-side up on the wax paper. Next, separate the rhinestone transfer paper and gently press the sticky side down on top of the rhinestone letter. Peel off the wax paper. If you plan on using this another day, reattach the non-sticky piece of rhinestone transfer paper to the sticky side. 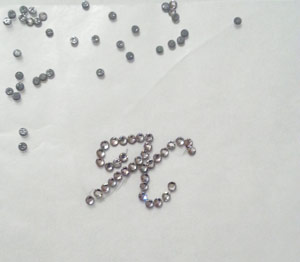
Buying Vs Creating Iron On Rhinestone Transfers
Many companies offer premade rhinestone bling iron ons of words, pictures, or abstract designs. While some of the simpler ones are just a few dollars, more intricate designs are more expensive. Yet, buying a rhinestone transfer is a convenient way to add some glitz. Alternatively, you can create a unique rhinestone transfer that reflects your personality. Rather than buy a mass-produced design, you can make a distinctive one-of-a-kind blinged-out shirt. Moreover, making rhinestone iron ons are simple and easy to do. Whether you’re using a premade or DIY rhinestone transfer, always prewash your garment before you begin. Often, clothing manufacturers treat clothing with chemicals that can interfere with the fabric’s absorbency of the glue. How To Attach Hot Fix Rhinestones Typically, you must heat hotfix rhinestones to 250 degrees F - 340 degrees F to activate the glue. To attach a hotfix rhinestone transfer design, you can use either a heat press or a non-steam iron. A heat press is a machine that uses pressure and heat to apply transfers. In the past, these machines were big and expensive. However, today you can find smaller versions with dimensions 4 x 2 inches for under $25. Moderately larger heat presses measuring 13 x 6 cost about $100. Alternatively, you can also use a non-steam iron with a smooth plate for evenly applied pressure. Unfortunately, the moisture from a steam iron can interfere with the hotfix application. When you’re ready to attach your rhinestone transfer, heat your heat press or iron. Then, peel the non-sticky backing off your iron on. Carefully position the transfer on your garment with the sticky side down and the rhinestone facets facing up. Usually, heat presses have settings and temperature indicators for greater control. If you’re using an iron, it’s harder to control the temperature Thus, you may want to place a piece of white paper of the iron on to prevent scorching your material. When the iron/heat press is hot, press down on the iron on initial for 15-20 seconds. Do not slide the iron over the design as this may move your rhinestones. Remove your heat source and allow the iron on to cool completely. Finally, remove the white paper and peel off the clear plastic. 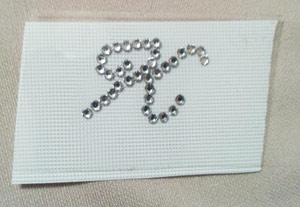
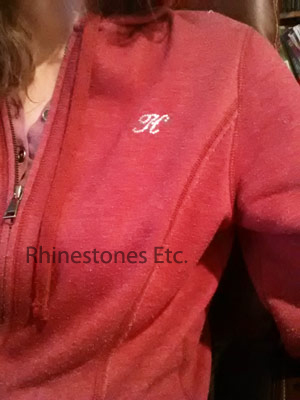
Caring for Blinged Out Clothes Now that you have a beautiful, bedazzled shirt, you’ll want to keep it looking nice. You can safely wash your blinged out clothes by following a few simple steps. First, turn your rhinestone clothes inside out and place them in a garment bag using cold or lukewarm water. If you use a dryer, use the lowest setting possible. While line drying is preferable, keep your garment out of direct sunlight because UV light can negatively affect some glues. Are you ready to make a personalized and unique rhinestone iron on? Rhinestones Etc. offers same-day processing for most orders so you get your rhinestones quickly. Browse our online store to find high-quality crystalline products at competitive prices. |
KarenI have been adding bling for over 20 years. Through my projects, I hope you find inspiration. Categories
All
Archives
July 2024
|

 RSS Feed
Home About Policies Return Shipping
Contact Us Size Chart Privacy Products Reviews
Copyright 2024 Rhinestones Etc. All rights reserved.
Contact Us Size Chart Privacy Products Reviews
Copyright 2024 Rhinestones Etc. All rights reserved.