|
DIY Rhinestones Tree Ornament Fortunoff is a store of distinction that started in Brooklyn, NY in the early 1920’s. At Christmas time, they transform their backyard store into a magical, glittery wonderland of decorated trees. In the early years of my marriage, my husband and I loved walking through the Fortunoff Christmas Store around the holidays. I loved looking at the hundreds of decorated trees with ornaments that were quite expensive and beyond my budget. However, you don’t have to spend a lot of money to make your tree look like a Fortunoff tree. For this project I used: 1 plastic ornament shaped 12ss Light Siam Rhinestones Gem tac Wax tipped tool Chalk 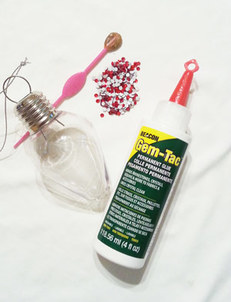 For this ornament, I decided on stripes. Using the pieces of chalk, I measured equidistant lines around the ornament. Place a drop of glue about the size of the rhinestone on the ornament, pick up a rhinestone using the wax tipped tool and gently press into the glue drop. 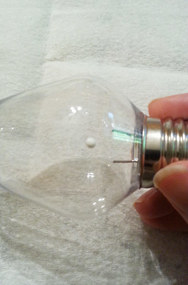 Continue gluing keeping your line of rhinestones equal distant apart. For the bottom, I glued a rhinestone directly at the center and then glued rhinestones in a circle around it. Here’s a picture of the bottom of the ornament: 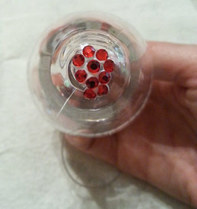 When finished gluing, allow to dry for 24 hours. 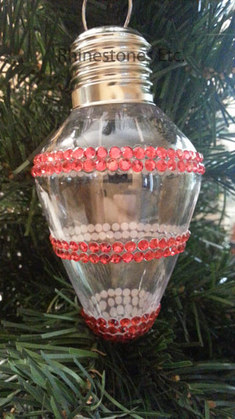 Ready to amaze your friends with your stunning Christmas tree? This ornament will sparkle and delight and you won’t find it at Fortunoff.
Rhinestones and wax tipped tool are available from: www.RhinestonesEtc.com
0 Comments
Some people in your life make gift giving very difficult. You know how it is, you walk from store to store and still come up empty handed. You want something showing how much you appreciate that special person without spending a lot of money. This personalized blinged out coffee mug is easy to make and is perfect for that one person on your list. The Best Reason to Give A Personalized Gift Generally, any gift is a thoughtful expression, but a personalized one expresses so much more. Here are our top reasons for giving a personalized keepsake. 1. Strengthens the Connection with Your Recipient Who doesn’t love a personalized, handmade gift? Moreover, your recipient will feel special and loved when something has their name or initial on it. 2. Your Gift Is Unique Personalization adds uniqueness to the item. Your gift will become a treasured keepsake. 3. Suites Any Occasion You can give a personalized gift to anyone for any occasion. They make the perfect universal present. Rhinestones Are Perfect for Personalization Rhinestones add a touch of luxury and glamor to whatever item you choose to bling out. Plus, you can glue rhinestones to virtually any item. Clothing, coffee mugs, shoes, pocketbooks, and sunglasses are just a few of the many things you can bling. Typically, smaller rhinestone sizes work better for making initials. You may want to try using rhinestone sizes from 6ss to 12ss. If you’re not used to working with rhinestones, you probably should use the larger 12ss size. Sometimes, beginners find tiny rhinestones harder to glue. Instructions to Make a Blinged Out Coffee Mug Generally, creating a blinged out coffee mug is an easy process. As with any rhinestone project, the secret is in the gluing method. Always check your adhesive to make sure it’s suitable for creating a strong bond to your material. Many crafters don’t like to use E6000 because of the potential toxicity of breathing in fumes when gluing. However, when used correctly, this glue is strong enough to keep rhinestones in place through repeated washings. You may want to try a 2-part epoxy instead. Finally, this type of rhinestone project requires hand washing only to keep the rhinestones intact. For this project I used: 1 coffee mug 12ss Crystal Rhinestones Gem Tac Wax tipped tool Chalk 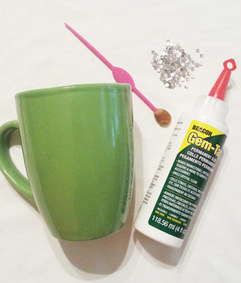
I usually find it easier to keep to my pattern with guidelines. Thus, I like to use chalk to create my framework because you can easily remove it. Plus, you can easily change the size or font when using erasable guidelines. So, begin by drawing the letter on your mug with a ruler and a piece of chalk. . 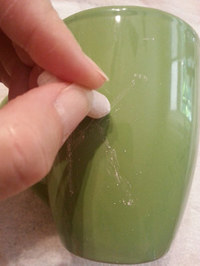
After you’ve chalked in your letter you are ready to start gluing. Place a drop of glue about the size of the rhinestone on your chalk guideline. Pick up a rhinestone using the wax tipped tool and gently press down into the glue drop. A very small amount of glue should seep from the edge of the rhinestone. This creates a seal to keep the embellishment from peeling off when washing. 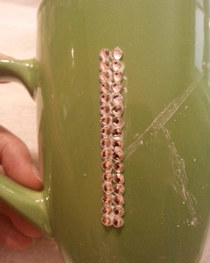
Then, continue gluing in this manner until the letter is complete. When you’re finished, let your project dry for 24 hours. 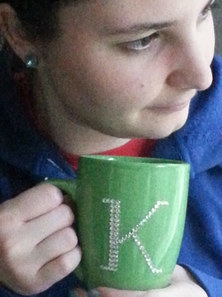
Discover Discount Rhinestone Prices
Expensive looking and personalized, a blinged out coffee mug makes the perfect gift. However, purchasing rhinestones may not seem so easy. You’ll find many online stores selling many types of rhinestones at different prices. At Rhinestones Etc. we can help you sort through the different types of rhinestones. We’ve been selling quality embellishments since 2011. With discount pricing, fast shipping, and great customer service, we want to be your source for rhinestones. Make your own rhinestone tree ornament Christmas is magical for kids and grownups alike and one of the things that make it so special is the Christmas tree. Decorating the tree together can be the highlight of the season and you can reminisce about the ornaments. These rhinestone encrusted ornaments are easy to make and will add to the magic of Christmas. For this project I used: One red Christmas ornament Gem Tac Wax tipped tool 12ss Red and Crystal Rhinestones White chalk 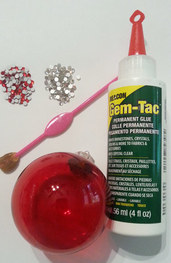 For this ornament, I chose a simple pattern. To keep it symmetrical, I measured the circumference of the ornament and divided it into equal sections and marked these sections with white chalk. 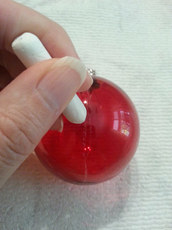 Using the chalk lines as guides, place a drop of glue about the size of the rhinestone on the ornament. Using the wax tipped tool, pick up a rhinestone and gently press it into the glue. 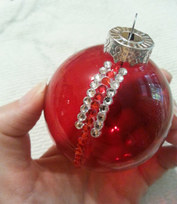 Continue gluing until your pattern is complete and then allow to dry for 24 hours. 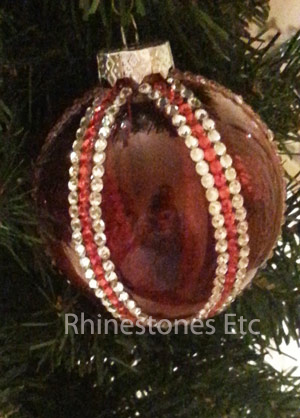 Traditional meets modern in these magical ornaments. They even make great gifts!
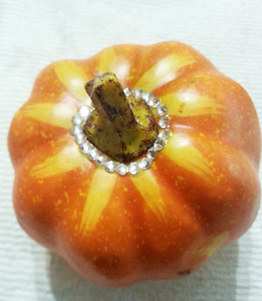
Rhinestones and wax tipped tool can be purchased at: www.RhinestonesEtc.com The aroma of delicious food wafts in from the kitchen and the table is set with fine china, silverware and wine goblets but something is missing. A beautiful centerpiece will add elegance to any table and this Autumn centerpiece is simple to make and will add that extra sparkle. For this project I used: 3 various sized craft pumpkins 12ss crystal rhinestones Gem Tac Wax tipped tool wire cutter 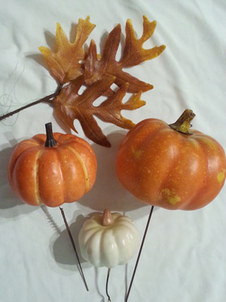 Using a wire cutter, cut the bottom wires off the pumpkins so that they will sit flat. There are many different designs you can do on these small pumpkins and I did them all the same to keep the look unified. Decide on the pattern you would like and when ready, place a drop of glue about the size of the rhinestone on the pumpkin and using the wax tipped tool, pick up a rhinestone and gently press it into the glue drop. 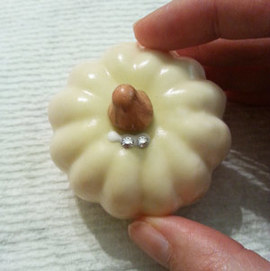 I glued rhinestones around the top of the pumpkins with the rhinestones coming down the sides. I will be showing you the different pumpkins in varying stages of gluing.
Continue gluing and let dry for 24 hours. 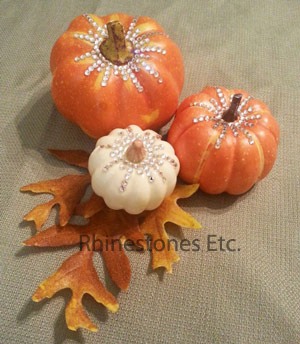 Your centerpiece will be the focal point of the celebration and you don’t have to tell your guests how easy it was to make. Perfect for Halloween, Thanksgiving or any other Autumn celebration!
Rhinestones and wax tipped tool are available from: www.RhinestonesEtc.com Do it yourself weddings are the current rage not only because you can save yourself money but also because your personality can shine through your handmade items. It is a way to make the wedding your own and fit your specific theme. For this project I used: 1 watercolor book White card stock Hole punch Embroidery thread Sewing needle 6ss Crystal Rhinestones Gem Tac Wax tipped tool or tweezers 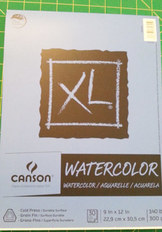 I purchased this 9 x 12 watercolor book at my local craft store. You can use this size, buy a smaller watercolor book or cut the pages down as I did. You will want to save both the cover and back for your book. Separate the pages. Using one of the sheets, fold in half lengthwise 3 times to make a template for your binding holes. Draw a line 1 inch from the short end and starting with the first fold make a mark and skip to every other fold marking your template like the picture below. You should have 4 dots drawn. 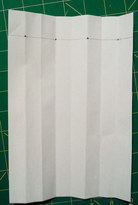 Using this template, punch holes in the covers and all pages. 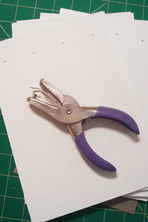 Next, cut a piece of card stock about 1 inch larger around all edges than your cover. Center the cover on the card stock and glue in place. Cut the corners on the diagonal, fold the corners to the inside and glue down. Then glue the sides down to the inside of the cover. 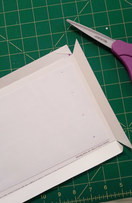 Cut a piece of white card stock slightly smaller than the cover and glue to the inside for the end paper. You are now ready to bind your book. There are several great videos on Youtube showing several different types of binding. I followed this one: https://youtu.be/j-r6c_trSxY. I used white embroidery thread. Measure the thread about 5 times the short length of the book. Thread a sewing needle (I used all 6 strands) and beginning in the middle of the book, sew from the inside to the front leaving a tail of about 5 inches. 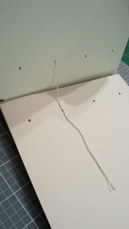 Sew up to the front of the book and then come around to the bottom and come up through the same hole. Sew to the hole on the bottom right down through the book, around the edge and back through the same hole. This time go around the long edge down through the front to the back. Sew across to the top left coming up the first hole you started in. Sew to the top left go around the edge and back into the hole. Sew to the left coming up to the front around the edge and up through the topmost hole. Go around the longest edge and sew down into the topmost hole. Come up through the bottom and sew across to the second hole from the top. Sew from the bottom up through the hole you started in bringing the needle to the middle to where your beginning end is. Make sure your binding is tight and then tie the two ends together. 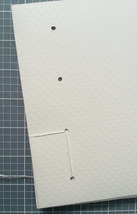 Using a ruler on the top and bottom as a guide, I glued 6ss crystal along the bottom front with a wedding date. Place a drop of Gem Tac about the size of the rhinestone on the cover and using the wax tipped tool, pick up a rhinestone and gently press it into the glue drop. You can also put your names, initials or hearts to personalize it.  Now you have a unique, one of a kind memento to remember your special day.
Rhinestones are available from: www.RhinestonesEtc.com Rhinestones can transform any item into something truly special. Here’s another idea for an easy wedding favor, Valentine’s gift or just thinking of you gift. For this project I used: Picture frame 2.25 x 2.25 inch (although any size will do) 9ss Light Siam Rhinestones Gem Tac Scotch Tape Graph paper Wax paper 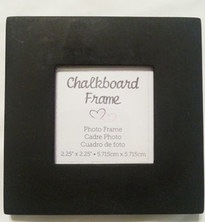 I used a 2.25 x 2.25 inch picture frame, but any size will work. 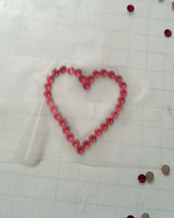 I placed a small piece of wax paper over a piece of graph paper. The graph paper will help keep the symmetry of the design. Using 9ss Light Siam rhinestones, I made a small heart shape. 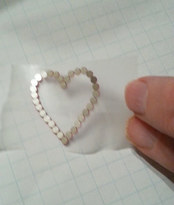 I taped 2 pieces of Scotch tape together and then placed the sticky side down on the heart shape. I then peeled the tape off of the wax paper so that the heart shape stuck to the tape. Next I applied Gem Tac to the area of the picture frame I wanted to put the rhinestones on. I applied the heart to the frame in the glue area, leaving the tape intact for 24 hours. Then I gently peeled off the tape. 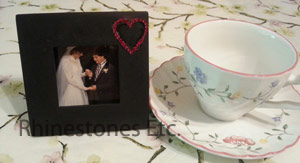 A perfect way to remember that special moment!
Rhinestones are available from: www.RhinestonesEtc.com Do you want to be notified of upcoming sales, new clearance, and new products? Would you like our guide to Gluing Rhinestones Without Panic? Subscribe to our newsletter by clicking here. Sometimes the most simple of things can be turned into works of wonder. If you are looking for something fun and unique for that special occasion, look no further! This vase is perfect for any occasion whether it be a wedding, an anniversary or a birthday. This vase is sure to be a favorite among your guests! For this project I used: Blue frosted vase about 4 inches tall 12ss crystal rhinestones Gem Tac Wax tipped tool Lace ribbon 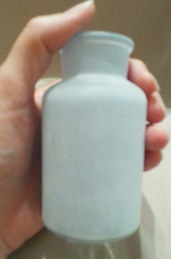 I found this cute little vase on clearance at my local craft store, but this idea can work with another shape or color. First, I drew a straight line from top to bottom using chalk (which will easily rub away). 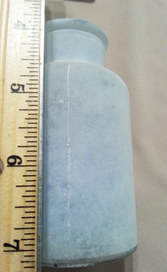 Next, I measured and marked the dimensions of the area of the vase I wanted to cover on graph paper and arranged the rhinestones in a pattern. Then placing a drop of glue on the vase about the size of the rhinestone, pick up a rhinestone and gently place into the glue drop, copying the design from the graph paper onto the vase. Allow to dry for 24 hours. I tied a bow using lace ribbon around the neck for a finishing touch. 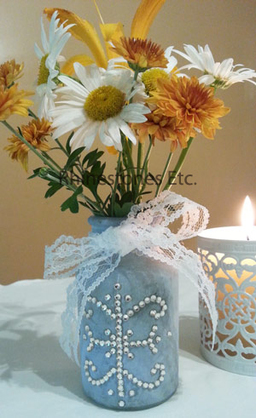 Now you have everything you need to brighten up any table for any occasion!
Rhinestones are available from: Rhinestones Etc. Do you want to be notified of upcoming sales, new clearance, and new products? Would you like our guide to Gluing Rhinestones Without Panic? Subscribe to our newsletter by clicking here. Romance is in the air and your wedding is just around the corner! So much to do, so little time and you haven’t found the perfect favor. Your guests will love this adorable candy scoop! It is simple to make, yet elegant and perfect for that final touch. For this project I used: Plastic candy scoop 5 - 30ss and 25 - 12ss crystal rhinestones Gem Tac Wax tipped tool or tweezers 6 inch wide white tulle about 16 inches long ¼ of an inch silver ribbon about 17 inches long White candies Plastic wrap 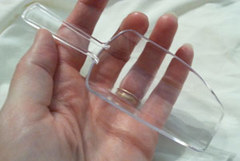 I purchased this plastic candy scoop for about 75 cents at my local craft store and a google search showed several places you can purchase them online for slightly less.  I used 5 – 30ss crystals alternating with 5 -12ss rhinestones in the middle of the handle and then the remaining 12ss crystals along the outside of the handle. Place a drop of Gem Tac about the size of the rhinestone on the handle and using the wax tipped tool, pick up a rhinestone and gently press it into the glue drop. Continue gluing rhinestones until the handle Is covered. Allow to dry for 24 hours. Place the candy in the scoop and wrap tightly with plastic wrap. This helps secure the candy and keep it from falling out. Cut a piece of 6 inch tulle about 16 inches long. Wrap this around the scoop and secure with the silver ribbon.  Breathtaking elegance that will wow your guests!
Rhinestones and wax tipped tool are available from: www.RhinestonesEtc.com Do you want to be notified of upcoming sales, new clearance, and new products? Would you like our guide to Gluing Rhinestones Without Panic? Subscribe to our newsletter by clicking here. Both my mother and mother-in-law loved the memory books I made for them for Mother’s Day, so I set out to make one for my father for Father’s Day. The same basic principles apply for the Father’s Day memory book except that I changed the theme to be more masculine. For this project I used: Heavy cardboard cut to 4 x 5 Decorative scrapbook paper Jute twine Photo stickers Glue Scrapbook stickers Metal Trim Card stock Instant coffee Pictures 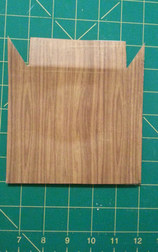 Begin by cutting your decorative scrapbook paper about 1 inch larger than your cardboard. Glue the cardboard to the white side of the decorative paper so that the print is facing outward. Cut corners on the diagonals. Fold the corners inward and glue the sides down.  For my end papers and pages, I coffee stained white card stock. To do this, place about ¼ cup of instant coffee on a cookie sheet. Pour boiling water into cookie sheet about halfway to the top edge of cookie sheet. Allow to cool to lukewarm. Place your card stock into the coffee water making sure to coat both sides with coffee water. Remove and place on a clean cookie sheet . To dry, you can use 1 of 2 methods. You can dry with a hair dryer or like I did place in the oven. Watch you papers carefully as you do not want to start a fire. Place in a preheated 200 degree oven for 5 -10 minutes again watching carefully and removing as soon as dry. There are several good YouTube videos on this if you need more instruction. Once your papers are dry, cut 2 pieces slightly smaller than your covers for your end pages. Cut 2 pieces of jute twine about 17 inches long and sandwiching the twine between the cover and end paper, glue the end paper to the cover. Next I used an accordion fold to make the pages, again, just slightly smaller than my covers. I glued 2 accordion pages together to get my 6 inside pages. Next I put my photos on the pages using acid free double sided photo stickers and decorated the pages using scrap booking stickers and metal trim. 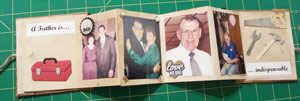 Allow to dry completely and then tie up with the twine. 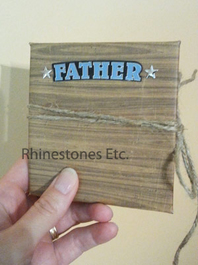 Your Dad will love this personalized gift from you!
Metal Trim is available from: www.RhinestonesEtc.com Do you want to be notified of upcoming sales, new clearance, contests and giveaways? Would you like our guide to Gluing Rhinestones Without Panic? Subscribe to our newsletter by clicking here. Mother’s Day was fast approaching and I was in need of a unique gift. My daughter and I were stumbling around the library one day, looking at craft books and we saw one we liked making memory books. So I set out making one for my mother and one for my mother in law. Although these are Mother’s Day themed, memory books make great gifts for birthday’s, graduations, anniversaries or thinking of you. For this project I used: Heavy cardboard cut to 4 x 5 Decorative scrapbook paper Ribbon Photo stickers Glue Scrapbook stickers Rhinestones Cardstock Instant coffee Pictures 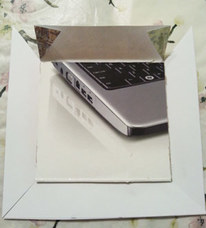 Begin by cutting your decorative scrapbook paper about 1 inch larger than your cardboard. Glue the cardboard to the white side of the decorative paper so that the print is facing outward. Cut corners on the diagonals. Fold the corners inward and glue down. 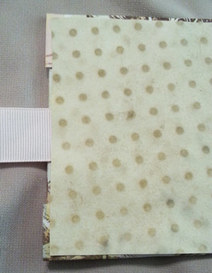 For my end papers and pages, I coffee stained white card stock. To do this, place about ¼ cup of instant coffee on a cookie sheet. Pour boiling water into cookie sheet about halfway to the top edge of cookie sheet. Allow to cool to lukewarm. Place your card stock into the coffee water making sure to coat both sides with coffee water. Remove and place on a clean cookie sheet or to get the polka dots like I did, place on a pizza tray. To dry, you can use 1 of 2 methods. You can dry with a hair dryer or like I did place in the oven. Watch you papers carefully as you do not want to start a fire. Place in a preheated 200 degree oven for 5 -10 minutes again watching carefully and removing as soon as dry. There are several good YouTube videos on this if you need more instruction. Once your papers are dry, cut 2 pieces slightly smaller than your covers for your end pages. Cut 2 pieces of ribbon about 17 inches long and sandwiching the ribbon between the cover and end paper, glue the end paper to the cover. Next I used an accordion fold to make the pages, again, just slightly smaller than my covers. I glued 2 accordion pages together to get my 6 inside pages. Next I put my photos on the pages using acid free double sided photo stickers, scrap booking stickers and rhinestones. 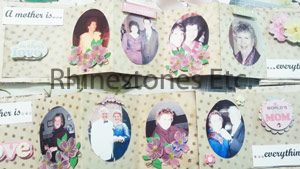 Here is a close up of the last page and you can see a bit clearer the rhinestones adding sparkle to the stickers : 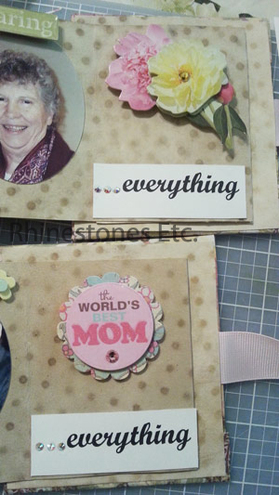 Allow to dry completely and then tie up with the ribbon. 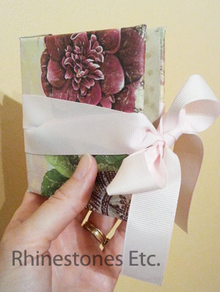 Sparkling memories to last a lifetime!
Rhinestones are available from: www.RhinestonesEtc.com Do you want to be notified of upcoming sales, new clearance, contests and giveaways? Would you like our guide to Gluing Rhinestones Without Panic? Subscribe to our newsletter by clicking here. |
KarenI have been adding bling for over 20 years. Through my projects, I hope you find inspiration. Categories
All
Archives
February 2024
|


 RSS Feed
Home About Policies Return Shipping
Contact Us Size Chart Privacy Products Reviews
Copyright 2024 Rhinestones Etc. All rights reserved.
Contact Us Size Chart Privacy Products Reviews
Copyright 2024 Rhinestones Etc. All rights reserved.