|
How to Make a Unique Table Centerpiece Using Acrylic Rhinestones and a Twig Planning a wedding or family gathering? Looking for something as special as the special occasion? Look no further then this majestic tree. Adorned with gold paint and glittering stones, this tree is perfect and lights up any table. See below for our easy to follow instructions. For this project I used: A twig Gold paint and paint brush Small stand of lights 25 mm clear acrylic rhinestones Gold thread Gem tac Small styrofoam piece Small box ( I picked up a box on clearance) 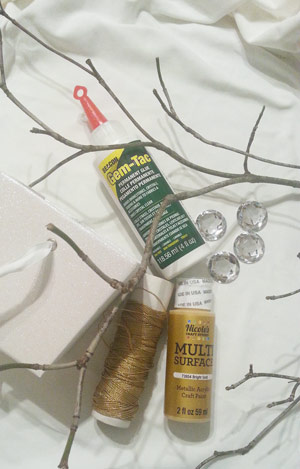 I looked around the yard for a twig that had lots of small branches but ended up cutting one off a tree and removing all of the leaves. Paint the twig with gold paint. You may need to do two coats. Let dry completely between coats. 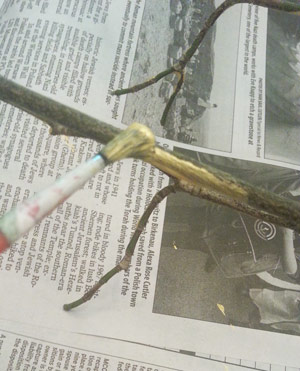 Take a small piece of Styrofoam and place it in your box. Make sure it sits flat. 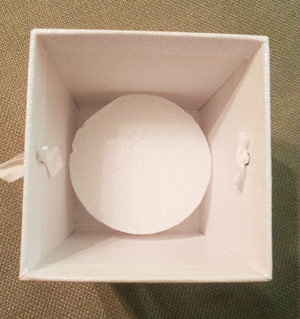 Wind your lights around the branches of your painted twig. There are battery operated lights available so that you can hide the battery case inside the box and cover it with crafting moss. Press the end of your twig into the Styrofoam piece in the box so that your twig stands upright. 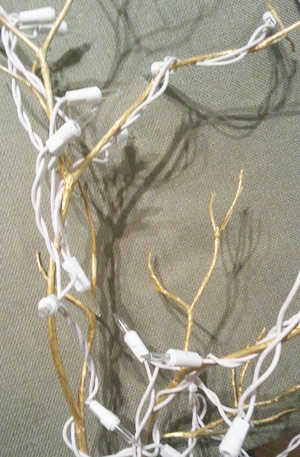 Spread Gem Tac on the backside of a 25 mm clear Acrylic rhinestones. Place the ends of a piece of gold string, 4 inches long in the glue to form a loop and place another rhinestone on top. Make several rhinestone ornaments. 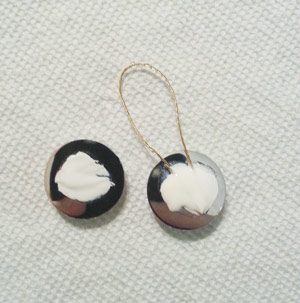 Allow to dry for 24 hours. When dry, hang the rhinestone ornaments on the branches to catch the light to create a romantic, sparkly ambience. 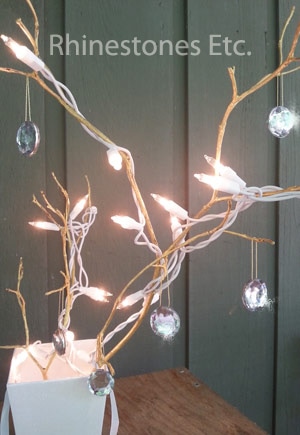 You now have your very own elegant center piece you can use whenever you want. Dazzle up a wedding or simply spice up your table at your next party. This tree is perfect for any event.
Rhinestones are available from: www.RhinestonesEtc.com
0 Comments
DIY Mother's Day Gift Mother’s Day is fast approaching and as it nears, it is time to start thinking about the perfect Mother’s Day gift. I like to give my mother personal and meaningful gifts. A slide bangle bracelet with homemade charms is both personal and stylish. In addition, adding rhinestones to the charms to accentuate it makes the gift even more special and personalized. For this project I used: 1 slide bangle bracelet Sculpey clay 8 mm jump rings E6000 Wax tipped tool Toothpick Small clay shape cookie cutters 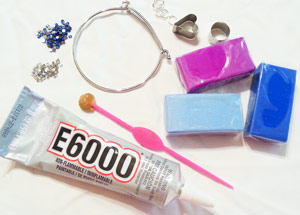 There are many great ideas for making clay charms. Whatever you decide to make, roll out the clay to ¼ inch thickness. My mother is a bird lover, so I shaped some light blue clay into a bird shape and added a darker blue for the wing. Using a small circular clay cookie cutter, I cut out a circular shape and a heart shape. The heart shape I added very small balls of clay to make a flower. Using the toothpick, poke a hole in the top of the charms for the jump ring. Place on a cookie sheet line with white paper and bake for 15 minutes at 275 degrees. Allow to cool completely. 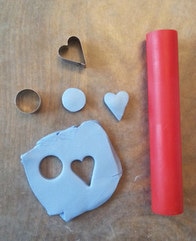 Decide how you want to accentuate your charms. I wanted my mother’s initial on the circular charm and I wanted a rhinestone for the birds eye and rhinestones on the wing. Place a drop of E6000 slightly smaller than the rhinestones and using a wax tipped tool, gently press into the glue. Allow to dry for 24 hours. 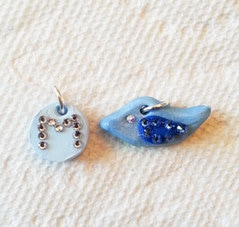 Open up a jump ring, insert it into the hole in your charm and close the jump ring. Depending in the style of your slide bangle bracelet, you may need to add another jump ring. Open your bracelet and slide on your charms. 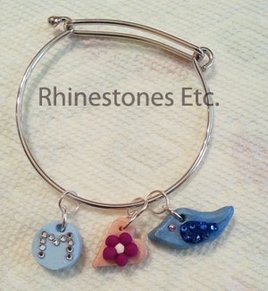 Your mother will love her new bracelet and for years to come, you can continue making her personalize unique charms to add to her bracelet.
Rhinestones and wax tipped tool are available from: www.RhinestonesEtc.com Easter Egg Craft The right centerpiece can add a touch of elegance to your table for your holiday gathering. In my last blog, I showed you how to make colorful sparkle Easter eggs. In this tutorial, I will show you how to make Easter eggs with a more Victorian look. For this project I used: Plastic eggs Gesso ( a paint primer) Paint brush Clear sparkle glitter Lace/ribbon 16ss and 10ss white half pearls E6000 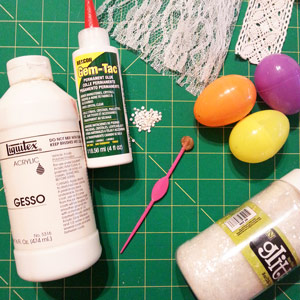 Begin by painting the plastic eggs with Gesso. Gesso is a paint primer that is available where ever art supplies are sold. You can either use white paint over the Gesso or as I did, paint several coats of Gesso on the eggs allowing each coat to dry completely. When painting the last coat, sprinkle the clear glitter on the wet paint and allow to dry.  Cut a piece of ribbon/lace to fit around the egg. Initially, I used Gem Tac but for some reason this glue which normally dries clear, dried yellow. E6000 worked better so I switched to using that. Glue the ribbon/lace along the seam of the egg. Allow to dry. When dry, glue pearls onto the ribbon/lace. Place a drop of glue slightly smaller than the pearls and using your wax tipped tool or tweezers, place the pearl in the glue and gently press down. Continue gluing pearls until your eggs are embellished. Allow to dry completely. 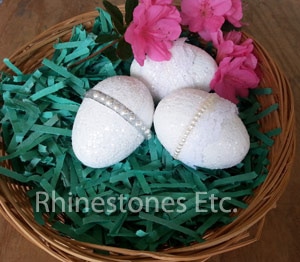 Perfect to add to your collection or start a new dazzling one. These eggs are sure to add a touch of elegance to your table.
Half pearls are available from: www.RhinestonesEtc.com Easter Egg Craft My kids and I love to color Easter eggs, each of us trying to make the most artistic looking one. The trouble is our beautiful eggs will get eaten. These beautiful eggs are made from plastic eggs you can buy at the dollar store and can decorate your table for many years. For this project I used: Plastic eggs Acrylic Gesso (a paint primer) Acrylic craft paint E6000 Crystal rhinestones Wax tipped tool 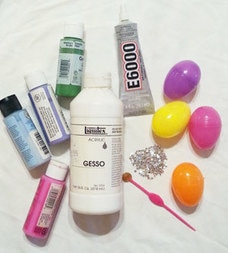 Paint the plastic eggs with Gesso and allow to dry completely. You may need to do several coats. Gesso is a paint primer prepares the surface for painting. It is available where ever art supplies are sold. 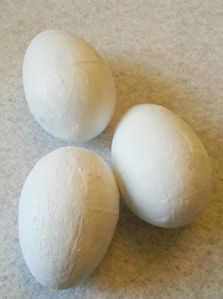 When completely dry, paint the eggs with your favorite color using acrylic craft paint. Allow to dry completely. 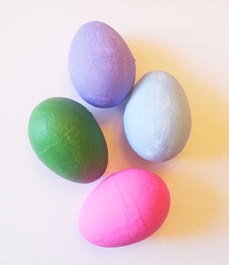 Decide on how you want to embellish your eggs. I chose several different patterns. You can use chalk to make marks to guide you as you glue your rhinestones. E6000 tends to be gloppy, so I like to squeeze the tube slightly over a paper plate and scrape the glue with a toothpick, applying it to the surface of the egg. E6000 provides a strong bond, so I use a drop of glue slightly smaller than the rhinestone. Using your wax tipped tool, pick up a rhinestone and place it in the glue, gently pressing down. Continue until your design is complete. Allow to dry for 24 hours. 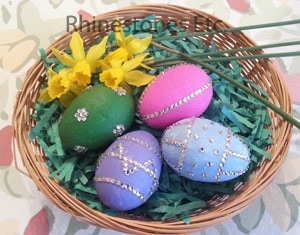 Easy to make and beautiful to look at, this striking table centerpiece will be the finishing touch to your Easter table.
Rhinestones and wax tipped tool are available from: www.RhinestonesEtc.com Valentine's Day Craft Sometimes, the simplest things can mean so much to someone. With Valentine’s Day just around the corner, a simple gift can show that special someone how much they mean to you. For this project I used: 1 heart glass shaped bottle 12ss Light Siam flat back rhinestones 30ss Crystal Rhinestones E6000 Silver ribbon 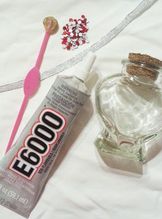 There are several tools on the market that help apply adhesives such as E6000 which tends to be sort of gloppy. I like to squeeze it out over a paper plate and scrape the glue up with a toothpick to apply it. Begin by placing a drop of glue on the glass bottle. Using the wax tipped tool, pick up a rhinestone and gently press it into the glue. 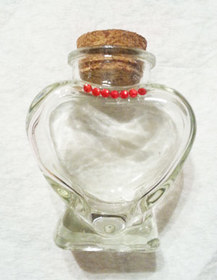 I began at the top of the bottle and covered the outside edges of the bottle with some swirl pattern in the inside. 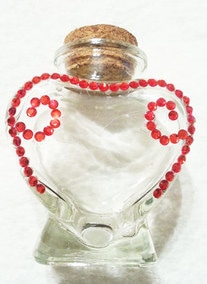 Then I glued some large 30ss crystal rhinestones in among the swirls. Allow to dry for 24 hours. 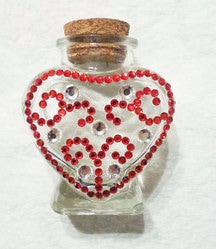 Cut a pieces of silver ribbon about 4 inches long and tie a bow at the top. Fill with small candy such as MMs in Valentine’s Day colors. 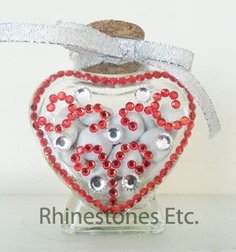 This is a simple gift that is easy to make yet will have such heartfelt meaning to the person you give it to.
Rhinestones and wax tipped tool are available from: www.RhinestonesEtc.com
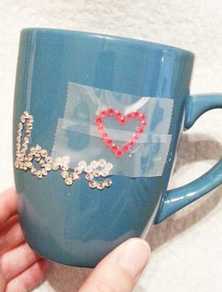
Give your favorite coffee drinker a beautiful bling coffee mug this Valentine’s Day! While purchasing a blinged out coffee mug is expensive, you can create one with a few supplies. Even if you’ve never glued rhinestones before, our step-by-step instructions make this project super easy.
Gathering Your Bling Supplies Remember your elementary school days when you handed out a Valentine’s Day card to all your friends? Letting your friends know how you feel about them doesn’t stop when you're older. Furthermore, Valentine’s Day is the perfect day to let a friend know how much you care. When beginning a bling project, you’ll have to decide on the type of rhinestone you want to use. Manufacturers make acrylic, glass, and crystal rhinestones. While acrylic rhinestones are the cheapest, they also have the least amount of sparkle. Next, you need to decide on your rhinestone color and size. Most rhinestone manufacturers create a large variety of hues. Usually, you can find standard colors, AB, and opals. Generally, manufacturers sort rhinestone sizes by the “ss” designation. Typically, retailers will provide a rhinestone size chart that converts ss to millimeters. Sometimes, you may want to use a larger rhinestone, other times a smaller one. For instance, using a smaller rhinestone for a large area will take you longer and require more stones. However, smaller rhinestones work better when creating initials or words. Finally, you’ll need glue to permanently adhere the rhinestones to the mug. Typically, you can find several rhinestone adhesives at your craft store. Always check the manufacturer’s instructions to make sure the glue is compatible with your project, dries clear, and is washable. For example, E6000 provides a strong bond, especially when gluing to ceramic. However, the manufacturer doesn’t recommend using it with acrylic rhinestones. This includes resin and jelly which are a type of acrylic. 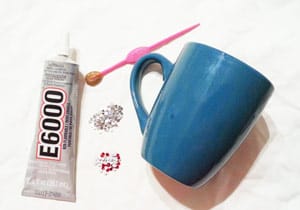
Steps to Make A Bling Coffee Mug
To make this blinged out project I used:

Many times, I like to use some sort of template to keep my design centered and even. Although a Cricut machine can do this easily, it’s also expensive. Thus, I began by sketching my design out on graph paper to keep my design symmetrical. To complete my design, I glued the word “love” and the symbol "heart" separately.
Once I finished drawing my design, I placed a piece of wax paper over it. The wax paper is opaque and will still let you see the underlying sketch. Next, I laid out the crystal rhinestones on the wax paper following the lines of my design. 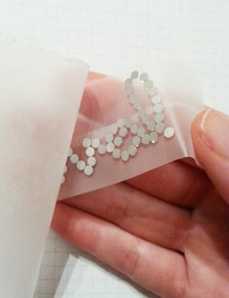
Now, I had to transfer my design to create my bling coffee mug. Using scotch tape keeps the rhinestones in place and allows me to place glue on the backsides. For this project, I used two pieces of thick tape, slightly longer than my design. Place the tape over the rhinestones, pressing down to make sure each one sticks to the tape. Then, peel the tape away from the wax paper.
Accordingly, I could now flip over the rhinestone design and apply my adhesive. I placed a drop of E6000 slightly smaller than the rhinestones on each of the rhinestones. Centering my design on the coffee mug, I taped the rhinestone design to the coffee mug. Before moving on to create the heart, I allowed the glue to dry for 24 hours. 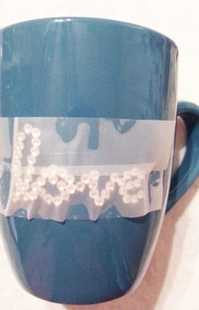
After 24 hours, I peeled the tape off the mug. Then, I repeated the process for the heart, again allowing the glue to dry for 24 hours. Once again, after the glue had dried, I peeled off the remaining tape.
A Bling Coffee Mug Makes A Great Gift
You can fill the mug with packets of flavored hot chocolate, tea, or coffee. Then, wrap it in clear cellophane paper, tie it with a ribbon, and you're ready to give your gift! Moreover, you can create other designs like initials. Your friend will love this and think of you every time she sips her favorite beverage. 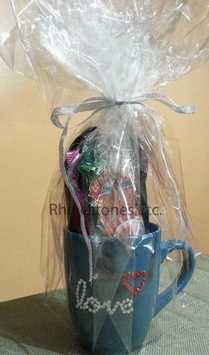
Of course, blinged out drinking vessels are not microwaveable or dishwasher safe. In addition, never leave them soaking in water.
Plus, when you need rhinestone supplies, view Rhinestones Etc. huge selection of colors and sizes. Plus, We have fast processing times so you get your embellishments fast. Rhinestone embellished picture frame Finding the perfect gift for Valentine’s Day can be challenging especially when you want to give something personal. Why not decorate a picture frame to not only make it personalized, but also use it to capture your favorite moment of the two of you together. For this project I used: 1 picture frame 9ss Light Siam Rhinestones 10ss Crystal Rhinestones E6000 Wax tipped tool 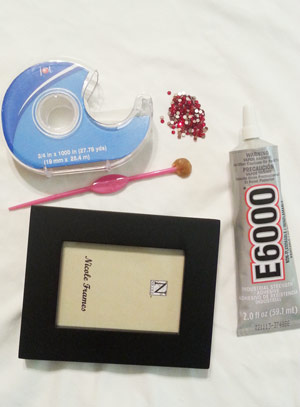 I find it difficult to glue rhinestones symmetrically when doing it freehand. An easier way is to lay a piece of wax paper over graph paper and lay the rhinestones out on the wax paper. The graph paper helps to keep your design symmetrical. Once your design is complete, carefully tape the rhinestones with scotch tape and peel off the wax paper. 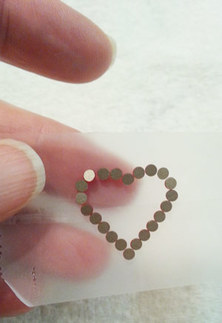 Place a drop of glue on the back of each of the rhinestone slightly smaller than the rhinestone and tape to the picture frame. Allow to dry for 24 hours. 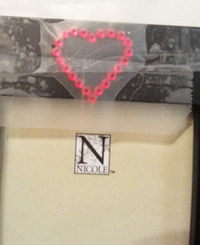 After 24 hours, remove the tape. I wanted to add a little something more to the design and this I did freehand, although the same method of taping can be used. 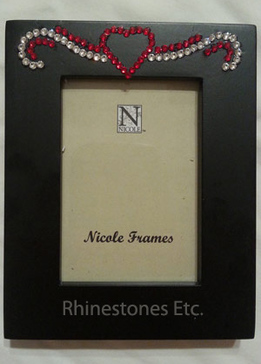 Now you have the perfect way to remember your favorite moment with your loved one for years to come.
Rhinestones and wax tipped tool are available from: www.RhinestonesEtc.com How to make a yarn Christmas tree Each year, the day after Thanksgiving, my kids beg me to take out our Christmas decorations to display around the house. Maybe it’s because decorations add that touch of festivity and magic, they look forward to decorating the house each year. This year, I’ve added a new one to our collection. This Christmas tree is easy to make and can be customized to fit any Christmas theme For this project I used: Green yarn White glue (any brand will do) Paper plate Plastic knife Cone shaped Styrofoam (the one I used was about 10 inches long) Aluminum foil Tape Gem Tac Crystal AB 10ss rhinestones Wax tipped tool 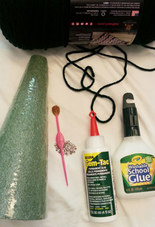 Begin by wrapping the Styrofoam cone with aluminum foil, taping the ends together. 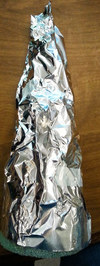 I found it easier to start with shorter pieces of yarn, between 12-14 inches. As I added layers of yarn, I used longer pieces of about 24 inches long. The yarn needs to be saturated with white glue and this can be done different ways. You can squeeze the glue into a bowl and mix the yarn in or as I did, place the yarn on a paper plate squeeze glue along the length of the yarn, scrape with the plastic knife and repeat until the yarn is good and gluey. Wrap the gluey yarn around the aluminum covered cone. 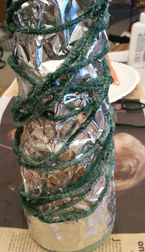 Continue adding gluey yarn until cone is nicely wrapped. I found it easier to do this in several layers, letting each layer dry completely. 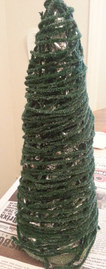 Slide the tree off the Styrofoam form and remove the aluminum foil. 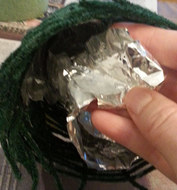 Using Gem-Tac, add Crystal AB 10ss rhinestones randomly along the tree. Place a drop of glue about the size of the rhinestone anywhere on the tree. Using the wax tipped tool, pick up a rhinestone and gently press it into the glue drop. Continue gluing rhinestones until you are satisfied with the amount of sparkle. Allow to dry for 24 hours. 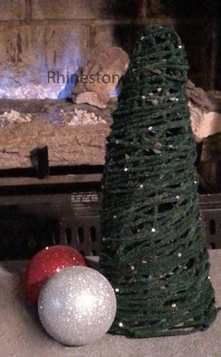 Now you have your very own handmade Christmas tree that can be easily personalized to fit in with any Christmas theme. On the mantel , bookshelf or as a table centerpiece, this will be a favorite for years to come.
Rhinestones and wax tipped tool are available from: www.RhinestonesEtc.com The glow of a candle creates an ambiance of warmth and coziness so it’s no wonder that candles are used as table centerpieces. This beautiful lace and rhinestone candle holder is the perfect gift to give to someone or keep for that special occasion centerpiece. Sometimes you just need a few simple things to turn something plain into something elegant and special. For this project I used: 1 glass votive holder White lace 12ss Crystal rhinestones Gem Tac Wax tipped tool 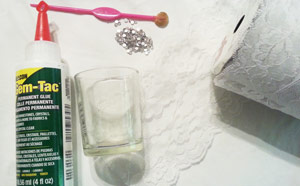 Begin by cutting a piece of lace that will fit around the glass votive with a slight overlapping. Using Gem Tac, glue the lace into place lining the lace up against the bottom edge. Allow to dry for 24 hours. 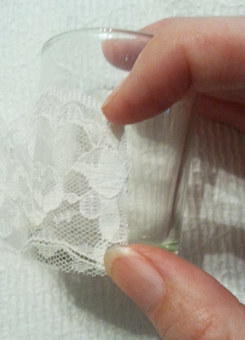 I liked the look of the rhinestones along the top edge of the lace but you can experiment and see what you like. Place a drop of glue about the size of the rhinestone along the top edge of the lace. Using the wax tipped tool, pick up a rhinestone and gently press it into the glue drop. 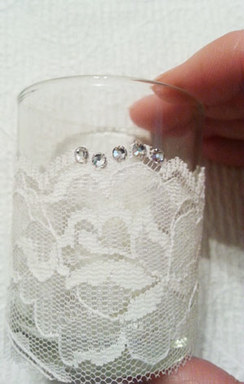 Continue gluing rhinestones until the upper edge is lined with rhinestones. Allow to dry for 24 hours. 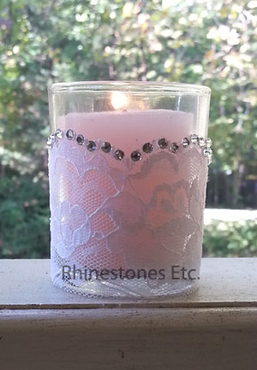 Perfect for any season or occasion, this lace and rhinestone glass votive holder is easy to make and pretty to look at.
Rhinestones and wax tipped tool are available from: www.RhinestonesEtc.com How to make a rhinestone Christmas Tree Ornament Growing up, there were certain ornaments on the Christmas tree that were special. Now that I am older, I still have special ornaments but they have different meanings, our first Christmas together, baby’s first Christmas or that High School Musical ornament that my daughter got when she was 8 and played the music over and over again, driving us all crazy. You can make this beautiful ornament and give to that someone special so that you will be remembered. For this project I used: 1 silver ornament Sapphire 12ss PriceLess Rhinestones Crystal 12ss PriceLess Rhinestones Gem Tac Wax tipped tool Chalk 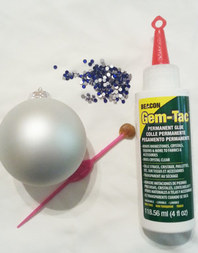 I like to lightly sketch the design on the ornament with chalk to use as a guide. When you are done gluing, you can easily wipe the chalk marks away. Once you’ve settled on a design, place a drop of glue about the size of the rhinestone on the guide chalk marks. Pick up a rhinestone using the wax tipped tool and gently press it into the glue. Don’t worry about keeping the design symmetrical and use the chalk lines as guides 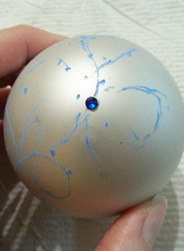 I added several crystal rhinestones scattered between the sapphire rhinestones. Allow to dry for 24 hours. Using a paper towel, wipe off any stray chalk marks. 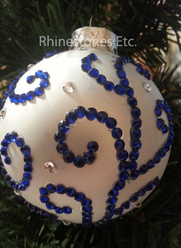 Now you have your own special ornament to build memories around! Rhinestones and wax tipped tool are available from: www.RhinestonesEtc.com Do you want to get started on a rhinestone ornament project? Browse our online store to find your colors,
|
KarenI have been adding bling for over 20 years. Through my projects, I hope you find inspiration. Categories
All
Archives
February 2024
|

 RSS Feed
Home About Policies Return Shipping
Contact Us Size Chart Privacy Products Reviews
Copyright 2024 Rhinestones Etc. All rights reserved.
Contact Us Size Chart Privacy Products Reviews
Copyright 2024 Rhinestones Etc. All rights reserved.