|
Simple diy washer bracelet Washer jewelry is the latest craze, combining simple washers with beads or rhinestones to create beautiful pieces with a unique flair. Previously, I created a simple washer bracelet and was so enthralled by the finished result that I decided to craft another creation based on this popular trend. My sister’s 50th birthday is coming up and wanting to make her a special gift, I came up with this elaborate design. For this project I used: Washers (#8) 12 mm Purple hemp cord E6000 Fuchsia 12ss rhinestones Cord end caps 2 4 mm jump rings Lobster clasp Wax tipped tool or tweezers Jewelry pliers  Cut 2 pieces of hemp cord about 12 inches in length. I like my bracelets 7 inches in length, so I used 12 washers. Thread one piece of the hemp cord through the washers. In order to get the washers to lay flat, you want to thread the next washer from the same exit location as the previous one. So for example, the thread exits the washer from the bottom, you'll thread the next washer from the bottom. When the thread exits from the top, you'll thread the next washer from the top (see the photo below). 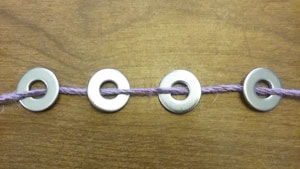 Take the second piece of hemp cord and thread it through the washers opposite the first piece of cord.. So if the first cord is on top, the second cord should be threaded underneath the washer. The next washer will be threaded from the same place as the exit location of the previous washer, same as you did for the first cord. 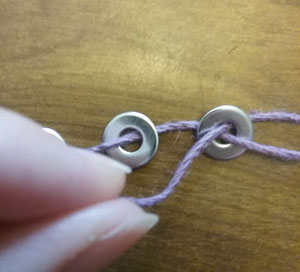 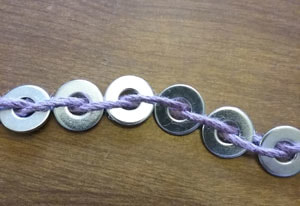 To keep the washers from sliding along the cord, take the end and thread it through the last washer again. 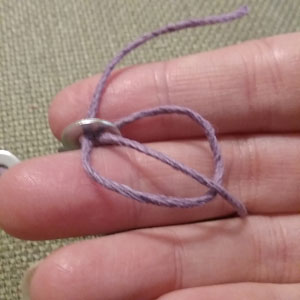 Measure the bracelet to the correct length and cut off the excess cord. Attach a cord end cap to each end. At one end, attach a jump ring and lobster clasp. You may also want to attach a jump ring to the other end. Lay the bracelet flat. I use E6000 to attach rhinestone to metal because of the strong bond it makes; however, some people don’t like to use it because of the warnings. Always glue in a well-ventilated area and follow the manufacturer’s instructions. Since E6000 tends to be gloppy, I squeeze a small amount over a paper plate and using a toothpick apply glue to the surface slightly smaller than the rhinestone. Then using a wax tipped tool or tweezers, pick up a rhinestone and gently press it into the glue drop. 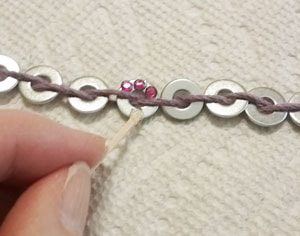 I glued 3 rhinestones above the cord, and three below it. 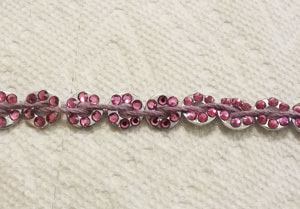 Allow to dry flat for 24 hours. 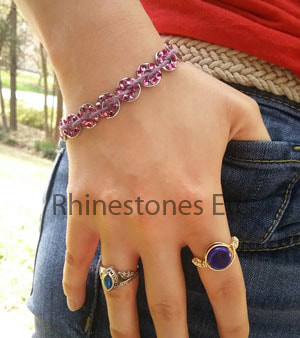 Keeping up with the latest fads is simple and inexpensive when you have crafty hands and can craft your own creations! Suitable for everyday wear, or compatible with your favorite evening dress, stay in style with this lovely washer bracelet!
Rhinestones and wax tipped tool are available from: www.RhinestonesEtc.com
0 Comments
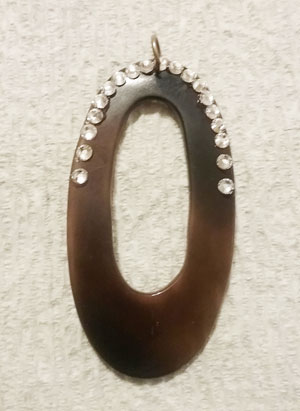
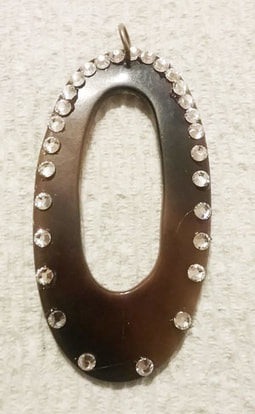
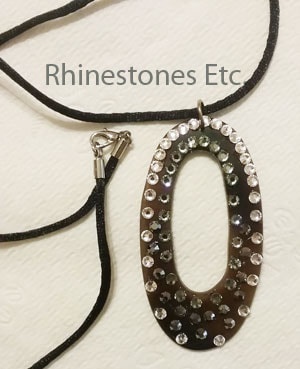
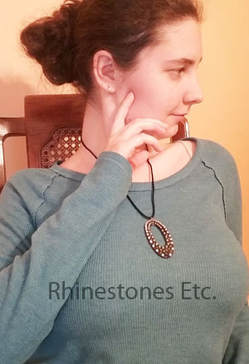
DIY Jewelry: How to turn an ordinary pendant into something extraordinary Rhinestones have the power to transform anything plain and ordinary into an eye-catching sparkly creation! After searching through the clearance rack at a craft store, I found this plain plastic pendant for only 1$. While a nice piece, that is nothing special about it until I decided to turn it into my next project and transform it into a blinged out pendant. For this project I used: 1 plastic pendant on clearance from the craft store E6000 12ss crystal, black diamond and jet hematite rhinestones Wax tipped tool or tweezers  The pendant is a dark brown color. I decided on a scatter pattern with crystal rhinestones outlining the outside edge of the pendant, black diamond outlining the inside edge of the pendant and jet hematite filling in the middle of the wider spaces between the crystal and black diamond rhinestones. E6000 creates a nice strong bond when gluing rhinestones to plastic so this is my adhesive of choice for this project. Make sure you use this glue in a well ventilated area and follow the manufacturer’s instructions. E6000 tends to be a bit gloppy so when I use E6000, I like to squeeze a bit over a paper plate and use a toothpick to scrape the amount of glue needed. I began with gluing all crystal rhinestones around the outer edge first. I began at the top placing the rhinestones touching and as I went down the pendant, spaced the rhinestones out from one another. Place a drop of glue slightly smaller that the rhinestone on the pendant and with the wax tipped tool or tweezers, pick up a rhinestone and gently press it into the glue drop.
I glued the black diamond rhinestones with the same spacing as the crystal: starting at the top placing the rhinestones next to each other and spacing the rhinestones out as I continued down the inside edge. 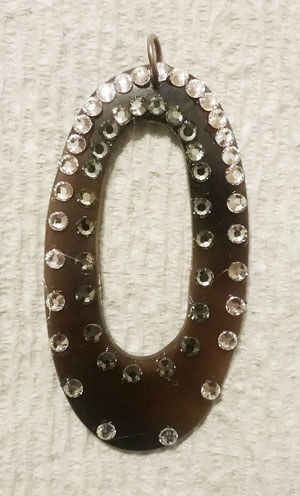 The pendant is wider on the sides and the bottom so there was some spacing that needed some sparkle. I glued jet hematite rhinestones in this area with random spacing between. When done gluing the rhinestones, allow to dry for 24 hours.
What a noticeable difference in pendants! The original piece was bland and boring, with no glamour but this new piece is fun, festive, sparkly and perfect for that casual outfit or formal dress that needs an extra touch of sparkle!
Rhinestones and wax tipped tool are available from: www.RhinestonesEtc.com How to Make a Rhinestone Washer Bracelet Christmas has passed, you’ve rung in the new year and now it’s January, freezing and icy. Need a little bling to put some sparkle back in your day? This rhinestone bracelet takes on the jewelry washer craze in a new and sparkly way. For this project I used: Washer size 8 (12 mm) E6000 Embroidery thread (any color to match rhinestones) 30ss rhinestones (any color to match embroider thread) Silver fold over crimp ends 6 mm jump rings Silver lobster clasps Jewelry pliers  Cut 2 pieces of embroidery thread 8 inches long. Use all six strands of the embroidery thread. Fold the thread in half to make a loop. Thread the loop through the hole in the washer and then thread the ends through the loop to secure to washer (a cow hitch knot). 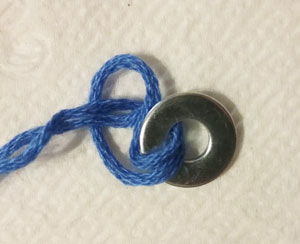 Repeat on the other side. With a toothpick, spread E6000 on the backside of a 30ss rhinestones and glue to the front of the washer. Allow a few minutes for the glue to set, then flip the washer over and apply a generous amount of E6000 in the hole of the washer/bottom of the rhinestone to secure. 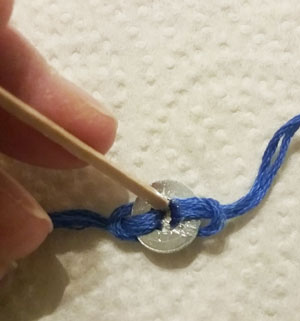 Let dry for 24 hours. Trim the ends of the embroidery thread. My bracelets fit comfortably at 7 inches, so I trimmed the ends so that my bracelets measured 7 inches including the length of the findings. Place the end of the thread in the fold over crimp ends. Be sure all the threads are underneath the first fold and then using the pliers, bend the first end over your thread end. Fold the second end over to secure your embroidery thread. 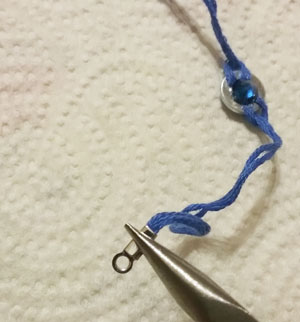 Repeat on the other side. Attach a lobster clasp at one end of the bracelet with a jump ring. 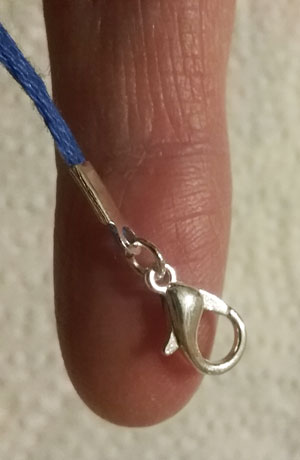 Look at how cute these diy washer bracelets are!  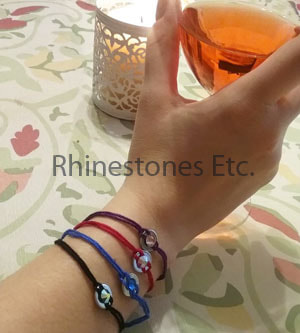 You can now sparkle your way through the year with your own unique washer bracelet.
Rhinestones are available from: www.RhinestonesEtc.com Bangle, tennis, charm, cuff, chain, or wrap are just some of the names of popular styles of bracelets. No matter which kind you love to wear, sparkly rhinestones can make your jewelry stand out. Although buying rhinestone jewelry can be expensive, you can make some beautiful pieces. For example, this rhinestone bracelet is easy to make and looks great. Bracelets Are an Important Accessory People have been wearing bracelets since ancient times, although the reasons for wearing them have changed. Sometimes, individuals wore these wrist accessories as amulets for protection or as a symbol of status and power. Today, women wear bracelets for several reasons:
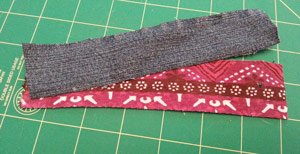
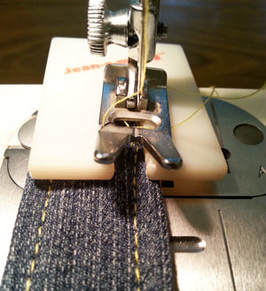
However, buying beautiful jewelry can be a budget buster. Instead, you can make your jewelry for a lot less. Moreover, instead of throwing out that old pair of jeans, you can recycle part of them into a fashionable accessory. Instructions For Our Rhinestone Bracelet For this rhinestone bracelet project you’ll need the following supplies: Old pair of jeans Sewing machine Needle and gold thread Buttons of various sizes and colors Assorted 30ss rhinestones E6000 Ribbon clamps Jewelry pliers 4- 4 mm jump rings Toggle clasp 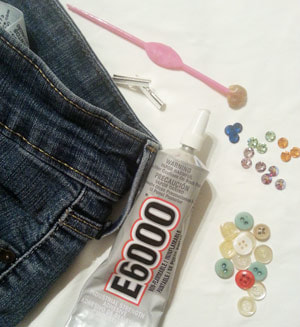 I began by cutting a piece of denim 7 inches long by 1.5 inches from an old pair of jeans. Of course, you can adjust the length depending on the size of your wrist. However, remember to make adjustments for the additional length of your clasp. You’ll want the long side to run the length of the leg and the short side across the leg. Using gold thread, stay stitch about ½ inch from the edge of your piece around the entire piece of denim. Then, gently pull one thread at a time from the piece on the length to achieve the fringe look. 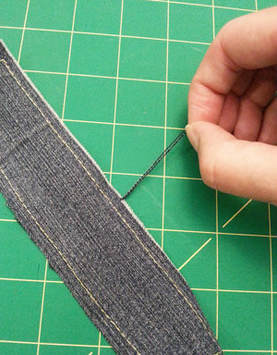 Continue doing so until you are about 1/8 of an inch from the stitching. Pick out some buttons from your assortments and stitch them onto the denim. You can follow a pattern or randomly place them. 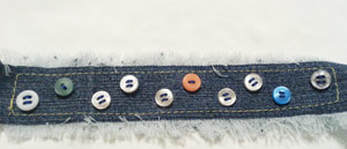 Once you have stitched all your buttons on, you are ready to glue on your rhinestones. Depending on the look you want to achieve, you can match or contrast the color of the buttons with rhinestones. Place a drop of glue slightly smaller than the rhinestone on the surface of the button. For this project, I used E6000, however, you can choose a different glue. You can read about gluing rhinestones to various surfaces here. 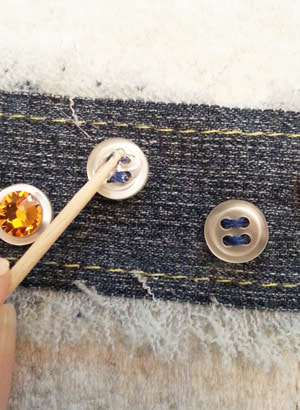 Using a wax tipped tool or tweezers, pick up your rhinestones and gently press it into the glue. Continue gluing rhinestones to buttons and when finished, allow to dry flat for 24 hours. Once dry, place a ribbon clamp on the short side of the bracelet. Using jewelry pliers, squeeze the clamp together. Repeat on the other side. 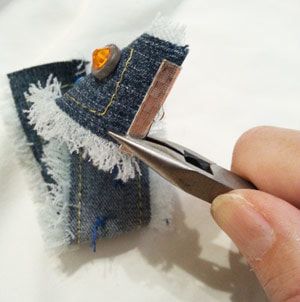 Then, using your jump rings, add your toggle clasp. Now you have a beautiful rhinestone bracelet to accessorize any outfit. Make a few using different rhinestone colors to match every outfit! 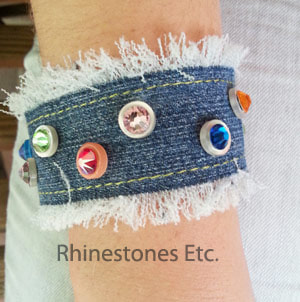 FAQ About Making Rhinestone Jewelry
Ready to make some jewelry but still have some questions? Below, we answer a few frequently asked questions. Can I Eliminate the Buttons and Glue the Rhinestones to Denim? Absolutely! You can glue rhinestones directly to denim and other types of fabric. What’s the Best Glue to Use? Generally, you’ll find many rhinestone glues at your local craft store. While most are multi-purpose, some do form stronger bonds on certain surfaces than others. Always check the manufacturer's guidelines before beginning any rhinestone project. Will Smaller Rhinestones Work Too? Yes. Just remember, the larger the rhinestone, the flashier the shine. Also, a beginner crafter may sometimes have difficulty working with smaller stones. Where Can I Buy Rhinestones? Since 2011, Rhinestones Etc. has been selling quality rhinestones. We have super-fast processing times, great customer service, and a huge selection of rhinestones. Browse our online store for a variety of colors, sizes, and quantities. How to make wire and rhinestone earrings Dare to be captivating at your next party! These do it yourself earrings are fresh and simple to make and add a boldness to your look. For this project I used: 12 gauge black wire Needle nose jewelry pliers 2 Ear wires E6000 2 16ss Fuchsia rhinestones 2 30ss Fuchsia rhinestones 2- 4 mm jump rings 2-8 mm jump rings 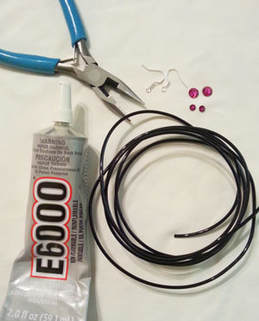 Cut a two pieces of wire 4.5 inches long. Carefully bend the pieces into ‘S’ shapes using jewelry needle nose pliers. 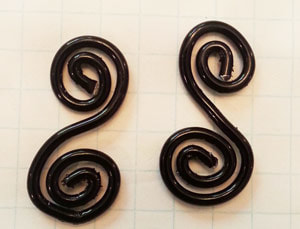 Jewelry makers will use a steel bench block for hammering wires to flatten them which I do not have. I used a DIY hack which worked for my purpose. I took 2 hammers, using the head of one as the bench block on which I gently hammered the wire to flatten it. 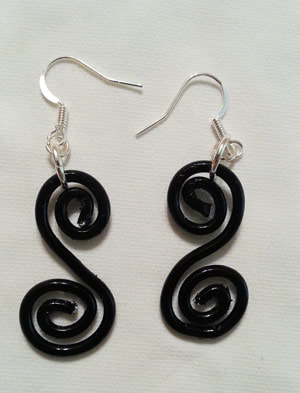 Attach the 8 mm jump ring to the flattened wire. Then use the 4 mm jump ring to attach the larger jump ring to the ear wires. Place a small drop of E6000 in the center of the top swirl. Using a wax tipped tool or tweezers, pick up a 16ss Fuchsia rhinestone and place it into the glue drop, gently pressing down. Repeat the process for the other earring. Place a drop of E6000 in the lower swirl and place a 30ss Fuchsia rhinestone in the glue, gently pressing down. Repeat for the other earring. Let dry flat for 24 hours. 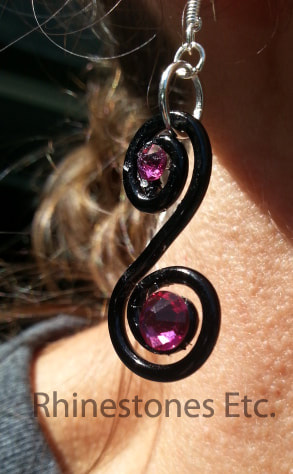 Bold, yet feminine and easy to make, do it yourself jewelry adds your own special touch of uniqueness to your style.
Rhinestones and wax tipped tool are available at: www.RhinestonesEtc.com Need help? Not sure where to begin? Download our guide to Gluing Rhinestones without Panic here. There is nothing worse than getting a hole in your favorite pair of jeans. Don’t throw them out! You can turn them into a stylish new denim and rhinestone bracelet. Accessorize Your Outfit with Rhinestone Jewelry Jewelry is an important part of any women’s wardrobe. The right piece can make you feel confident, beautiful, and stylish. while expressing your personality. When you accessorize with jewelry, you can add a pop of color giving your outfit a finished look. In particular, rhinestones jewelry adds some eye-catching sparkle. While a few years ago, women reserved rhinestone jewelry for formal wear, today you can wear rhinestones anytime. For example, add a chunky rhinestone necklace to your outfit to appear trendy. Or, stack a few rhinestone bracelets for an elegant and chic look. Moreover, many kinds of rhinestone jewelry are easy to make. So, you can make pieces inexpensively to fit your wardrobe. Below, we give instructions on how to make a casual, chic, rhinestone bracelet. Instructions to Make a Denim and Rhinestone Bracelet For this project I used: A pair of old jeans Scrap piece of cotton fabric Scissors (or cutting wheel and mat) Sewing machine (with jeans needle and yellow thread) 2 Ribbon clamps Jewelry pliers 3 -4 mm silver jump rings Toggle clasp White flat back pearls in sizes 34ss and 10ss Capri Blue rhinestones in sizes 16ss and 12ss Fern Green 12ss Rhinestones Gem Tac Wax tipped tool  Begin by cutting a piece from your jeans 7 inches by 1.5 inches. Cut a piece the same size from the scrap of cotton fabric.
Place the right sides of the fabric together. Using yellow thread and ¼ inch seam allowance, stitch one short end and both long ends together. Be sure to use a jeans needle. Clip the corners to reduce bulk and then turn the bracelet inside out. Fold under the short side raw edges to the inside and press with a hot iron. Sew a topstitch around the entire bracelet, ¼ if an inch from the edge. You might find it helpful to use a jean-a-ma-jig. The jean-a-ma-jig raises the presser foot making it easier to sew through thicker fabrics like denim.
Insert one of the shorter ends of the cuff into a ribbon clamp and using pliers squeeze to clamp. Then do the same for the other end. 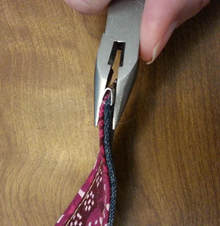 Add a 4 mm jump ring to each ribbon clamp. Then add a jump ring to the toggle clasp and 2 jump rings to the bar part of the clasp. I chose a flower design with pearls at the center of the flower surrounded by Capri Blue rhinestones. In the center, I placed a white 34ss half pearl. Then I surrounded this by 5 evenly spaced 12ss rhinestones. Around these, I placed 16ss rhinestones. For the smaller flowers, I used 4 -10ss flat back white pearls surrounded by 5 evenly spaced 12ss rhinestones. I used the Fern Green 12ss rhinestones in a “wave” between the flowers with a single green rhinestone in between. 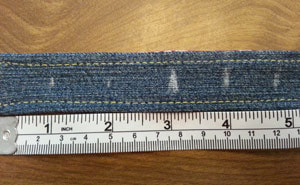 Using a piece of chalk and a ruler, mark the center of the bracelet and then one-inch marks from the center to the edges. These marks will be where you glue the pearls. Place a drop of Gem Tac slightly smaller than the rhinestones on the bracelet. With the wax-tipped tool, pick up a pearl and gently press it into the glue drop. Gently press a rhinestone into the glue drop allowing some glue to ooze slightly around the edges of the pearl. This prevents the embellishment from peeling off. Continue gluing pearls and rhinestones 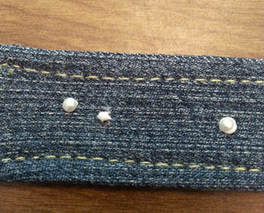 Let your bracelet dry flat for 24 hours 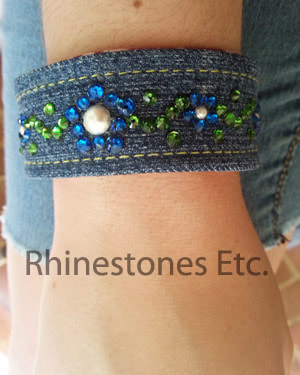 Super easy and fun! This is a great way to recycle those old jeans and make a stylish bracelet.
Rhinestones Etc. has a great selection of rhinestones in various size packages. We have fast shipping and great customer service. How to glue rhinestones to a metal bangle Ready to show off your patriotic spirit? Don’t have anything patriotic to wear? No problem we got you covered! Follow our simple instructions to learn how to make your own one of a kind patriotic bracelet. For this project I used: 1 metal bangle 12ss Light Siam, Crystal and Sapphire rhinestones E6000 adhesive Wax tipped tool 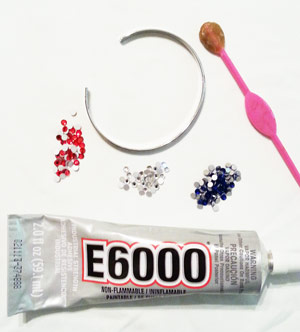 After measuring out the length of the bracelet, I decided I wanted to do 3 rhinestones of each color. I located the center and started with the crystal rhinestone. E6000 tends to be sort of gloppy so when I use E6000, I squeeze a bit over a paper plate and then scrape a small amount of glue with a toothpick. I then apply this glue onto the surface of the metal bangle. Using the wax tipped tool, pick up a rhinestone and gently press it into the glue. 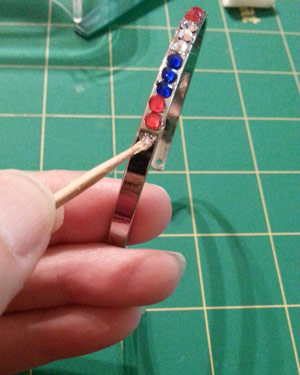 Continue gluing rhinestones around the bracelet and then allow to dry for 24 hours. 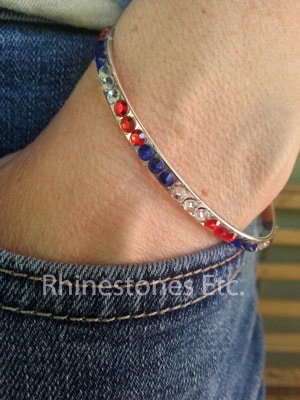 Fun , fashionable, and patriotic. This bracelet is perfect to wear anytime not just for the Fourth of July.
Rhinestones and wax tipped tool are available from: www.RhinestonesEtc.om DIY Mother's Day Gift Mother’s Day is fast approaching and as it nears, it is time to start thinking about the perfect Mother’s Day gift. I like to give my mother personal and meaningful gifts. A slide bangle bracelet with homemade charms is both personal and stylish. In addition, adding rhinestones to the charms to accentuate it makes the gift even more special and personalized. For this project I used: 1 slide bangle bracelet Sculpey clay 8 mm jump rings E6000 Wax tipped tool Toothpick Small clay shape cookie cutters 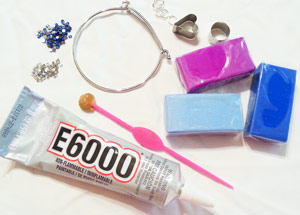 There are many great ideas for making clay charms. Whatever you decide to make, roll out the clay to ¼ inch thickness. My mother is a bird lover, so I shaped some light blue clay into a bird shape and added a darker blue for the wing. Using a small circular clay cookie cutter, I cut out a circular shape and a heart shape. The heart shape I added very small balls of clay to make a flower. Using the toothpick, poke a hole in the top of the charms for the jump ring. Place on a cookie sheet line with white paper and bake for 15 minutes at 275 degrees. Allow to cool completely. 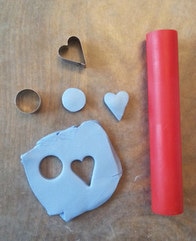 Decide how you want to accentuate your charms. I wanted my mother’s initial on the circular charm and I wanted a rhinestone for the birds eye and rhinestones on the wing. Place a drop of E6000 slightly smaller than the rhinestones and using a wax tipped tool, gently press into the glue. Allow to dry for 24 hours. 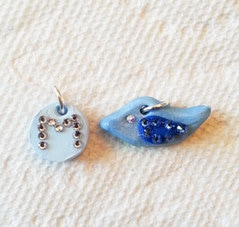 Open up a jump ring, insert it into the hole in your charm and close the jump ring. Depending in the style of your slide bangle bracelet, you may need to add another jump ring. Open your bracelet and slide on your charms. 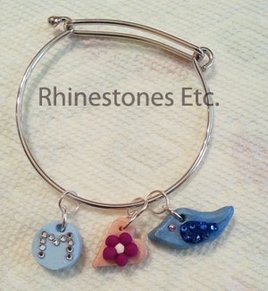 Your mother will love her new bracelet and for years to come, you can continue making her personalize unique charms to add to her bracelet.
Rhinestones and wax tipped tool are available from: www.RhinestonesEtc.com Do it yourself jewelry Feeling a little edgy and bold? Want to turn heads at your next event while still displaying a bit of sparkle? For this project I used: 12 and 24 gauge black wire Amethyst and Crystal 12ss rhinestones Hammer Wire cutters Jewelry pliers E6000 Ribbon  Begin by cutting two pieces of the 12 gauge wire about 12 inches long. Cut 3 smaller pieces about 3 ½ -4 inches long. Jewelry makers will use a steel bench block for hammering the wire which I do not have. I used a DIY hack which worked for my purpose. I took 2 hammers, using the head of one as the bench block on which I hammered the wire. 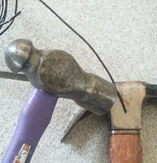 Using the needle nose jewelry pliers, bend the ends of the longer pieces to form a small semicircle facing back to the wire so that the ends are tucked under. Hammer these longer pieces until flat. Then shape into a circle about 5 inches in diameter. Shape the shorter pieces into “s” shapes and then hammer them flat. 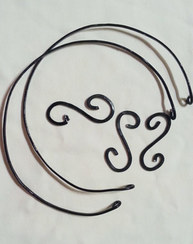 Cut pieces of the 24 gauge wire about 2 inches in length. Attach one of the “s” shapes to one of the longer wires placing it at of the center and wrapping the 24 gauge wire around the 12 gauge wire. Do the same for the other pieces. Then attach the “s” shapes to the remaining 12 gauge wire. Finally, wire wrap the ends together of the longer pieces. 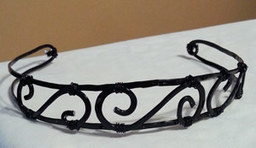 Place a drop of E6000 about the size of the rhinestone on the flattened wire. Using a wax tipped tool, place a rhinestone in the drop of glue, gently pressing the rhinestone into the glue drop. Continue gluing. Allow to dry for 24 hours. Slip a ribbon in the ends of the choker to be able to tie around the neck.  And there you have it! A sophisticated, yet edgy look! Go ahead try this idea and make your fashion statement today!
Rhinestones and wax tipped tool are available from: www.RhinestonesEtc.com Make your own rhinestone earrings A stunning piece of jewelry can enhance any outfit and make you feel like a million dollars but your jewelry piece should not empty your wallet. These earrings are simple to make, look expensive and you don’t need any jewelry making experience. For this project I used: A pair of oval shaped craft wood pieces (found in most craft stores) approximately 10 mm x 26 mm Small drill bit (approximately 1 mm in diameter) and/or awl Silver metallic craft paint Silver jump rings – 4mm and 8 mm Ear wires Gem Tac 9ss Light Siam rhinestones 10ss Crystal Rhinestones 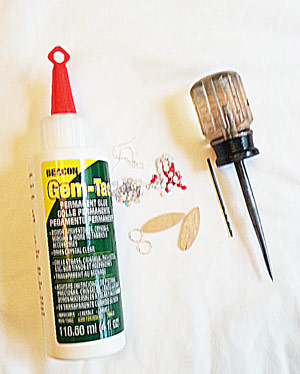 To begin, you need to make a hole in the top of the wooden oval shapes. I tried several methods. I found that you can use an awl but if you apply too much pressure, the wood will crack. If you apply slow steady pressure, you can make a hole without cracking it. I found it easier though to hand drill a hole using a small drill bit. I placed a block of wood underneath the wood shape and applying slow even pressure with the on the drill bit, I rotated the wooden shape until I was through to the other side. 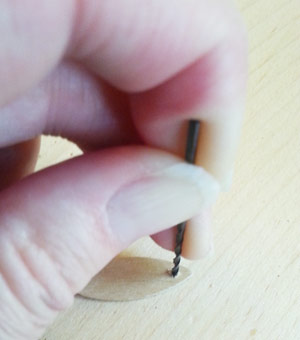 I wanted my earring to have a metallic look so next I painted the shapes with silver metallic craft paint. I painted several coats letting each coat dry completely. When the paint was dry, I inserted a 8 mm jump ring into each hole. To keep the earrings from facing the back, I added a 4 mm jump ring and then earring wires. 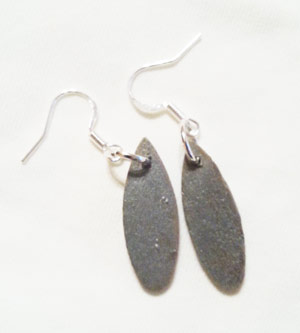 You are now ready to glue on your rhinestones. Begin at the bottom of the earring by placing a drop of glue about the size of the rhinestone. Using your wax tipped tool, pick up a rhinestone and gently press it into the glue drop. Continue gluing until your shape is covered in rhinestones. Allow to dry for 24 hours. 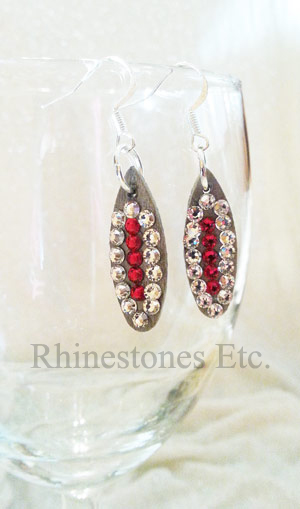 Just a turn of your head will send out shimmers of sparkle and you will feel like a million dollars!
Rhinestones and wax tipped tool are available from: www.RhinestonesEtc.com |
KarenI have been adding bling for over 20 years. Through my projects, I hope you find inspiration. Categories
All
Archives
July 2024
|


 RSS Feed
Home About Policies Return Shipping
Contact Us Size Chart Privacy Products Reviews
Copyright 2024 Rhinestones Etc. All rights reserved.
Contact Us Size Chart Privacy Products Reviews
Copyright 2024 Rhinestones Etc. All rights reserved.