|
I never pass an opportunity to pick through the clearance bins at the craft store. I found this wooden pendant for 25 cents. I wasn’t sure how to embellish it. My daughter said steam punk but I didn’t see it. I kept coming back to it and finally something clicked. For this project I used: 1 wooden pendant 34ss white flat back pearls 10ss white flat back pearls Gem Tac Wax tipped tool 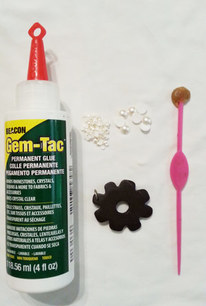 I began with gluing the 10ss pearls around the center hole. I placed a drop of glue about the size of the pearl on the pendant and placed a pearl in the glue drop, gently pressing down. 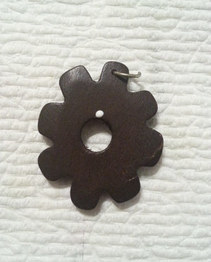 Continue gluing around the center hole. 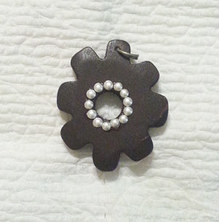 Next, I glued the 34ss. 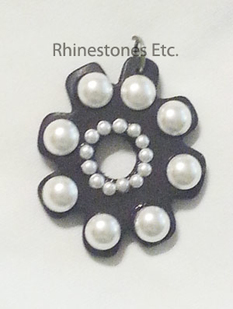 Breathtakingly simple, flat back pearls add a touch of elegance that will accessorize any outfit and the best part, no one will have seen anything like it before. 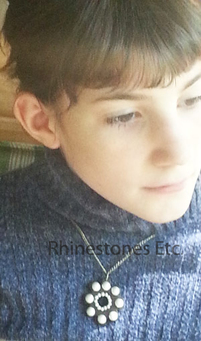
0 Comments
I picked this round pendant up for 25 cents on clearance. It has some interesting texture to it, but nothing that really grabs your attention. With some glue and rhinestones, this will become something spectacular! For this project I used: 1 round pendant E6000 Wax tipped tool 4 – 30ss Black Diamond Rhinestones 4- 20ss Comet Argent Light (silver) Rhinestones 16 – 12ss Crystal Rhinestones 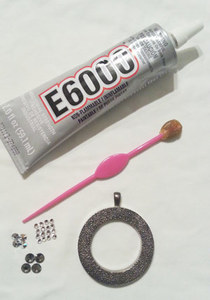 So believe it or not, this was my first attempt at using the adhesive E6000. I have tended to stay away from using it because you cannot get the same control out of the tube that you can with Gem Tac. Since most of my experience has been with fabrics, Gem Tac has always been my choice of adhesives. For this project, I am gluing to metal and E6000 it better at adhering than Gem Tac. I used a toothpick to help spread the glue and it was easier than I anticipated. Squeezing just a slightly at the bottom of the tube, I applied a drop of glue about the size of the rhinestone on the pendant. I place the Black Diamond rhinestones at the 12, 3, 6, and 9 o’clock positions. 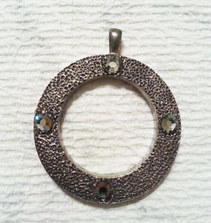 Next I applied the Comet Argent Light 20ss rhinestones halfway between the Black Diamond. 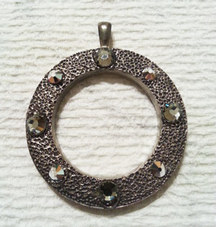 Finally, I added 2 crystal 12ss rhinestones, side by side between the Black Diamond and the Comet Argent Light Rhinestones. 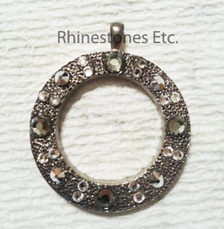 Gorgeous! Now you have something completely different than what you started with. This pendant is sure to get you noticed!  Does your jewelry collection have too many ordinary bracelets? How about adding some rhinestones to fit your unique style? After all, a girl can never have too many bracelets or too much bling, can she? Of course not! Here is a fun and quick way to glam up your wardrobe. For this project I used: Granite Sculpey clay Oval shaped cutter 15mm x 9mm 29 - 4 mm silver jump rings Jewelry pliers Toggle clasp (bar and ring) 30ss Crystal Rhinestones Gem tac Wax tipped tool or tweezers  Roll out sculpey clay to 1/4 of an inch thick. Using your cutter, cut out 9 ovals measuring about 7 inches long.  Insert a jump ring into the short end of each oval. Place on a white sheet of paper on a cookie sheet. Bake for 15 minutes in a 275 degree preheated oven. Remove from the oven and allow to cool. 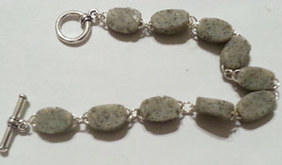 Using your jewelry pliers, open a jump ring, connect two ovals together and close the jump ring. Attach the ring and toggle at each end of the bracelet. 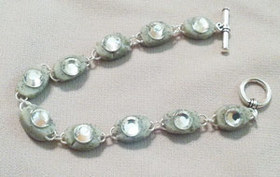 Place a drop of Gem Tac about the size of the rhinestone in the middle of the oval. Using your wax tipped tool, pick up a rhinestone and gently press it into the glue drop. Continue adding rhinestones onto each oval. Allow to dry flat for 24 hours.  Fabulous, easy and sparkly! What more can a girl want?
Rhinestones and wax tipped tool are available at: www.RhinestonesEtc.com Do you want to be notified of upcoming sales and new clearance, ? Would you like our free guide to Gluing Rhinestones without Panic? Subscribe to our newsletter by clicking here. In 1885, Russian Emperor Alexander III commissioned Faberge to craft a jeweled egg for his wife as an Easter gift. Alexander’s delight of Faberge’s work was the starting point of a tradition that scanned 32 years. You can create your own smaller version of a jeweled egg that will be the pendant and focal point of any outfit. For this project I used: Light blue sclupey clay 4 mmJump ring Varnish Paint brush 6ss crystal rhinestones 9ss Sapphire, tanzanite and rose rhinestones Gem tac Wax tipped tool or tweezers  Begin with a small ball of scupley clay about 3/4 inch in diameter. Shape it into an oval or egg shape. Press a jump ring into the top of the egg about halfway up the jump ring. Bake in a preheated 275 degree oven for 15 minutes. Remove from the oven and allow to cool. When cool, paint a coat of varnish on the egg and allow to dry. 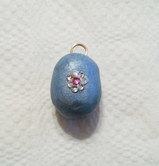 When dry, place a drop of glue about the size of the rhinestone and gently press a rhinestone into the drop of glue. Continue gluing rhinestones on one side of the egg. Allow to dry for 24 hours and then glue rhinestones on the other side. Allow to dry for 24 hours. 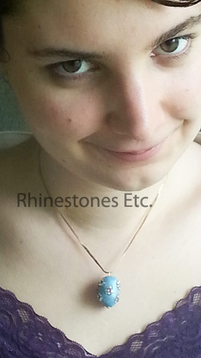 Thread a chain through the jump ring and your necklace is complete. Wear this anytime you want to add some sparkle.
Rhinestones and wax tipped tool are available from: www.RhinestonesEtc.com Do you want to be notified of upcoming sales, new clearance, contests and giveaways? Would you like our free guide to gluing rhinestones without panic? Subscribe to our newsletter by clicking here. Having a piece of jewelry that can take you from everyday to elegant is a great accessory. This easy to make bracelet can do just that. For this project I used: Black Accents Sculpey clay (Twinkle Twinkle) 14 – 12mm silver jump rings 1- 4 mm silver jump ring Silver bar and ring clasp 12ss and 30ss Crystal Rhinestones Gem tac Wax tipped tool or tweezers Exacto or plastic knife Poker tool or toothpick 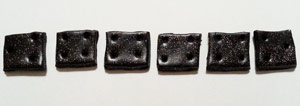 Begin by rolling out sculpey clay to 1/4 of an inch thickness. Using the exacto (or plastic) knife cut clay into 7 squares about 1 inch by 1 inch. Using the poker tool or toothpick, poke holes in each corner 1/8 – 1/4 of an inch from the end in 5 of the squares. In the other 2 squares, poke 2 holes in each corner and 1 hole into the middle of the opposite side. Place on a sheet of white paper and bake in a 275 degree preheated oven for 15 minutes. Remove and allow to cool. 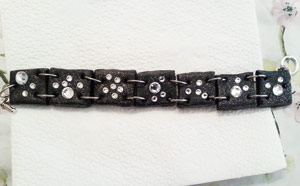 When cool, connect the square pieces together with the 12mm jump rings leaving the squares with 3 holes for the ends. Attach a 12mm jump ring to each of the squares on the ends. On one end attach the 4mm jump ring to the 12mm jump ring and on this end attach the bar. On the other end, attach the ring. Place a drop of glue about the size of the rhinestone on one of the squares and using the wax tipped tool or tweezers place the rhinestone in the glue and gently press down. Continue gluing rhinestones randomly on the black squares. Allow to dry flat for 24 hours. 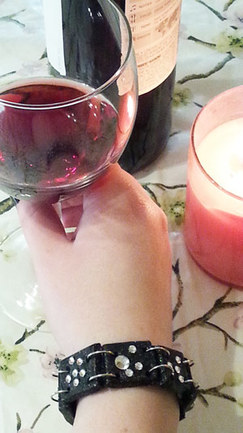 Fabulous with any outfit, your friends will be asking you about this bracelet.
Rhinestones and wax tipped tool can be purchase from: www.RhinestonesEtc.com Do you want to be notified of upcoming sales, new clearance, contests and giveaways? Would you like our free guide to gluing rhinestones without panic? Subscribe to our newsletter by clicking here. St Patrick is the patron saint of Ireland but On St. Patrick’s Day, everyone is Irish. So cook up some corned beef and cabbage with Irish soda bread. Celebrate the luck of the Irish with this emerald shamrock pin. For this project I used: Green Sculpey clay Pin 12ss Emerald Rhinestones Gem Tac Wax tipped tool Shamrock template 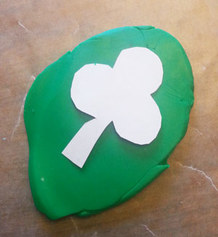 Roll out the green Sculpey clay to 1/4 of an inch thickness. Cut out shamrock shape using the template and an plastic knife. Place on a cookie sheet that has been lined with white paper. Bake in a preheated 275 degree oven for 15 minutes. Remove from the oven and allow to cool. 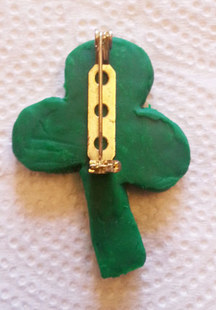 Once cool, place a drop of Gem Tac about the size of the rhinestone on the front of the shamrock. Using the wax tipped tool, pick up a rhinestone and place it in the drop of glue. Gently press down allowing the glue to cover the edges of the rhinestone. Continue placing glue drops and rhinestones until the shamrock is covered. Allow to dry for 24 hours. When the glue is completely dry, turn the shamrock over and using Gem Tac, glue the pin in place. Again, allow to dry for 24 hours. 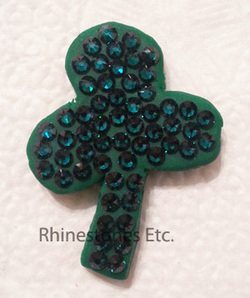 A beautiful glittering symbol of the Irish to help you celebrate!
Rhinestones and wax tipped tool are available from: www.RhinestonesEtc.com Do you want to be notified of upcoming sales, new clearance, contests and giveaways? Would you like our free guide to rhinestones? Subscribe to our newsletter by clicking here. Bold necklaces accentuate any outfit and help you to stand out from everyone else. This piece was inspired by contemporary jewelry pieces. For this project I used: Granite scupley clay 12mm silver jump rings 24 inch Silver jewelry chain Jewelry pliers (needle nose and round nose) Gem Tac 12ss and 30ss Crystal Rhinestones Wax tipped tool or tweezers 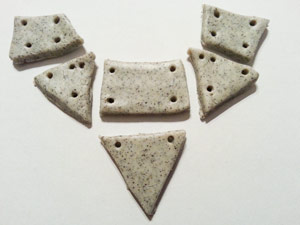 Begin by rolling out scupley clay to ¼ of an inch. Cut out shapes; I used rectangle, triangle and rhombus. Using a poker tool or toothpick, poke holes in the corners to be able to connect with jump rings after baking. Make sure the holes are wide enough to fit a jump ring. Place on a white sheet of paper on a cookie sheet and bake in a preheated 275 degree oven for 15 minutes. Remove and allow to cool. 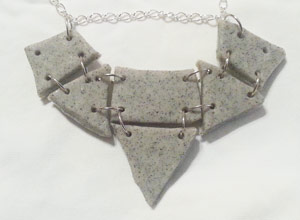 When cool, connect the pieces to each other using jump rings and then to the necklace chain. Place a drop of glue on the pendant slightly larger than the rhinestone you wish to glue and using the wax tipped tool or tweezer place in the glue drop. Gently press the rhinestone into the glue. Continue gluing until your necklace is embellished. Allow to dry flat for 24 hours.  Experiment with different shapes, sizes and colors! Whatever you decide to do, you will surely be making a statement.
Rhinestones and wax tipped tool are available from: www.RhinestonesEtc.com Do you want to be notified of upcoming sales, new clearance, contests and giveaways? Would you like our free guide to rhinestones? Subscribe to our newsletter by clicking here. Bangles are a beautiful accessory that originated in South Asia. Ranging from thick to thin, plastic to gold, plain to ornate, you will certainly make a statement when you wear one. For this project I used: Empty soda pop can White Sculpey clay 11 - 7 mm Silver Square Metal Trim 19 - 4 mm Silver Round Metal Trim 12ss Crystal Rhinestones Flat back Gem Tac Tweezers or wax tipped tool 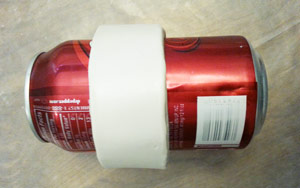 Roll out Sculpey clay to ¼ of an inch thickness, approximately 8.5 inches long and 1 inch in width. Lay the clay strip on an empty soda can and lay this on the side on a white piece of paper on a cookie sheet. Bake in a preheated 275 degree oven for 15 minutes. Remove from the oven and allow to cool. When cool, slide the bangle off soda pop can. 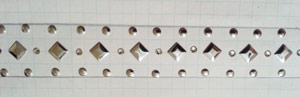 Using a piece of graph paper, outline the dimensions of the bangle. Lay the metal trim and rhinestones out on the graph paper. Once you are happy with your design, transfer the embellishments to your bangle. Begin by placing a drop of glue on the bangle and then place a piece of metal trim in the glue and press down. Continue until the pattern is completed on your bangle. Allow to dry for 24 hours.  You will feel beautifully accessorized every time you wear this bangle. And it is so easy to make, you’ll want to make several!
Rhinestones and metal trim are available from: www.RhinestonesEtc.com Do you want to be notified of upcoming sales, new clearance, contests and giveaways? Would you like our free guide to rhinestones? Subscribe to our newsletter by clicking here. Although it remains a mystery, it could be the skeleton key was so named because its resemblance to a skeletal figure with the circle at the top resembling a skull. Skeleton keys adorned with rhinestones make great pendants. Rather than buy a replica, why not make your own. For this project I used: Plastic mold (actually I used a plastic form found in daughter’s room while cleaning) Premo Sculpey clay - Antique Gold Gem Tac 12ss Crystal Rhinestones Various shaped clay cutters Tweezers or wax tipped tool 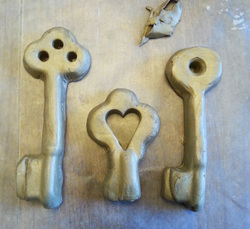 Press the clay into the forms. Gently remove the keys, reshaping as needed. Using clay cutters, cut out circles or heart shapes from the top circle of the key. Place on a piece of white paper on a cookie sheet and bake in a preheated 275 degree oven for 15 minutes. Remove from oven and allow to cool. 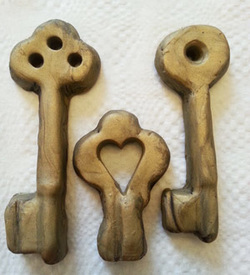 Using black acrylic craft paint that has been thinned with water, paint the sides and grooves of the keys to give it a more antique look. Allow paint to dry completely. 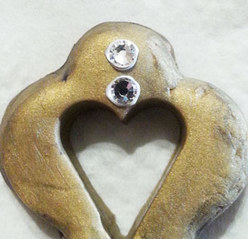 When the paint is dry, place a drop of Gem Tac on the key and press a rhinestone into the glue using tweezers or a wax tipped tool. Continue gluing rhinestones until you key is embellished. Allow to dry 24 hours. 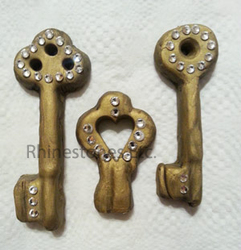 Unlock your sparkle every time your where this gorgeous pendant! Rhinestones and wax tipped tools are available from: www.RhinestonesEtc.com Do you want to be notified of upcoming sales, new clearance, contests and giveaways? Would you like our free guide to rhinestones? Subscribe to our newsletter by clicking here.  Diamonds may be a girl’s best friend, but rhinestones are for everyday. This rhinestone bracelet nicely accessorizes any outfit. For this project I used: 9 - 10 inch length of 1/8 inch leather strip Gem Tac Gold jewelry wire (I used 20 gauge) 2 gold 6mm jump rings Jewelry pliers (side cutters, needle nose, round) Tweezers or wax tipped tool 28 -12ss Crystal Swarovski Elements Rhinestones 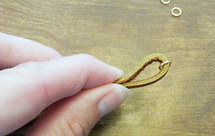 If you need a visual for this step, there are several good youtube videos showing how to add a lobster clasp to a leather cord. The one I like was this one: https://www.youtube.com/watch?v=oa-2iVV4fuw Cut a piece of gold jewelry wire about 7 inches long. Thread a jump ring through one end of the leather strip folding over the leather strip by about ½ of an inch. Leaving about 2 inches on the end, place your wire alongside your leather strip and begin making coils around your piece of leather, ending with both ends of the wire together. I made 3 coils but the number of coils will depend on the gauge of your wire. You will be making a knot so you need to thread the top wire underneath the coils so that now your wire ends are opposite. 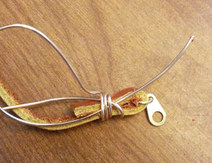 Pull the ends tight so that you have a nice tight wrap. Clip the wire ends as close as possible to the leather. Place a drop of Gem Tac on each wire end to secure. Repeat on the other end of the leather and allow to dry for 24 hours. You can attach your lobster clasp now if you have not already done so by opening up the jump ring, slipping in your clasp and closing your jump ring. 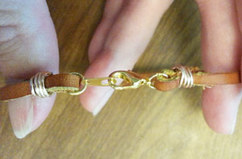 Lay the bracelet as flat as possible and place a drop of Gem Tac on the leather strip. Using a tweezers or wax tipped tool, place a rhinestones into the drop of glue and gently press the rhinestone down into the glue. Continue gluing rhinestones, spacing them evenly along the leather strip. Allow to dry for 24 hours. 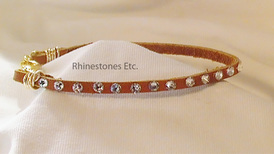 Beautiful sparkly bracelet that is sure to get you noticed! Make several and mix and match them to customize your look. Rhinestones and wax tipped tool are available from: www.RhinestonesEtc.com Do you want to be notified of upcoming sales, new clearance, contests and giveaways? Would you like our free guide to rhinestones? Subscribe to our newsletter by clicking here. 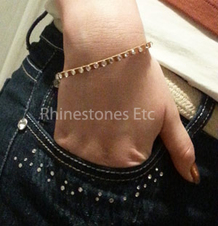 |
KarenI have been adding bling for over 20 years. Through my projects, I hope you find inspiration. Categories
All
Archives
February 2024
|

 RSS Feed
Home About Policies Return Shipping
Contact Us Size Chart Privacy Products Reviews
Copyright 2024 Rhinestones Etc. All rights reserved.
Contact Us Size Chart Privacy Products Reviews
Copyright 2024 Rhinestones Etc. All rights reserved.