|
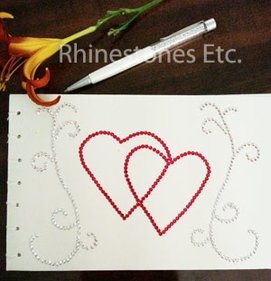
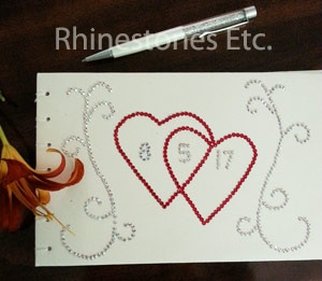
Your wedding is such a special occasion but very often passes by in a blur. Did you say hello to Aunt Sophie? Chat with your friends from college? A guest book is a great way to help preserve those memories. For this project I used: A watercolor book Cream colored card stock White card stock Glue White embroidery thread 12ss Light Siam rhinestones 10ss Crystal AB rhinestones Gem tack 1/8 inch hole punch I previously bound a book using a much simpler book binding method and you can view that here. The book binding method I used here turned out much more complicated but I chose it because I wanted a book that would sit flat when opened. You may want the easier method or you can even purchase a plain journal and decorate it with rhinestones as I show you below. 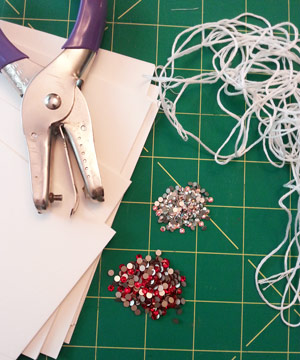 I purchased a watercolor book at my local craft store. And cut the pages down to 9 x 5.75 inches. You may want to purchase a smaller watercolor book and leave the pages uncut. Separate the pages. You will want to save both the cover and back for your book. 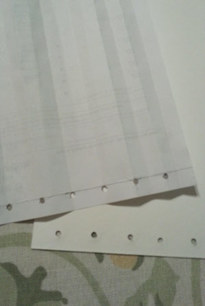 Take a plain piece of paper the same size as your watercolor sheets and fold it in half 3 times. On the short edge, measure ¾ of an inch and mark. Starting with the second fold, hole punch at the line. Continue punching holes at every other fold. Use this as a template and punch holes in your water color paper. 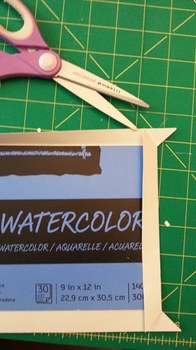 Cut a piece of the cream colored card stock 1 inch larger on each side than your cover. Glue the cover to the center of the card stock. Cut the corners on the diagonal, fold the corners to the inside and glue. Cut a piece of white card stock slightly smaller than the cover for the end paper and glue to the inside of the cover. 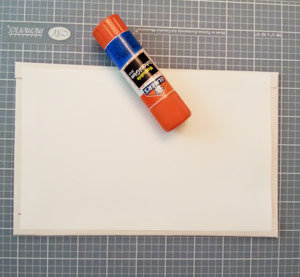 Let the glue dry and then punch holes in the front and end covers. The actual binding of the book is complicated so you may want to watch this youtube video which explains the process: https://youtu.be/04vt8YfT7XM I suggest using embroidery thread that is about 18 inches long, and I used short straight needles rather than the curved needles. 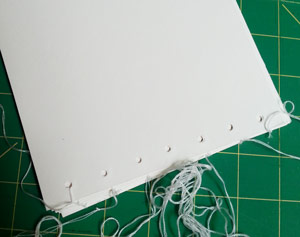 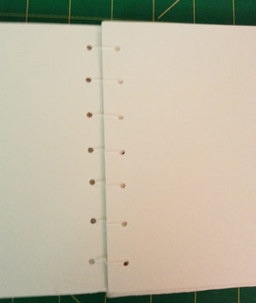 Once you are done with book binding, you can add your rhinestones. I like to use a template which I cut out of plain white paper. You can lay the template on the cover and with a pencil, lightly mark the design. When you lift off the template, you can see where to glue the rhinestones. Place a drop of glue slightly smaller than the rhinestone on the marking and using a wax tipped too, gently press the rhinestone into the glue drop. Continue gluing until your design is complete and let dry for 24 hours.
I have shown 2 different designs, one without a wedding date and one with. Either one makes a beautiful keepsake that keep those memories of that special day alive.
Rhinestones and wax tipped tool are available from: www.RhinestnesEtc.com
0 Comments
Your comment will be posted after it is approved.
Leave a Reply. |
KarenI have been adding bling for over 20 years. Through my projects, I hope you find inspiration. Categories
All
Archives
July 2024
|

 RSS Feed
Home About Policies Return Shipping
Contact Us Size Chart Privacy Products Reviews
Copyright 2024 Rhinestones Etc. All rights reserved.
Contact Us Size Chart Privacy Products Reviews
Copyright 2024 Rhinestones Etc. All rights reserved.