|
Nail designs with rhinestones are the new current rage. Beautifully polished nails embellished with dazzling rhinestones are sure to make a fashion statement. But have you checked out those salon prices? Yikes, definitely not in your budget! However, you’d still like to have the look of rhinestone nails for that upcoming party. But the question is, can you do it yourself? Supplies Needed for Rhinestone Nails Yes, you can for both regular nail polish and gel, although the methods are slightly different. For regular nail polish, you will need nail glue and a quality top coat. While using gel nail polish will require an LED light. Prices run anywhere from $10-$40 on Amazon. Of course, you’ll need some good quality rhinestones. Some nail technicians like to use flatback rhinestones while other use pointed back. Moreover, you can choose from a variety of rhinestone sizes and colors.  How to Apply Rhinestones to Nails with Regular Nail Polish Let’s start with how to attach rhinestone to your nails with regular nail polish. First, make sure you use a good quality nail polish. Unfortunately, if you use a cheaper brand, the polish may chip causing the rhinestone to fall off. Furthermore, this can occur even if you glued it correctly. Begin by applying a base coat and then your favorite color and allow to dry completely between coats. With a toothpick, apply a small amount of nail glue to the nail where you want to place the rhinestone. Using a wax tipped tool or tweezer, pick up a rhinestone and gently press it into the nail glue. Next, using a small detailing brush, apply a top coat around the edges of the rhinestone. Do not apply the top coat over the top of the rhinestone, only the edges. This helps seal the rhinestone so that it doesn’t peel off. 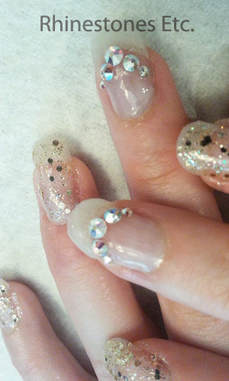 Using Gel Nail Polish to Attach Rhinestones Now let’s go over the method of creating rhinestone nails with gel polish. Apply the gel foundation and cure under your LED light. Then apply the gel color again curing under the LED light. In the area where you are applying the rhinestone, roughen lightly with an emery board. Wipe nails clean with rubbing alcohol using a lint free wipe. Next, apply a gel top coat over the entire nail. Pick up a rhinestone using a wax tipped tool or tweezers and apply the rhinestones to the nail. Then, cure under the LED light. Finally, using a small detailing brush, apply the gel top coat around the edges of the rhinestone. When you are finished, cure under the LED light one final time. With a little practice, you’ll be creating fabulous designs on your nails suitable for every occasion. Plus, you won’t pay those high prices at the nail salon. Practice enough times and you’ll be creating your very professional own one-of-a kind nail designs. Want to get started on your nail designs right away? Buy quality rhinestones from Rhinestones Etc.
0 Comments
Your comment will be posted after it is approved.
Leave a Reply. |
KarenI have been adding bling for over 20 years. Through my projects, I hope you find inspiration. Categories
All
Archives
July 2024
|

 RSS Feed
Home About Policies Return Shipping
Contact Us Size Chart Privacy Products Reviews
Copyright 2024 Rhinestones Etc. All rights reserved.
Contact Us Size Chart Privacy Products Reviews
Copyright 2024 Rhinestones Etc. All rights reserved.