|
Embellished shirts are expensive but cheap plain shirts tend to be boring. However, for most of us, our budget says buy the boring plain shirt. After you learn how easy and cheaper it is to bedazzle a shirt, you’ll be happy buying that ordinary solid color shirt. The t-shirt used in this project was one I found on clearance for $4.00 and the stencil I found at the dollar store. For this project I used: 1 t shirt Stencil Gold metallic fabric paint Paint brush Black diamond 12ss rhinestones (about 170 rhinestones) Gem Tac Wax tipped tool or tweezers 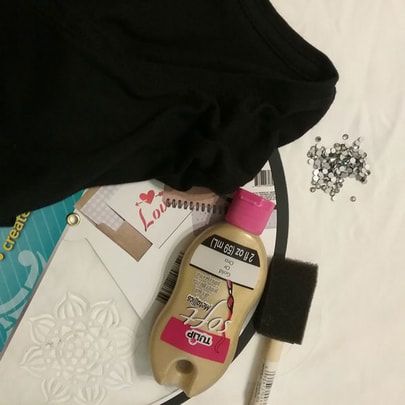 Easy Steps to Bedazzle a Shirt Wash and dry your shirt. Because I like my designs to be somewhat symmetrical, I like to mark with chalk the position of the designs. Chalk works great because you can brush off your marks if you need to make a change and it easily washes out. 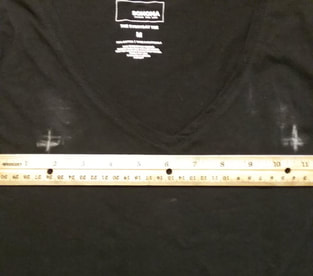 Once I marked out the position of my design, I was ready to paint. You can use a shirt board If you have one; place it on the inside of the shirt. Usually, I just use a piece of thick cardboard I have laying around. Using the chalk marks, position your stencil and apply the fabric paint using a paint brush. Either a foam brush or a regular paint brush works fine. 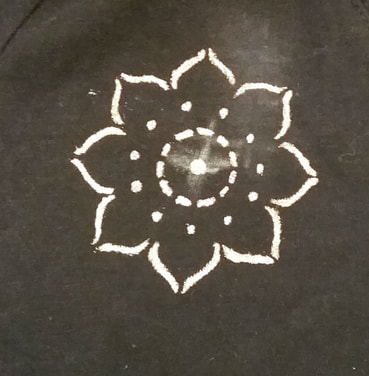 Remove the stencil and clean it off before repositioning it. When you are done painting, allow to dry completely. I chose the rhinestone color of black diamond because I liked how it reflected off the black of the shirt and yet didn’t overpower the gold color of the stencil designs. Again, I marked with chalk the design of the rhinestones. 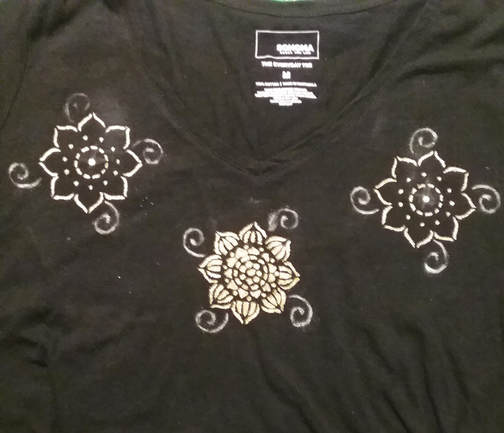 If the material to the t-shirt is thin, you may want to leave the shirt board in place when gluing or place a piece of wax paper on the inside of the shirt. To glue your rhinestones, place a drop of glue slightly smaller than the rhinestone on the shirt. Then, using your wax tipped tool or tweezers, pick up a rhinestone and gently press it into the glue drop. Continue gluing until your design is complete. Allow to dry flat for 24 hours. 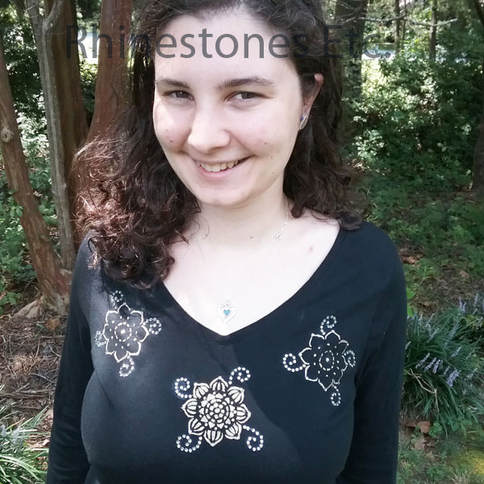 How much do you think you’d pay in retail for this shirt? At least $25. But by doing it yourself, you can bedazzle a shirt for $10-$15 depending on the brand of rhinestones you choose to use. You’ll feel trendy and stylish while keeping to your budget.
0 Comments
Often, we associate sparkling gemstones with Hollywood glamour or the lives of the rich and famous. There’s something about the play of light upon the facets that attract and enchant us. While most of us can’t afford designer clothing, we can easily alter store purchases with sparkling flatback crystals. Rhinestones add a bit of glamour at a reasonable price. Moreover, applying rhinestones to clothing isn’t as hard as you might think. No matter how you use them, rhinestones add a touch of elegant sparkle. Have a plain shirt? Bedazzle it with rhinestones for a dressy casual look. Upcoming wedding? Bling out your wedding invitations. Don’t know what to give your best friend for Christmas? Deck out a coffee mug with rhinestones. Rhinestones Etc. has many tutorials blogs like these with instructions.  The Best Glue for Rhinestones Depends on the Surface Probably the most popular way to attach rhinestones is to use an adhesive. Your choice of glue depends on the surface you’re applying the rhinestone to and the rhinestone itself. The substrate, or surface you’re gluing to, can be porous or smooth, heavy or lightweight. Thus, some adhesives work better on certain surfaces. Beacon’s Gem-Tac is a great all-purpose glue. The manufacturer recommends this glue for fabric, wood, suede, glass, vinyl, and metal. It’s easy to apply, dries clear, and is washable. E6000 is another adhesive suitable for just about any type of surface. The manufacturer recommends it for all the same surfaces as Gem-Tac plus plastic, tile, ceramic, cement, rubber, leather, and Styrofoam. However, this glue is a bit harder to work as it is thicker, harder to apply, and dries quickly. There are applicator tips for E6000 that you can buy separately. We like to squeeze a bit out over a paper plate and use a toothpick to apply the glue. Once the glue starts to become tacky, simply squeeze out a bit more. This glue does dry quickly and you must use it in a well-ventilated area. While most adhesives are safe to use, some manufactures don’t recommend their product for use with Acrylic rhinestones. Both Beacon’s Fabri-Tac and E6000 advise against using their glue for use with these types of rhinestones. Always check the glue manufacturer’s instructions and the supplier of your rhinestones for the best adhesive to use.  How to Glue Rhinestones onto Fabric The most important aspect of gluing rhinestones on fabric is using enough glue. One of the most frustrating aspects of bedazzling clothing is rhinestones falling off during washing. This always occurs with an improper gluing technique. To properly glue rhinestones, you need a drop of glue about the same size as the rhinestone. When you place the crystal in the glue, some adhesive should seep out from the sides. This creates a seal, firmly attaching the rhinestone to the fabric and prevents it from peeling off. Since all rhinestone fabric glues dry clear, the only thing you’ll see is the sparkle. Hot Fix Rhinestones Have Glue On Their Backing Hot fix rhinestones have flat backs with an adhesive already on their flat or backside. When you heat the glue to a temperature between 250-340° F, you can apply it to form a permanent bond. Some fabrics may be unsuitable for hot fix application. These types of textiles include tightly woven fabrics, thin fabrics like organza, or real and imitation leather. If you’re not sure if you can use hot fix rhinestones on your fabric, you can perform the pearl test. Place several drops of water on the material. Fabric that has water that pearls is not suitable for hot fix application. On the other hand, you can use hot fix rhinestones on fabrics that absorb the water drops quickly.  Other Methods for Applying Rhinestones Two other ways of attaching rhinestones are sewing and metal settings. Sew-ons involve rhinestones with predrilled holes for attaching. Simply sew the rhinestone on with a needle and thread through the predrilled holes. Rose Montees are rhinestones set in a metal setting. The setting has a cross channel on the back for sewing or stringing wire through.  Metal settings give your rhinestones and extra secure hold with a decorative element. Tiffany settings have the prongs come through the back of the fabric to attach the rhinestone. Whereas rim settings frame the rhinestone with the prongs going through the fabric from the top. Rose pins are rhinestones already attached to metal settings.  Add Rhinestones For A Touch of Glamour As you can see, there are several methods of applying rhinestones. Some projects allow for different ways to affix them. Begin by thinking about the project you are working on. If you’re planning on using adhesive for attaching your rhinestones, check the glue manufacturer’s suggested use. If you still have any questions about what works best for your project, you can contact us for help at here. Of course, we'd love to be your source for rhinestones. With discount pricing, fast shipping and great customer service, Rhinestones Etc. can help you with your crystal needs. Adding rhinestones to any type of clothing adds a bedazzling effect. With every movement, the rhinestones send out a shimmer of light. Yet, bedazzled clothing is expensive. However, once you see how easy it is to apply rhinestones to fabric, you’ll be bedazzling most of your wardrobe. You can attach rhinestones to many objects:
Rhinestones add sparkle to every object you add them to. However, it can be very intimidating the first time you try to glue rhinestones. Many first-timers are afraid of using too much glue or gluing rhinestones in the wrong position. Once you learn the technique you need to follow, you’ll see how easy it is to bedazzle clothing. 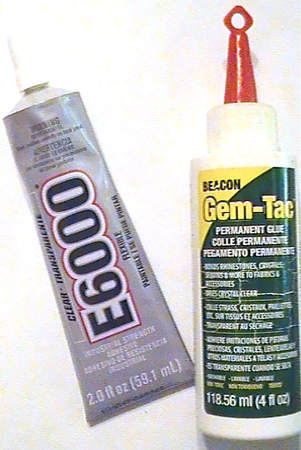 Choose the Right Rhinestones Glue The most popular type of rhinestone is the non-hot fix also known as the flatback. To some, this term can be confusing because hotfix and sew-on rhinestones also have a flat back. Yet, manufacturers generally refer to flatback rhinestones as those needing glue or settings to attach them. Settings are pieces of metal with prongs to hold the rhinestone onto the fabric. You bend the prongs around the rhinestone to hold it into place. However, using glue is the most popular option for applying rhinestones. First, you need to select an adhesive. There are many different rhinestone adhesives on the market. Your choice will depend on the object you’re blinging. For instance, some glues work better on leather or glass. If you’re blinging a coffee mug or sneakers, you may want to use E 6000. This industrial-strength glue is great for a variety of surfaces:
However, this glue tends to be gloppy and hard to apply. Plus, the manufacturer doesn’t recommend using it with acrylic rhinestones. When applying rhinestones to fabric, you may want to use Gem-Tac. You can use this glue on an assortment of surfaces:
This glue is much easier to use to bedazzle clothing and makes applying rhinestones a snap. It’s our favorite glue to use on fabric. Whichever adhesive you choose, be sure the manufacturer recommends it for use on fabric, it's washable, and dries clear. 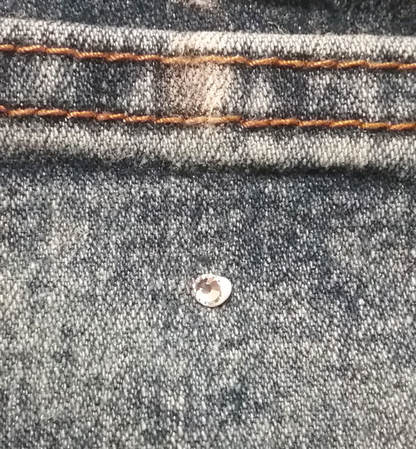 The Technique To Apply Rhinestones to Fabric While choosing the right glue is important, there is also a technique for permanently attaching rhinestones. An improper gluing technique may cause your rhinestones to fall off, especially when you launder the garment. When applying rhinestones to fabric, it’s very important to use enough glue. Often, first-timers use too little glue fearing the adhesive will be visible. However, all glues for use with rhinestones dry clear. To begin with, pre-wash and dry your garment before you start gluing. Lay the garment as flat as possible. Sheer or thin fabrics may require a piece of wax paper between the layers of fabric. This prevents the glue from seeping through and inadvertently gluing layers together. The drop of glue should be about the size of the rhinestone. After you press the rhinestone into the glue, the glue should seep out from the edges. This makes a seal that helps keep the rhinestone from peeling off. One of the most common reasons for rhinestones falling off is this one, a lack of glue seal. After you finish gluing all your rhinestones to your garment, always let dry flat for 24 hours before wearing. While some glues set in 10 minutes, it takes 24 hours for all glues to dry completely. 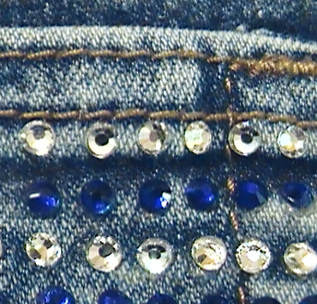 You’ll Need a Tool for Picking Up the Rhinestones
You’ll also need a tool for picking up the rhinestones. Many people use tweezers and these make an adequate tool. However, the glue will build up on the edges requiring frequent wiping. Moreover, be careful not to squeeze the tweezers too tightly or your rhinestone may go flying off. Another tool is a wax tipped tool. The wax end easily picks up many types of embellishments including rhinestones. When you press the rhinestone into the glue drop, the rhinestone detaches from the tool. There are many variations of this implement from cheap to expensive. Finding the Best Rhinestones for Your Project Rhinestones are available in different types. You can buy acrylic, glass, and crystal rhinestones. Generally, you’ll want to use cheaper rhinestones where the quality isn’t are important, like a children’s craft project. Likewise, you may want to use the more expensive brand-name rhinestones for more important occasions like a wedding. Plus, there are many good quality middle-of-the-road rhinestones. You can find many quality rhinestone choices at Rhinestones Etc. With fast shipping, competitive pricing, and excellent customer service, we want to be your source for bling supplies. 
Presenting a dance routine at competition begins with the choreography and ends with the costume. Yet, not just any dance outfit will do. The dancer’s costume must unite with the music theme. Often the look of the costume includes the addition of embellishments like rhinestones. Let’s explore how to rhinestone a dance costume with ease. Why You Should Add Bling to a Dance Outfit As an art form, dance communicates ideas and experiences through movement. It incorporates both visual and sound elements to invoke a mood. Moreover, the dancer’s costume is an important aspect of conveying the tone of the piece. Typically, humans are opinionated beings. As your dancer takes the stage, the judges will subconsciously rate her on her look. So, paying attention to details, like eye-catching elements, is very important. And adding rhinestones to your daughter’s costume also makes her feel beautiful and gives her confidence. When she feels beautiful, it shows in her dance. Often, competitive dance costumes can be quite expensive especially if you buy one with rhinestones already on it. Occasionally, the quality of rhinestones already on dancewear can also be of lower quality. However, you can save money by buying and applying rhinestones to the costume yourself. The Best Way to Apply Rhinestones to Fabric Sometimes, deciding where to place rhinestones on a dance costume is easy. The dance dress may have straps you can accentuate. Fabric or color changes on the costume can present another area to bling out. Often, it can be helpful to lay rhinestones on the costume to see the spacing and effect. If you need to, you can mark the placement of the stones using a washable sewing marker. Then, simply glue the rhinestones on according to your marks. When you're ready to begin, gather your tools and lay your costume out as flat as possible. Your choice of glue should be safe for rhinestones, washable, and clear when dry. A wax tipped tool is also very helpful. If you’re gluing to a sheer fabric like chiffon, place a piece of wax paper between the layers of fabric. This will keep the layers from gluing together. Begin by placing a drop of glue slightly smaller than the size of the rhinestone on the fabric. Pick up a rhinestone using your wax tipped tool, and pressing it into the glue drop. Some of the glue should seep out from the edges. This is very important as it forms a seal and helps to keep the rhinestone from peeling off. Once you’ve glued all the rhinestones to your costume, you need to allow it to dry flat for 24 hours. 
FAQs About How to Rhinestone a Dance Costume Rhinestones add that final detail you need to separate you from other dancers. Their eye-catching sparkle and scintillation turn a nice costume into a stunning one. Below, we’ve answered a few more questions related to how to rhinestone a dance costume. Please drop us a note here if you have any others. Which Is the Best Size to Use? Rhinestone sizes have a unique system that dates back centuries. Thankfully, most retailers include the millimeter size alongside the ”ss” or stone size. Generally, the most popular sizes for dance costumes are 20ss and 30ss. However, smaller sizes can work equally as well. Mostly, your choice of stone will come down to your budget and the look you want to achieve. For example, a larger rhinestone will cover a bigger area so you’ll need less. Yet, bigger rhinestones are also more expensive than smaller ones. What Color Should I Pick? Color theory principles can guide your options for choosing a rhinestone color. For example, using complementary colors will provide contrasts and make both hues appear more vibrant. Other times, you may want a more subdued look by blending similar shades. Then again, if you aren’t confident in choosing a color, you can pick something neutral. Crystal is a clear stone and Crystal AB is a clear stone with a rainbow coating. Either will complement any shade imaginable. Yet, color is a personal choice reflecting the individualism of the dancer and the mood of the piece. The aim is to create a unified look. How about Creating Bedazzling Clothing? The technique of how to rhinestone a dance costume is the same for other garments. Now you can bling out shoes, dresses, and accessories. Bedazzling your clothes can breathe new life into dull, dated outfits.
When you’re looking for a source for quality rhinestones, choose Rhinestones Etc. We have great customer service and super fast processing times. Most orders ship the same day!
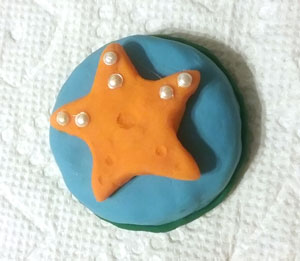
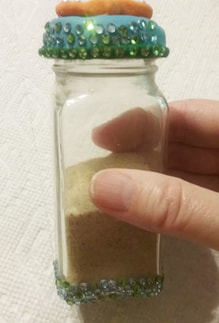
This project was inspired by my Mother in Law who loved to travel and collected sand in small bottles from the many places she visited. Instead of putting the sand in an ordinary bottle, you can upcycle and embellish a small bottle to reflect the theme of your vacation. The theme of my bottle is my favorite destination spot: the beach. For this project I used: 1 small old bottle (mine is an old spice bottle) Sculpey clay 10ss flat back pearls 12ss peridot and aquamarine flat back rhinestones Wax tipped tool or tweezers E6000 Sand from your vacation spot 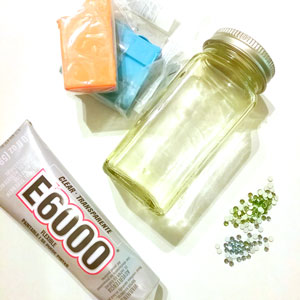 How to upcycle an old bottle Thoroughly clean and dry your bottle that you will upcycle. I enlisted the help of my daughter with the clay components as she is much more talented than I am. First, cover the lid with clay. 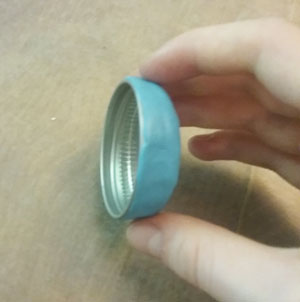 Since our theme was the beach, she created a star fish to put on top. 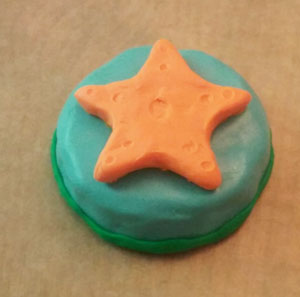 Then she created some beach themed components to place inside the bottle: a little crab and anchor. 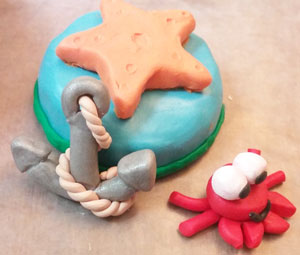 Place your components and lid on cookie sheet lined with white paper. Bake in the oven according to the clay manufacturer’s instructions (we did 275 degrees for 15 minutes). When done baking, remove from the oven and allow to cool. Glue a 16ss flat back pearl to the middle of the starfish and 2 10ss flat back pearls on each of the arms. Place a drop of glue slightly smaller than the pearl and using a wax tipped tool or tweezer, pick up a pearl and gently press it into the glue drop. I used both green and blue rhinestones mixed to give the bottle an ocean feel. I glued rhinestones along the bottom of the bottle and then along the side of the cap. The adhesive I like to use when gluing rhinestones to glass is E6000. Many people don’t like to use it because of the warnings; however, it is a very strong adhesive and recommended for use in gluing rhinestones to glass. Use in a well-ventilated area and always follow the manufacturer’s instructions. Allow to dry for 24 hours.
Add the sand from your favorite vacation spot and then place the crab and anchor on the sand. 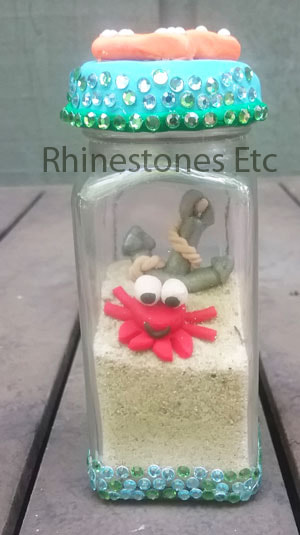 Your vacation is now immortalized in a one of a kind upcycle bottle! Why not create one each time you go on vacation and start a collection? Use it to decorate any space and each time you walk by you’ll see it and remember the fun time you had.
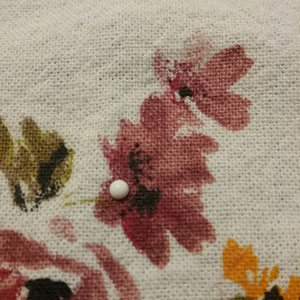
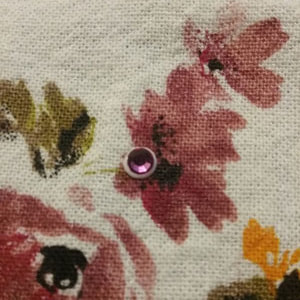
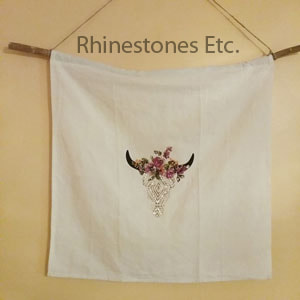
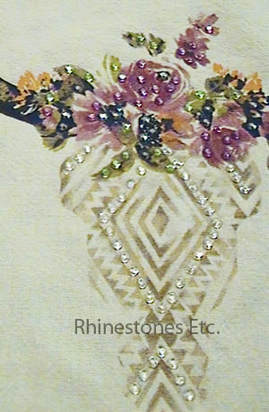
Rhinestones and wax tipped tool are available from: www.RhinestonesEt.com I love to go bargain shopping and leave no clearance bin unchecked. There is no better feeling than finding the perfect item and the perfect price! A few weeks ago, I was out searching for a birthday present for my mom. Outside in a bargain bin was this cotton cloth with a western motif (I think it was a napkin). I didn’t know what I would do with it, but it was only $1, so I couldn’t pass it up. Gluing rhinestones to fabric is simple and the perfect project to make with my new $1 napkin. For this project I used: My bargain cotton fabric with western motif Assorted 12ss rhinestones Wax tipped tool or tweezers Gem tac Branch Sandpaper Sewing machine/needle and thread Jute string 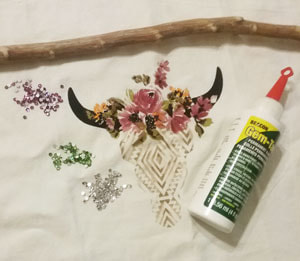 Cut a branch about 4 inches longer than the width of your material. I liked the branch of a crepe myrtle, so I cut off a branch about ½ inch in diameter. Sand the entire branch including the edges until smooth. 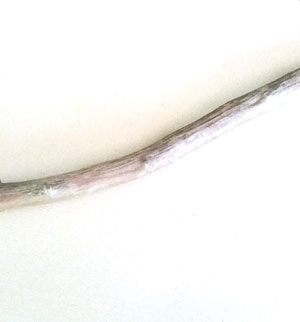 The cloth was too long, so I cut about 1/3 of it off. To prevent the cloth from fraying, I serged the edge and then hemmed it (you can double hem it). Fold this edge down about one inch to make a sleeve to put the branch through. 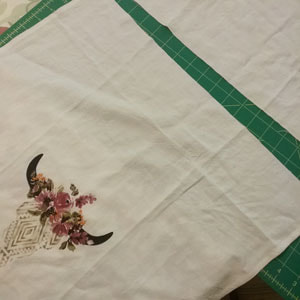 Gluing rhinestones to fabric is easy. I used assorted rhinestone colors to accent the western motif design. Place a drop of glue slightly smaller than the glue drop on the linen. Using a wax tipped tool or tweezers, pick up a rhinestone and gently press it into the glue drop. The glue should seep out slightly from the edges to form a seal and prevent the rhinestone from peeling off. Gem Tac is my favorite fabric glue because it is easy to apply, dries clear and is washable. Continue gluing rhinestones, accentuating different areas.
Allow to dry flat for 24 hours. When dry, slip the branch into the top sleeve. Cut a piece of jute sting about 24 inches long. Tie each end to the end of the end of the branch.
Simple yet enticing. By gluing rhinestones to fabric it’s easy to take something ordinary and turn it into something extraordinary. This hanging will catch eyes with its simple sparkle and rustic design. Use it to brighten any space! The possibilities are endless!
Rhinestones and wax tipped tool are available from: www.RhinestonesEtc.com Simple diy washer bracelet Washer jewelry is the latest craze, combining simple washers with beads or rhinestones to create beautiful pieces with a unique flair. Previously, I created a simple washer bracelet and was so enthralled by the finished result that I decided to craft another creation based on this popular trend. My sister’s 50th birthday is coming up and wanting to make her a special gift, I came up with this elaborate design. For this project I used: Washers (#8) 12 mm Purple hemp cord E6000 Fuchsia 12ss rhinestones Cord end caps 2 4 mm jump rings Lobster clasp Wax tipped tool or tweezers Jewelry pliers  Cut 2 pieces of hemp cord about 12 inches in length. I like my bracelets 7 inches in length, so I used 12 washers. Thread one piece of the hemp cord through the washers. In order to get the washers to lay flat, you want to thread the next washer from the same exit location as the previous one. So for example, the thread exits the washer from the bottom, you'll thread the next washer from the bottom. When the thread exits from the top, you'll thread the next washer from the top (see the photo below). 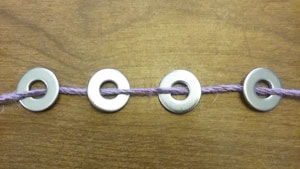 Take the second piece of hemp cord and thread it through the washers opposite the first piece of cord.. So if the first cord is on top, the second cord should be threaded underneath the washer. The next washer will be threaded from the same place as the exit location of the previous washer, same as you did for the first cord. 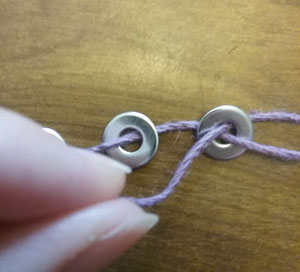 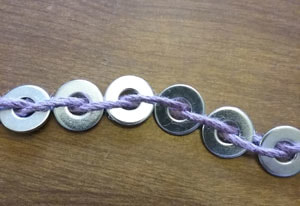 To keep the washers from sliding along the cord, take the end and thread it through the last washer again. 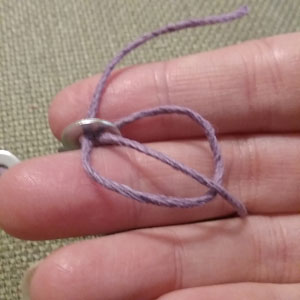 Measure the bracelet to the correct length and cut off the excess cord. Attach a cord end cap to each end. At one end, attach a jump ring and lobster clasp. You may also want to attach a jump ring to the other end. Lay the bracelet flat. I use E6000 to attach rhinestone to metal because of the strong bond it makes; however, some people don’t like to use it because of the warnings. Always glue in a well-ventilated area and follow the manufacturer’s instructions. Since E6000 tends to be gloppy, I squeeze a small amount over a paper plate and using a toothpick apply glue to the surface slightly smaller than the rhinestone. Then using a wax tipped tool or tweezers, pick up a rhinestone and gently press it into the glue drop. 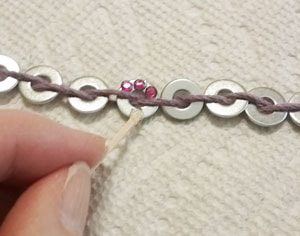 I glued 3 rhinestones above the cord, and three below it. 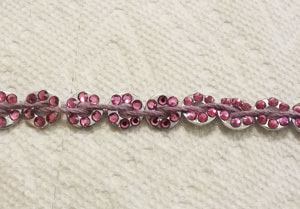 Allow to dry flat for 24 hours. 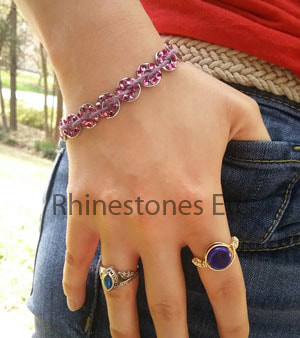 Keeping up with the latest fads is simple and inexpensive when you have crafty hands and can craft your own creations! Suitable for everyday wear, or compatible with your favorite evening dress, stay in style with this lovely washer bracelet!
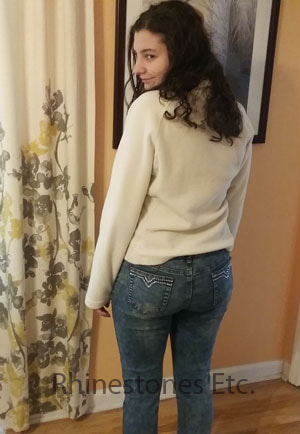
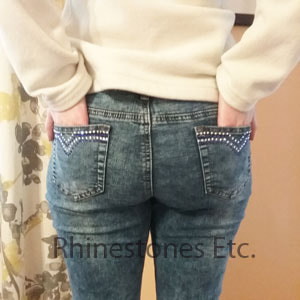
Rhinestones and wax tipped tool are available from: www.RhinestonesEtc.com How to Glue Rhinestones to Jeans Are you tired of your same old boring jeans? Want to take your favorite pair and dazzle them up? Now’s your chance! Rhinestone jeans are easy to do, and the possibilities are endless! Create your initials, line the pockets or chose your favorite design. It’s up to you! For this project I used: A pair of jeans 12ss Crystal and Sapphire rhinestones Wax tipped tool Gem Tac 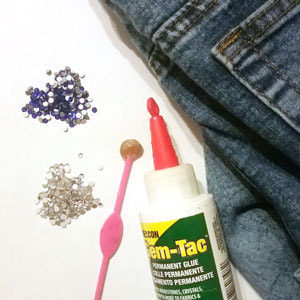 If you are using a brand-new pair of jeans, be sure to wash and dry them before embellishing them. Pick out a design. Even a simple straight-line design can really dress up a pair of jeans. My favorite glue for fabrics is Gem-Tac because it is water proof, dries clear and it easy to control the flow of glue. I planned on gluing 4 lines of rhinestones with a “v” in the middle across the back pocket. Using a piece of chalk, I marked the middle of the pocket to make sure I kept the design symmetrical. Lay the jeans as flat as possible. Squeeze a drop of glue slightly smaller than the rhinestone. 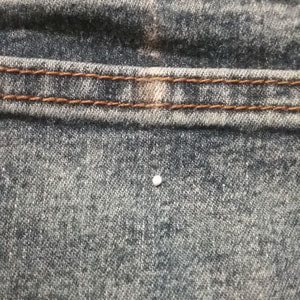 Using the wax tipped tool, pick up a rhinestone and gently press it into the glue. The glue should ooze out slightly from the sides to form a seal which keeps the rhinestone from peeling off. The glue will dry clear and you will not be able to see it unless close up. 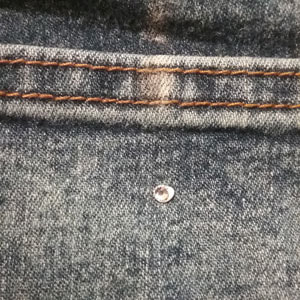 As you can see by the picture below, once the glue is dry, it is invisible. 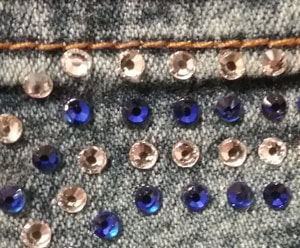 Continue gluing until your pattern is complete. Allow to dry flat for 24 hours.
Why spend lots money when you can easily create your own custom pair of jeans for a fraction of the price? With your new pair, you’re sure to turn heads.
Rhinestones and wax tipped tool are available from: www.RhinestonesEtc.com DIY Valentine's Day Rhinestone Ceramic Tile Plaque Known as the holiday of love, Valentine’s day is the perfect time to tell someone you love them. However, Valentine’s day is often only considered to be a day for romantic love but there are plenty other relationships to celebrate. I like to celebrate with my children, friends, and family as well as my husband. Whatever the relationship, a handmade Valentine’s gift is the perfect way to show your family and friends how much you love to them! Creating a ceramic tile plaque is a beautiful way to express your love. For this project I used: 1 ceramic tile (a wooden plaque works just as well) Red acrylic craft paint Paint brush Stencil (you can download a free template here) Clear Acrylic coating (to seal) E6000 12ss Light Siam (red) rhinestones Wax embellishment tool Craft glue Clear glitter 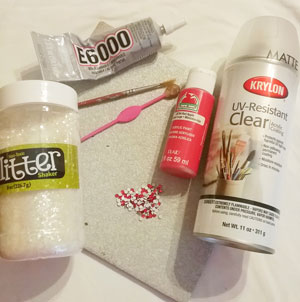 heart template opt inI always like to work with a template and you can download the one I used for this project here. Cut out the darkened areas on the template using an X acto knife and cutting mat or a pair of cheap embroidery scissors leaving small areas uncut to leave the inside of the heart intact. 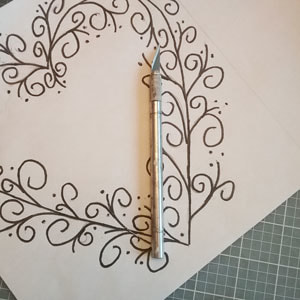 Tape this to your tile. 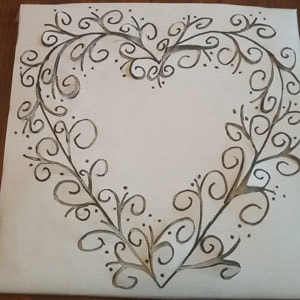 Paint in the cut areas with a paint brush and red acrylic craft paint. Gently remove the template and paint in the missing areas. Allow to dry. 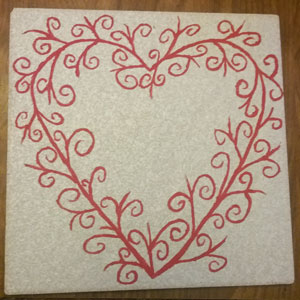 When dry, spray with a clear acrylic coating (I used Krylon brand). This keeps the paint from any damage. Allow to dry. I liked the idea of adding some clear glitter, so using a craft glue that dries clear, I mixed a generous amount of clear glitter with the glue. Paint on around the pattern using a paint brush. Allow to dry and then spray with another coat of clear acrylic coating. 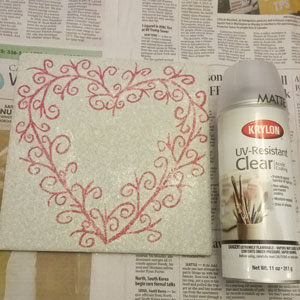 When completely dry, glue on rhinestones using E6000. You can use the template as a guide for placement of rhinestones. The dots on the template are the places I glued the rhinestones. Squeezing the E6000 over a paper plate, use a toothpick to apply an amount of E6000 to the tile just slightly smaller than the rhinestone. Using a wax tipped tool or tweezers, pick up a rhinestone and gently press it into the glue. Continue gluing until your pattern is complete and allow to dry flat for 24 hours. 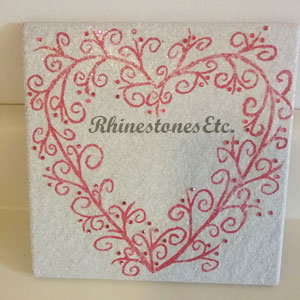 The clear glitter and rhinestones give this hand-painted ceramic tile the perfect amount of sparkle. Have a specific person in mind? Try personalizing this gift by adding their name or a date in the middle.
Rhinestones and wax tipped tool are available from: www.RhinestonesEtc.com How to Make a Rhinestone Washer Bracelet Christmas has passed, you’ve rung in the new year and now it’s January, freezing and icy. Need a little bling to put some sparkle back in your day? This rhinestone bracelet takes on the jewelry washer craze in a new and sparkly way. For this project I used: Washer size 8 (12 mm) E6000 Embroidery thread (any color to match rhinestones) 30ss rhinestones (any color to match embroider thread) Silver fold over crimp ends 6 mm jump rings Silver lobster clasps Jewelry pliers  Cut 2 pieces of embroidery thread 8 inches long. Use all six strands of the embroidery thread. Fold the thread in half to make a loop. Thread the loop through the hole in the washer and then thread the ends through the loop to secure to washer (a cow hitch knot). 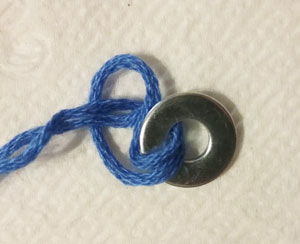 Repeat on the other side. With a toothpick, spread E6000 on the backside of a 30ss rhinestones and glue to the front of the washer. Allow a few minutes for the glue to set, then flip the washer over and apply a generous amount of E6000 in the hole of the washer/bottom of the rhinestone to secure. 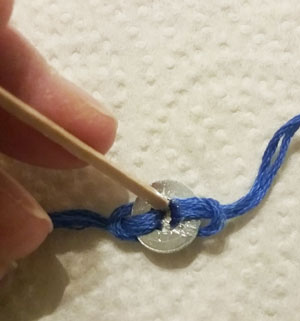 Let dry for 24 hours. Trim the ends of the embroidery thread. My bracelets fit comfortably at 7 inches, so I trimmed the ends so that my bracelets measured 7 inches including the length of the findings. Place the end of the thread in the fold over crimp ends. Be sure all the threads are underneath the first fold and then using the pliers, bend the first end over your thread end. Fold the second end over to secure your embroidery thread. 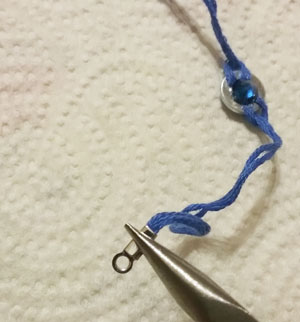 Repeat on the other side. Attach a lobster clasp at one end of the bracelet with a jump ring. 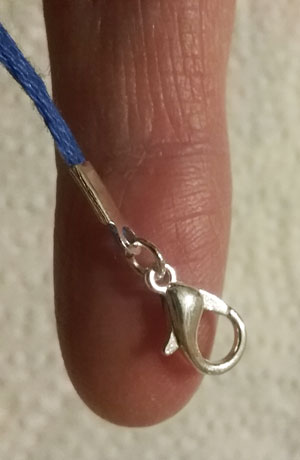 Look at how cute these diy washer bracelets are!  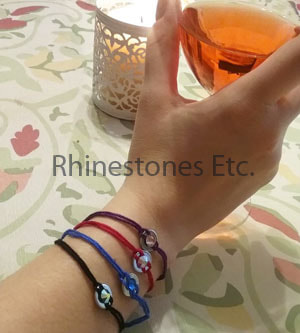 You can now sparkle your way through the year with your own unique washer bracelet.
Rhinestones are available from: www.RhinestonesEtc.com |
KarenI have been adding bling for over 20 years. Through my projects, I hope you find inspiration. Categories
All
Archives
February 2024
|

 RSS Feed
Home About Policies Return Shipping
Contact Us Size Chart Privacy Products Reviews
Copyright 2024 Rhinestones Etc. All rights reserved.
Contact Us Size Chart Privacy Products Reviews
Copyright 2024 Rhinestones Etc. All rights reserved.