|
Fashion changes often, making keeping abreast of the latest fad expensive. Yet, the holidays are just around the corner, and with it all the holiday parties. Wearing the same outfit as last year is a fashion no-no, yet you can’t afford another fancy dress. Changing your outfit up by adding bling is an easy solution. Moreover, with many different manufacturers, it’s easy to find rhinestones for clothing. Stay Trendy by Creating a Rhinestone Dress However, you can look great without spending a bucket of money. You can refresh an old dress by adding rhinestones for a new vibe. Additionally, you can pick up a simple dress on clearance or at Goodwill. With some sparkling rhinestones, your dress will become elegant. 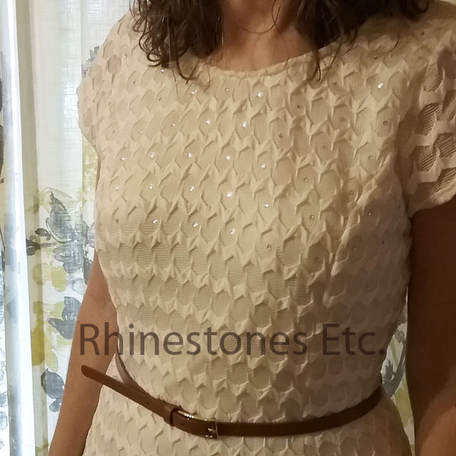 How to DIY Rhinestone Dress I picked up a simple dress for $15. Your cost for bling will change based on your choice of manufacturer and your quantity. Additionally, rhinestone pricing varies considerably depending on the size and color. While many consumers prefer brand names crystal, you can find some less expensive high-quality rhinestones on the market. The next step is to choose your adhesive. When choosing your brand, check the manufacturer’s instructions to make sure the glue dries clear, is washable. Moreover, confirm the glue is suitable for your type of rhinestone. For example, some adhesive manufacturers advise against using their glue for acrylics.
For this project, I used 12ss crystal PriceLess Rhinestones. Since the dress already had a pattern, I offset the rhinestones in between the pattern of the dress. Gem-Tac is the brand of glue I prefer for clothing for its ease of application. Before you start applying rhinestones, wash and dry your garment. When you’re ready to glue, lay your garment on a flat surface. If the material is sheer, place a piece of wax paper between the layers to avoid gluing the fabric together. Begin by placing a drop of glue slightly smaller than the rhinestone on the garment. Pick up a rhinestone using a wax-tipped tool or tweezers. Gently press the rhinestone into the glue drop. Some of the glue should seep out from the edges. This makes a seal and helps prevent the rhinestone from peeling off. Continue gluing rhinestones in this manner. When done, allow to dry flat for 24 hours. Use Rhinestones for Clothing Other Garments, Too! Even adding just a small amount of rhinestones makes a huge difference in this dress. And you now have a glamorous, fashionable dress without going over budget. Moreover, you can use rhinestones for clothing other than dresses! You can add rhinestones to shirts, jeans, shoes, and even accessories like belts and handbags. Plus, you can experiment with different sizes and colors to create a different look each time. Stay trendy and fashionable and save yourself a pile of money by adding bling! FAQs About Rhinestones If you’re just starting with rhinestones, you may be confused by all the different types on the market. To help you make the best choice, we’ve answered some of our most commonly asked questions. Should I Buy The Most Expensive Brand? It depends on the type of project you’re rhinestoning. For example, you may want to use a name brand for your wedding dress. However, you may want to use a less expensive brand for your handbag. How Many Rhinestones Will I Need? Typically, your quantity depends on the look you want to achieve and the size of your rhinestones. Will you be creating large spaces between the rhinestones or placing them close together? Generally, too, smaller rhinestones sizes cover less area requiring more. If you need help determining the amount you need, drop us a note here, and we’ll be glad to help you. Does It Matter Where I Buy My Rhinestones? If you want quality rhinestones at competitive prices, great customer service, and fast shipping, buy from Rhinestones Etc. For over 10 years, we’ve been selling quality embellishments online.
0 Comments
It’s been a difficult year financially, yet the Holiday party is just around the corner and you want to sparkle. You’ve looked at many rhinestone dresses but can’t afford any of them. Dresses found at any type retail store with serious bling will cost you in the hundreds of dollars. However, you can save yourself a bundle by buying a plain dress and embellishing it yourself. Embellishing a dress with rhinestones can be done, even with someone with no experience. Take this dress picked up on clearance.  Although it’s a pretty dress with the floral print on the bottom, there nothing to really catch the eye. We’ll transform this dress into a “get another look at that dress” just by adding rhinestones. Dress bought on clearance $35 Retail cost of rhinestones: $11-14 depending on the brand of rhinestones and retailer Glue: $ 8.99 - $9.99 for 4 oz Total cost: $60.00 Instructions for Gluing a Rhinestone Dress For this project I used: dress Gem tac Black Diamond 12ss rhinestones about 1 gross Jet Hematite 12ss rhinestones about 1 gross Wax tipped tool or tweezers Measuring tape Always prewash your garment before starting to glue. Once it is washed and dried, lay it flay on your work surface. If the material is thin, place a piece of wax paper between fabric to prevent gluing the layers together. Here, I used black diamond rhinestones along the strap edges spaced ½ inch apart. You can use a tape measure to keep the rhinestones evenly spaced it you want. Jet hematite rhinestones completed the design scattered on the straps and bodice. These were glued closer together along the straps and bodice. I space them further apart lower on the bodice. When gluing fabrics, my favorite glue to use is Gem-Tac. It is easy to apply, dries clear and is washable. Begin gluing by placing a drop of adhesive slightly smaller than the rhinestones on the dress. 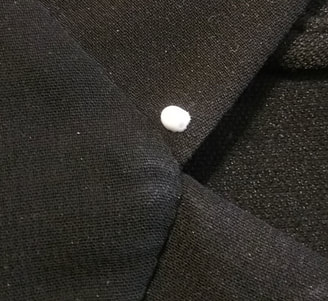 Using a wax tipped tool or tweezers, pick up a rhinestone and gently press it into the glue drop. The glue should seep out slightly from the edges. This creates a seal and helps prevent the rhinestone from peeling off. 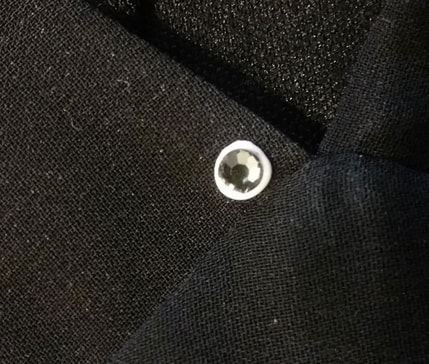 Gem-Tac dries clear and using the little bit of extra glue to keep your rhinestones from falling off is important. 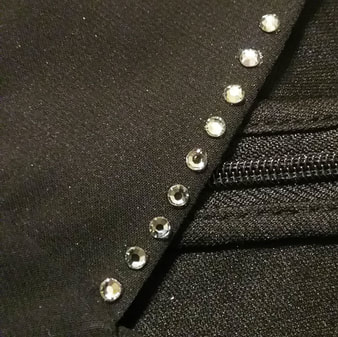 Continue to glue rhinestones on until your design is complete. Then, allow to dry flat for 24 hours.  A picture does not capture the stunning sparkle of this dress. With every movement, light is reflected, creating a dazzling aura. Now you are sure to catch some eyes with this rhinestone dress while saving yourself a pile of money. Want to sparkle at your Holiday party? Need rhinestones to bling out your dress? Get the rhinestones you want at Rhinestones Etc.
Footwear is the foundation of any outfit. Your choice can define your look and presents a particular image to the world. Yet, owning a pair of Jimmy Choo or Christian Louboutin shoes is way out of many women’s budgets. One way to accessorize your wardrobe ensemble is to create shoes with rhinestones. When you want to keep your shoe collection fresh and exciting, you can add rhinestones for a new look. Adding bling to any type of footwear adds elegance and beauty. Plus, it’s simple to do and you can save money doing it yourself. 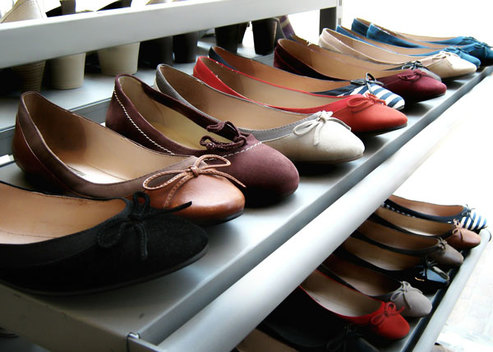 The Best Adhesives for Gluing Rhinestones to Shoes Generally, you can attach rhinestones to any type of footwear including boots and athletic shoes. To keep rhinestones from falling off, be sure to use a good adhesive with a strong bond. Typically, many people use E6000 for gluing rhinestones to shoes. Another popular glue is Gem-Tac. Both work on a variety of surfaces and dry clear. However, always check the manufacturer’s specifications on the material it bonds and recommended type of rhinestone. Some adhesives can ruin acrylic embellishments. Additionally, you’ll want to avoid areas of your shoe that will be constantly stressed. For example, footwear flexes where your toes bend. This constant folding of your footwear may also cause rhinestones to fall off. 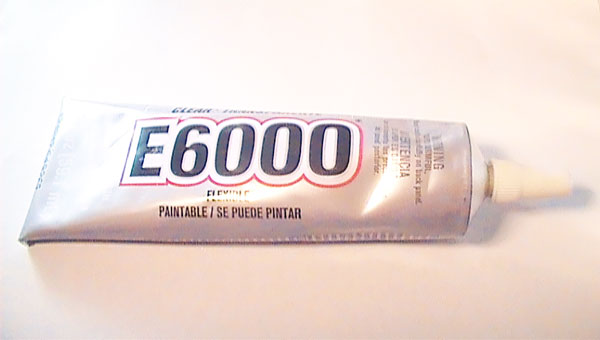 Types of Rhinestones If you’ve never purchased rhinestones, you may be confused by all the different kinds available. Google the word “rhinestone” and results will show acrylic, glass, crystal, Czech, Austrian, or Asian options. Furthermore, you’ll notice a vast difference in price structure. Usually, manufacturers base their pricing on the cost of the raw material and the process to create their product. For example, manufacturers produce resin and acrylic rhinestones by pouring raw material into a mold. While manufacturers of more expensive crystal rhinestones cut facets into the surface of the crystal. Another consideration is the number of facets and their arrangement. These two factors, along with the material, determine the stone’s sparkle, scintillation, and dispersion. Moreover, you’ll find many different rhinestone sizes from tiny to large. Some beginners struggle with deciding on the perfect size for their project. Often, the design will dictate which size will work best. Other times, it’s just a matter of preference. Creating Shoes with Rhinestones Once you decide on your kind of rhinestones and glue, the next most important aspect is the gluing process. Many beginners will use too little glue. Over time, these rhinestones may peel and fall off. When gluing rhinestones, it’s very important that a little bit of glue seeps slightly out from the edges. This produces a seal to keep the rhinestone in place. Generally, rhinestones adhesives dry clear, so once the glue dries, only the sparkle shines through. FAQs about Rhinestones Are you ready to begin blinging out shoes, but have more questions? Below, we’ve answered a few commonly asked questions. Which Rhinestone Brand Should I Buy? With so many rhinestone brands available, it can be hard to choose the perfect one for your project. Sometimes only the best will do. Generally, Austrian and Czech manufacturers have a reputation for quality. However, you’ll also find some Asian manufacturers producing excellent embellishments at a fraction of the price. We carry Preciosa Maxima and another high-quality Asian brand, PriceLess. How Many Rhinestones Should I Buy? Generally, many retailers package rhinestones in 1 gross batches. This means each package will contain 144 rhinestones. First, you’ll need to measure the area you want to cover. Then, compare this to the size of the rhinestones you want to purchase. Larger rhinestones cover a larger area, so you’ll need less than if you buy a smaller stone. What’s The Best Color? Usually, this choice is a matter of preference. You can choose to match the color of your shoes to simply create sparkle. Whereas choosing a contrasting hue will give your footwear a nice pop of color while adding shimmer. Many people choose crystal or crystal AB because both colors work great with any background color. Ready to begin your project of making shoes with rhinestones? Rhinestones Etc. offers competitive pricing, fast shipping, and great customer service. Rhinestones add that special touch of dazzling sparkle. You’ve seen them on dresses, boots, and sneakers. But the important question is can rhinestone stick to anything? Just about! You can stick rhinestones to virtually any surface: glass, metal, fabric, and leather to name a few. More precisely, the questions should be, what glue or adhesive is good for the surface I am working on. Different brand glues work better on some surfaces and some glues are just easier to work with. Once you know your adhesive, you can glue rhinestones to many, many surfaces.  Best Rhinestones Adhesives for Fabrics Because the most common surface to glue rhinestone to is fabric, I’ll start with some good fabric adhesives. Beacon brand makes two different adhesives: Fabric-Tac and Gem-Tac. Fabric-Tac is solely for fabrics. Be careful as it is not recommended for use with acrylic rhinestones. Gem-tac is another one of Beacon’s adhesives and it bonds to more than just fabric. It also works on wood, suede, glass, vinyl and metal. Additionally, it is easy to apply and generally considered non-toxic. Dry cleaning is not recommended. Next up is an adhesive that is made specifically for stretchy surfaces. Aleene’s Flexible/Stretchable glue is specifically made for us on T-shirts, knits, dancewear and socks.  Rhinestone Adhesives for other surfaces E6000 is another popular glue. It provides a strong bond for these surfaces: fabrics, wood glass, plastic, tile, metal, ceramic, rubber, vinyl, leather cement and styrofoam. Keep in mind that this glue must be used in a well-ventilated area. Many people don’t like E6000 because of potential toxicity. However, as long as you follow the manufacturer’s instructions, you should not experience any difficulties. If you prefer to avoid E6000 but want a strong glue, you may want to try Swarovski 2-part Epoxy Resin. This adhesive bonds to metal, rubbers, synthetics and glass. In keeping with Swarovski’s pledge for a healthy environment, it is not toxic, corrosive, hazardous or dangerous. So, the next time you are considering a bling project, think about rhinestone adhesives first. What surface you will be gluing to will determine which glue you should use. Thinking of starting a rhinestone project? Rhinestones Etc. has quality rhinestones while providing excellent customer service.
There are so many different types of fabrics available: velvet, polyester, tweed and silk, chiffon just to name a few. These range from light weight to medium weight and heavy weight woven fabrics. Some of these are sheer like chiffon, net or georgette. Others are very thick like velour or denim. With so many different choices, are all fabrics suitable for rhinestone embellishment? 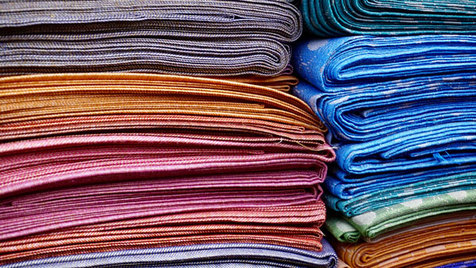 The short answer is yes. Certainly, there are some fabrics that you cannot embellish with hot fix rhinestones. Chiefly, these are fabrics that have low absorbency or have been chemically treated with water repellent treatments, easy to care treatments or softening agents and sheer fabrics. Glues for Attaching Rhinestones to Fabric However, providing you use the correct glue and technique, non-hot fix rhinestones can be used to embellish many more types of fabric. Glues such as super glues, hot glue and those containing acetone are NOT recommended. Two of the most popular glue for attaching rhinestones are E6000 and Gem-Tac. Gem-Tac is my favorite glue for using on fabrics for ease of use. You can squeeze it directly out of the bottle and easily control how much glue you apply. E6000 is gloppy and harder to control the flow. 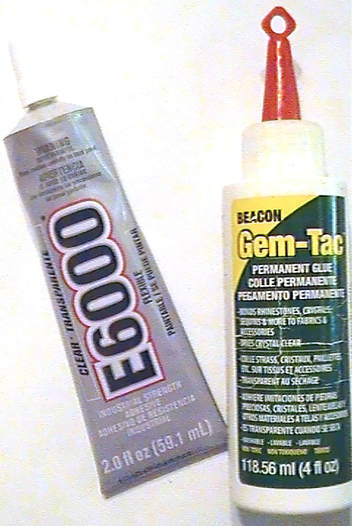 Technique for Gluing Rhinestones to Fabric Notably, most important aspect of gluing rhinestones is the amount of glue. Ultimately, the glue needs to seep out from the edges when the rhinestone is pressed into the glue drop. This provides a seal to protect the rhinestone and keep it from falling off. Adhesives tend to shrink when curing. If too little glue is used, there may be too much space between the rhinestone and the glue. As a result, this can cause the rhinestone to peel off. All suitable rhinestone fabric glue dries clear, so it will not be seen if you accidentally use too much. And it is preferable to use too much rather than too little and have your rhinestone peel off. 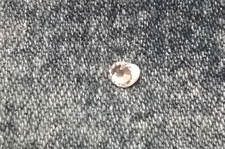 Sheer fabrics can be embellished with rhinestones too. Place a piece of wax paper underneath when gluing. Then, glue as described above. When the glue is done curing, simply peel the was paper off from the underside of the fabric. Applying rhinestones to fabric seems daunting but is actually very easy. If you have any questions, feel free to contact Rhinestone Etc. We will be happy to answer your questions. Rhinestones Etc Storesells quality rhinestones while providing excellent customer service.
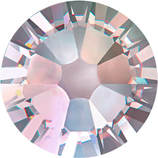
Have you checked the price of figure skating dresses which are embellished with rhinestones? Bargain prices can range up in the $300 range. If you shop around, you can find a plain skating dress for about $75. That is a big difference when you are paying for skates, lessons, testing and competitions. Do you want your skater to dazzle on the ice? Buy the cheaper figure skating dress, glue on rhinestone yourself and save yourself a pocketful of money. Even factoring the cost of rhinestones, you will not come close to paying $300. 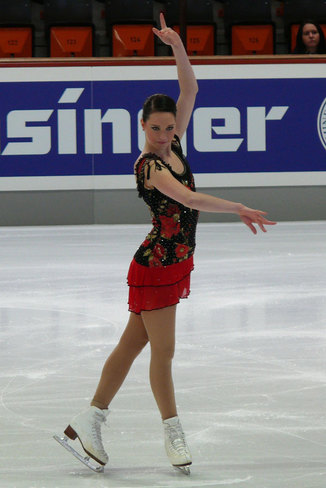 How to glue rhinestones to Figure Skating Dresses Interested in learning more but don’t know where to start? First learn the basics of finding quality rhinestones. You can read about the 4 C’s determining rhinestones quality here. Once you’ve decided on the brand of rhinestone, you’ll need to choose the color and size. Since you are new to gluing rhinestones to figure skating dresses, you many want to stick with either Crystal or Crystal AB. Both are popular colors which will enhance any dress. Crystal is a clear rhinestones and Crystal AB is the clear rhinestones with an iridescent coating on it.
The size you choose is also a matter of preference and dependent on the type of design. Generally, most skating dresses are embellished with the larger size stones, 20ss and 30ss. How many you need depends again on the design and the size. Helpful tips on size are discussed here on this rhinestone sizing blog. Next, pick out your adhesive. Both E6000 and Gem Tac are widely used. I prefer Gem Tac for the ease of application. Whatever adhesive you choose, make sure it is suitable for gluing rhinestones to fabric, permanent, washable and dries clear. Follow the manufacturer’s guidelines. A pair of tweezers or wax tipped tool is essential for picking up rhinestones and pressing into the glue.  Prewash the figure skating dress before beginning to glue. Additionally, if the material is thin, you may want to put a piece of wax paper between layers. When gluing rhinestones, use a drop of glue slightly smaller than the rhinestone. Some of the glue should seep out from the edges when you press the rhinestone into the glue drop. This is very important as it creates a seal to keep the rhinestone from peeling off. Allow the garment to dry flat for 24 hours.
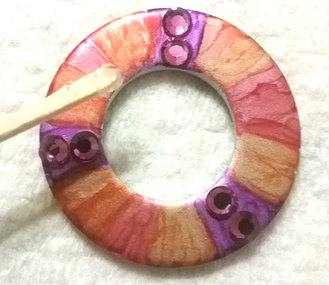
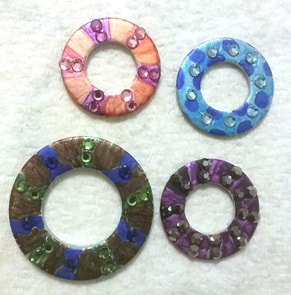
After you start gluing rhinestones, you will see how easy it is! As you get more confident, you can experiment with different designs and color. With practice, you’ll be good enough to design those fancy skating dresses you see during the Winter Olympic Games. Alcohol ink washer necklaces are the latest fashion and I love the look of them. You take a simple item, a washer from the hardware store, color it with alcohol ink and you have a work of art. Simply attach a cord and you have a stunning necklace. Add rhinestones to make your necklace stand out even more. For this project I used: ½ and ¾ inch washers Alcohol ink markers Various rhinestone colors in size 12ss E6000 Wax tipped tool or tweezers Embroidery thread Cord end caps 4 mm jump rings Lobster clasp Krylon clear matte acrylic coating Jewelry pliers How to Make Washer Necklaces One of my daughters is a very good abstract artist. Some of her artwork is on Facebook as ArtisticallySweet and Instagram as @megcatdragon. She colored the washers with alcohol ink markers. 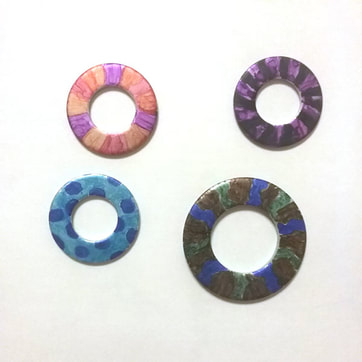 Once the ink dries, you will want to put a clear protective coating on it. Krylon brand which is easy to apply and dries in 10-15 minutes. Follow the manufacturer’s instructions when applying. I picked some coordinating rhinestones colors in size 12ss to enhance the washers with. When gluing rhinestones to metal, I like to use E6000 because of the strong bond. Use in a well-ventilated area and always follow the manufacturer’s instructions. E6000 can be a bit gloppy, so I squeeze E6000 over a paper plate and use a toothpick to apply to glue. Then using tweezers or wax tipped tool, pick up a rhinestone and gently press it into the glue. Continue gluing rhinestones and then allow to dry for 24 hours.
For the cord, I used embroidery floss. It comes in many colors, so you are sure to find one that will coordinate with your necklace. Measure your neck to see where you want the necklace to lay. You can use one long piece of floss, or as I did, two shorter pieces. I cut mine 27 inches long. Fold the floss in half to form a loop at the one end. Pull this loop from underneath the washer up through the hole. Take the two loose ends, put them through the loop and pull to tighten. Do the same for the other piece of floss.  Trim the ends of the floss so they are even. Then taking a cord end clasp, lay the ends of the embroidery floss in the clasp and using jewelry pliers, bend the first side over then the other to secure the ends.
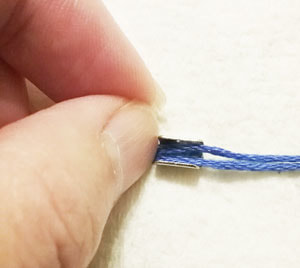
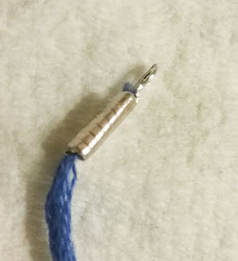
On one end add a jump ring and lobster clasp and on the other just a jump ring.  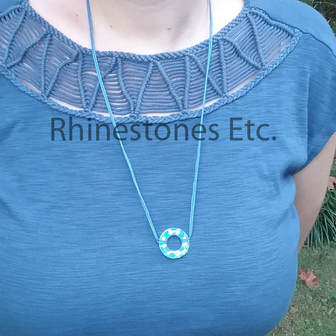 Stunning, aren’t they? And so simple to make. Unleash your creative side and make some washer necklaces for every outfit! Are you ready to make your own washer necklaces and need some rhinestones? Rhinestones and wax tipped tools are available from: www.RhinestonesEtc.com When my son was little, he loved the television show Bob the Builder, a show about a construction worker and his tool friends. He had a CD with Bob the Builder songs which he played constantly. One song had these lyrics: “Don’t go blaming the tool box, you need the right tools for the job.” Sometimes you can get the job done with what you have on hand. But, specialized tools can make the job so much easier. 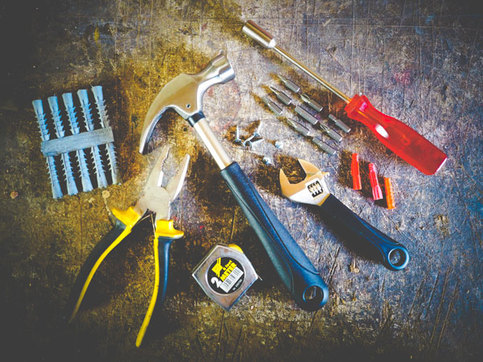 The same holds true for gluing rhinestones. Basically, you just need rhinestones and glue and something to pick the rhinestones up with. Tweezers are one option. Just make sure you don’t squeeze the tweezers too tightly or your rhinestone will slip out and go flying. Also, whenever you press the rhinestone into the glue drop you may get glue on the tweezers' ends. Make sure you wipe the glue off, so that the rhinestone doesn’t stick to the tweezers. Wax Tipped Rhinestone Tool Overall, one of the handiest tools to have is a wax tipped tool. This tool allows you to simply tap the rhinestone and it will stick to the tip. It will stay there until you press it into your glue drop. And the wax tipped tool fits comfortably in your hand, much like a pencil. Gluing rhinestones is quick and easy with a wax tipped tool. 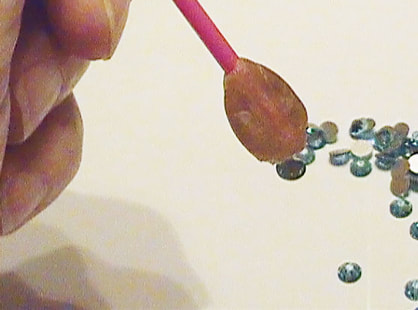 There are varying types of wax tipped tools on the market, ranging in price. You can spend out $2.00 for a simple wax tipped tool. Or you can invest in a higher end Crystal Katana for about $25. If you are just starting out, the cheaper wax tipped tools are great. In fact, that’s what I use most of the time. 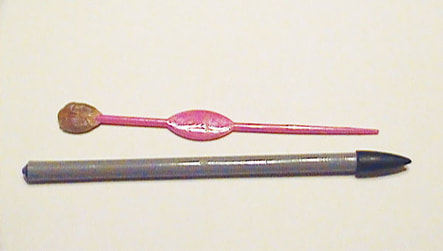 Once you try a wax tipped tool, you will never go back to tweezers again. Ultimately, you’ll find it much easier and quicker to glue rhinestones when you use a wax tipped tool.
Wax tipped tools are available from: www.RhinestonesEtc.com Accessorizing an outfit can really add that extra something and make it stand out. Adding just the right jewelry can really impact how you feel about yourself. You can go from pretty to beautiful just by adding the right touch. But it isn’t always easy to find the right jewelry to match an outfit. Once you see how simple it is to create your own rhinestone stud earrings, you’ll be making a pair to match every outfit. For this project I used: E6000 Flat post earrings and backings 30ss rhinestones Tweezers or wax tipped tool 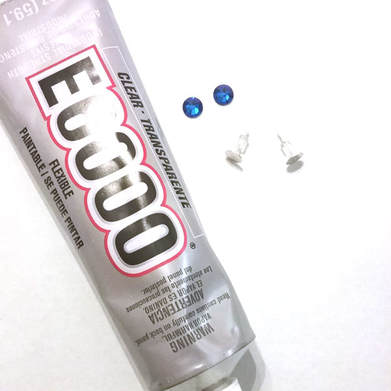 How to Make a Pair of Rhinestones Stud Earrings Most craft stores have a large jewelry supply section. So, you should have no trouble finding some flat post earrings and backings. I have a nickel allergy and was happy the ones I found were nickel free. When I glue rhinestones to metal, I like to use E6000. It provides a good adhesion to metal. Always make sure you use it in a well-ventilated area and follow the manufacturers instructions. Also, I found that you can use slightly less glue when using E6000 than other adhesives because it provides such a strong bond. 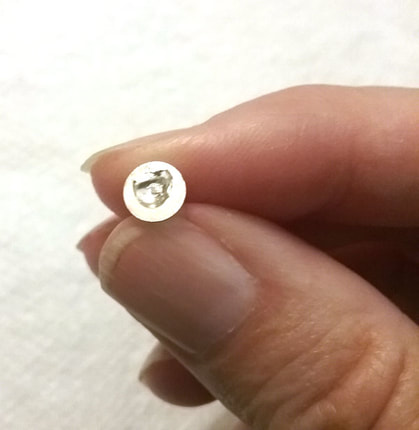 Start by applying E6000 to the flat part of the earring stud. Using a toothpick when applying E6000 helps to make sure you have the right amount as E6000 tends to be gloppy. Then, pick up a rhinestone using tweezers, or a wax tipped tool. Gently press the rhinestone into the glue. Do the same for the other earring stud. Allow to dry for 24 hours.  Super easy to make and as nice looking as those expensive department store earrings. Plus, you can make a different colored pair for every outfit you own without blowing your budget. Happy crafting!
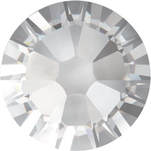
Rhinestones are available from: www.RhinestonesEtc.com.  If you are new to rhinestones, you may be confused by the choices of sizes, colors and manufacturers. There are acrylic or crystal rhinestones, hot fix or non-hot fix, round, square or practically any shape imaginable. Not to mention all the many colors available. So many choices and where to begin? While there are many rhinestone options today, this was not always the case. Once upon a time, rhinestones were a naturally occurring resource. Quartz mixed with lead pebbles were found along the banks of the Rhine River, one of Europe’s greatest rivers. Eventually, this natural resource became depleted, and in 1715 the Czech company, Preciosa, developed a way to manufacture rhinestones. Daniel Swarovski originally worked for Preciosa and left to open his own company in 1895. Today, there are many manufacturers of crystal rhinestones as well as acrylic rhinestones.  Types of Rhinestones Crystal rhinestones, those made by Swarovski, Preciosa and other manufacturers are laser cut. Different manufacturers have different number of facets. Keep in mind, that the more facets a rhinestone has, the more light it reflects. The Xiruis Rhinestone manufactured by Swarovski, has a whopping 16 facets. Preciosa Rhinestones have 12 facets. Should you decide to buy a non-brand name rhinestone, be sure to check on the number of facets as it will affect its sparkle.  Additionally, crystal rhinestones break up the light like a prism. Rhinestones sparkle so beautifully because of this prismatic effect combined with the number of facets. In 2012, Swarovski patented a new lead-free crystal formula making their stones CPSIA compliant. CPSIA laws govern lead content in items for children. For this reason, Swarovski is a good choice for parents who have children ice skating, dancing, or in participating other activities. Acrylic rhinestones are molded rhinestones and while the facets do reflect the light, they do no have the prismatic effect of crystal. Inexpensive and lead free make acrylic rhinestones a good choice for children’s crafts.  The 4 C’s Key points to keep in mind If you are planning on using a non-name brand rhinestone: the four C’s: color, cut, contour and clarity.
What about that “ss” size? Originally, when rhinestones were found along the banks of the Rhine River, they were measured in “stone sizes” or “ss”. Although natural rhinestones are no longer, the “ss” system of measurement is still in use today. The smaller the number next to the “ss”, the smaller the rhinestones. Likewise, the larger number next to the “ss”, the larger the rhinestones. And the smaller the rhinestone, the more you will need to cover an area. By the same token, the larger the rhinestone, the less you will need to cover an area. Most retailers will also give the millimeter size. Below is a conversion chart from ss to millimeters: ss mm ss mm ss mm 3 1.4 8 2.35 20 4.7 4 1.6 9 2.65 30 6.41 5 1.8 10 2.85 34 7.17 6 2.0 12 3.1 40 8.54 7 2.15 16 3.9 48 11.11 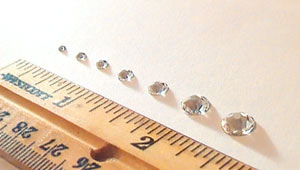 Recommended Adhesives There are two things to consider when applying rhinestones. First, the surface and then the type of rhinestone. Some adhesives provide a more permanent bond to some surfaces. Beacon’s Gem Tac is a great all-purpose glue. Gem Tac is recommended for fabric, wood, suede, glass, vinyl and metal. E6000 is another adhesive suitable for just about any type of surface. Recommended for all the surfaces as Gem Tac as well as plastic, tile, ceramic, cement, rubber, leather and Styrofoam. However, this glue is a bit harder to work with as it’s thicker and harder to apply. Keep in mind that this glue dries quickly and must be used in a well-ventilated area. Be careful as some adhesives are not recommended for use with Acrylic rhinestones. Beacon’s Fabri-Tac and E6000 are not recommended for use with these types of rhinestones. Always check the glue manufacturer’s instructions and the supplier of your rhinestones for the best adhesive to use.  How to attach Rhinestones to Fabric After you pick your adhesive, you are ready to glue. Prewash whatever garment you are applying rhinestones to. Squeeze a drop of glue slightly smaller than the rhinestone on your fabric. Using a tweezer or wax tipped tool, pick up the rhinestone and gently press it into the glue drop. Some glue should seep out of the edges of the rhinestone. This makes a seal and helps to prevent the rhinestone from peeling off. Allow to dry flat for 24 hours. Hot fix rhinestones are rhinestones with glue on the bottom. These can be adhered to fabric using a hot fix tool or a hot iron without steam. A hot fix tool is a wand with different size tips for the various size rhinestones. Position the rhinestones crystal side up, heat the tool, then vertically position the wand over the item you want to pick up. With a light touch, pick up the item in the cup at the end of the tip. It will stick in the tip. Depending on your type of wand, wait 10-15 seconds for the glue to heat (you will see it bubble). Gently tap the tip onto the fabric and the rhinestone will stick. Too much pressure will cause the rhinestone to stick in the tip so make sure you use a light touch. In a few minutes the glue will cool, and the rhinestone will be securely attached. Another nifty tool is hot fix transfer paper. You can make complicated designs or lettering by laying rhinestones on the sticky side, then simply use an iron without steam to apply. The recommended temperature for glue activation by Swarovski is a temperature range of 120°C to 170°C (250°F to 340°F). Due to a lack of absorbency, some fabrics are not suitable for use with hot fix rhinestones. These include tightly woven fabrics, very thin fabrics such as organza, leather or imitation leather as well as fabrics treated with water-repellent treatments, stain-resistant treatments and easy-to-care treatments.  Other Methods for Attaching Rhinestones Two other ways of attaching rhinestones to fabric are sewing and metal settings. Sew-ons are rhinestones with predrilled holes for sewing. Simply sew the rhinestone on with a needle and thread through the holes. Rhinestones with metal settings that have channels on the back such as Rose Montees can be used for sewing as well. There are two types of metal settings, tiffany and rim. Tiffany settings enter from the back of the fabric, the rhinestone is placed in the middle of the prongs and then prongs fold over the front of the rhinestone. Rim settings fit over the top of the rhinestone and the prongs are pushed into the fabric and folded on the backside of the fabric. There are also rhinestones already attached to metal settings such as Rose Pins. How Many Rhinestones will I need? What is the size area you are covering and are you completely covering it with rhinestones? And yes, it involves math. For a straight line of rhinestones: Step A. Multiply the number of inches by 25.4 Step B. Then divide your answer by the millimeter size of the rhinestone. So for: 3.1 for 12ss (3.1 is the mm size for 12ss rhinestones) 3.9 for 16ss (3.9 is the mm size for 16ss rhinestones) 4.76 for 20ss (4.76 is the mm size for 20ss rhinestones) If you are covering a large area with rhinestones you will need this formula: Step A. Find the area by multiplying the width and length of the area you wish to rhinestone. Step B. Multiply the answer in Step 1 by 67.14 for 12ss rhinestones 42.41 for 16ss rhinestones 29.20 for 20ss rhinestones The answer will be the amount of rhinestones you will need to cover that area. If you are still confused or need help in figuring out how many rhinestones you will need, contact us here at Rhinestones Etc and we will be glad to help you do the math.  What Color Rhinestones Should I use? Much of choosing a color is preference but choosing certain colors will give your project a certain look. Choosing a rhinestone the same color as the background will provide sparkle while blending in. A contrasting color will pop while providing sparkle. Not sure what color to use? Popular colors, crystal and crystal AB are good choices. Both colors look great with anything. Crystal is a clear rhinestone while Crystal AB is a clear rhinestone with an Aurore Boreale (AB) coating that gives the rhinestone a rainbow look. Crystal AB rhinestones are great at picking up and reflecting back the surrounding color. Is your Head spinning from all this information? Do you have more questions than answers? Don’t hesitate to contact the friendly staff at Rhinestones Etc. We love to help people with their projects. |
KarenI have been adding bling for over 20 years. Through my projects, I hope you find inspiration. Categories
All
Archives
February 2024
|


 RSS Feed
Home About Policies Return Shipping
Contact Us Size Chart Privacy Products Reviews
Copyright 2024 Rhinestones Etc. All rights reserved.
Contact Us Size Chart Privacy Products Reviews
Copyright 2024 Rhinestones Etc. All rights reserved.