|
In mythology, Cupid is often depicted as a winged child with a quiver full of arrows. If Cupid shot you with one of his arrows, you would fall in love with the first person you set eyes on. Falling in love doesn’t really happen that way but you can still celebrate the day with this heart pin. For this project I used: Red Sculpey clay Heart cookie cutter or template Gem Tac Tweezers or wax tipped tool 33 - Rose Gold 12ss flat back Swarovski Elements Rhinestones Jewelry Pin 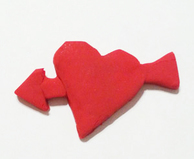 Roll the red clay out to ¼ of an inch thickness. Using the cookie cutter or template, cut out a heart with an arrow through it. Place on a sheet of white paper on a cookie sheet. Bake in a preheated 275 degree oven for 15 minutes. Allow to cool. When cool, glue the Rose Gold rhinestones to the arrow part with Gem Tac. Place a drop of Gem Tac on the heart and place a rhinestone in the middle of the glue drop using the tweezers or wax tipped tool. In the middle of the heart, glue 6 Rose Gold rhinestones. Allow to dry flat for 24 hours. 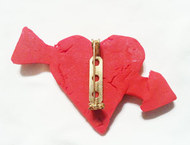 When completely dry, turn the pin over and glue a pin to the back. Again, allow to dry flat for 24 hours. Whether you’ve been struck by Cupid’s heart or not, you can still say I love you with this easy to make heart pin.  Rhinestones are available from:
www.RhinestonesEtc.com Do you want to be notified of upcoming sales, new clearance, contests and giveaways? Would you like our free guide to rhinestones? Subscribe to our newsletter by clicking here.
0 Comments
 St Valentine was a priest who lived under the persecution of Claudius II. He refused to give up his faith and he was martyred. In 496 AD, Pope Gelasius marked February 14th as a celebration in honor of his martyrdom. He is the patron saint of happy marriages, lovers and engaged couples. Today, we celebrate Valentine’s Day with hearts, the symbol of love and chocolates. Here is how to create your own one of a kind heart. For this project I used: Jewelry Wire (I used 20 gauge) 3-Crystal 16ss Swarovski Rose Montees Gem tac Jewelry Pliers (needle nose, wire cutter and round) 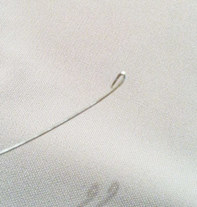 Cut a piece of wire about 8 inches long. On one end, fold the end down to make a very small loop. Begin to bend the wire in a circular pattern making it a little larger as you circle around. Once you get to the desired size swirl, bend wire down, then at a 90 degree angle to start making the heart shape. 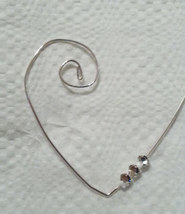 Place a little bit of glue on the right wire near the bottom and slip 3 – 16ss Crystal Rose Montees onto the wire and into the glue. Allow flat for 24 hours. Once glue is dry, continue to bend the wire into a heart shape and thread under the swirl. 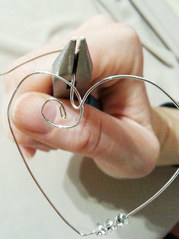 Using your needle nose pliers, bend the free end of the pendant at a 90 degree angle. Grab the wire with the rounded pliers and again using your fingers wrap the wire around the pliers creating your loop. Holding the loop secure with the needle nose pliers, wrap the remaining wire around the bottom of the loop several times. Cut the remaining wire with your side cutters and tuck in the end of the wire. You now have a lovely design which can be kept or given to express love to that special someone. Swarovski Rose Montees are available from: www.Rhinestones Etc.com Do you want to be notified of upcoming sales, new clearance, contests and giveaways? Would you like out free guide to rhinestoning? Subscribe to our newsletter by clicking here. 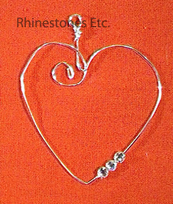 Looking for a unique piece of jewelry that screams you? For this project I used: 6 Crystal AB 16ss Swarovski Elements Rose Montees Jewelry Wire (20 gauge) Jewelry Pliers (needle nose, wire cutter and round) Gem Tac 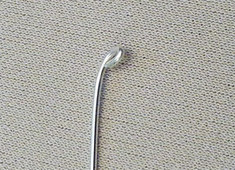 Cut a piece of wire about 8 inches long. On one end, fold the end down to make a very small loop. Begin to bend the wire in a circular pattern making it a little larger as you circle around. Once you get to the desired size, slip your Swarovski Rose Montees into place and secure with a bit of Gem Tac . Let dry for 24 hours. 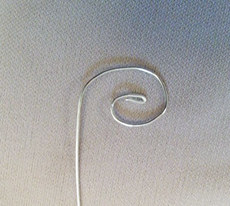 Once dry, you need to make the loop for the pendant. Using your needle nose pliers, bend the free end of the pendant at a 90 degree angle. Grab the wire with the rounded pliers and again using your fingers wrap the wire around the pliers creating your loop. Holding the loop secure with the needle nose pliers, wrap the remaining wire around the bottom of the loop several times. Cut the remaining wire with your side cutters and tuck in the end of the wire. 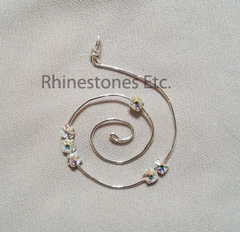 String a chain through and you have a unique one of a kind rhinestones pendant. Use a tighter loop and attach to ear wires for earrings. Experiment and try different shapes.
Crystal AB 16ss Swarovski Elements Rose Montees are available from: www.RhinestonesEtc.com Do you want to be notified of upcoming sales, new clearance, contests and giveaways? Would you like our free guide to rhinestoning? Subscribe to our newsletter by clicking here. 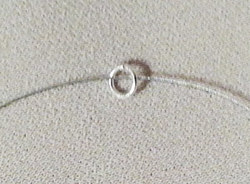 I just love the sparkle and beauty of diamond bracelets but being the mom of 5 children, I most likely never be able to afford one. Rhinestone Montees offer a cheaper alternative with maximum sparkle. For this project I used: 38 - 16ss Crystal Swarovski Rose Montees Beadalon wire .015 thick about 22 inches long Jump rings 2 - 4mm and 1- 6mm Lobster clasp Crimp bead Pliers  Begin by threading a jump ring through the wire and place it so that it is at the halfway point. Then thread each end of the wire into the channels in the back of the rose montee so that the wire crosses in the back. Pull the wires taut so that the rose montee is flush with the jump ring. Continue threading rose montees pulling taut so that each one is flush with the one before until your bracelet measures about 7 inches. (Standard size bracelets are 7.5 inches long)  Thread both ends through a crimp bead, then jump ring , back through the crimp bead and then through opposite channels in the rose montee. Pull the wire until findings are flush with the rose montee and then crimp your bead. Cut off any excess wire. 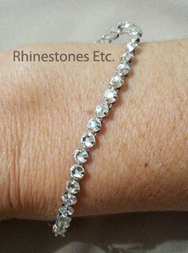 Slip this beautiful bracelet on whenever you want to impress and shine!
Rose Montees are available from: www.RhinestonesEtc.com Findings and wire can be obtained from www.pandajewels.com Do you want to be notified of upcoming sales, new clearance, contests and giveaways? Would you like our free guide to rhinestoning? Subscribe to our newsletter by clicking here. 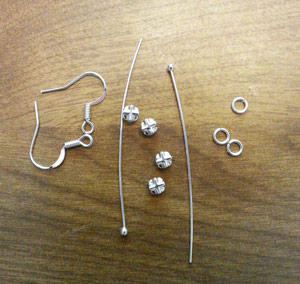 Last time I made rhinestones dangle earrings using Rose Montees, I used flexible wire to secure the Rose Montees. For these earrings, I wanted more rhinestones with a more linear look. For this project I used: 2 silver headpins Ear wires 2-6mm Silver jump rings 8 - 16ss Swarovski Crystal Rose Montees Pliers: Round Nose, Needle Nose and Side Cutters Gem Tac 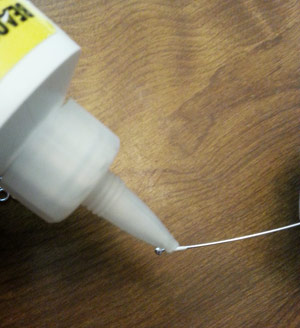 To secure the rose montees and prevent the rose montees from flipping to the backside, lay a line of Gem Tac glue along the bottom of the headpin. Slide 4 rose montees onto the head pin, rhinestones all facing the same way, until flush with the bottom ball and allow to dry completely. Repeat for the other head pin. 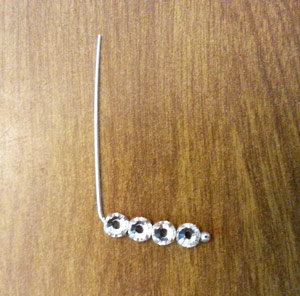 Once the glue is completely dry, take your needle nose pliers. Place the pliers up against the rose montee at a spot on your pliers that is about 1.5 mm thick and using you finger, bend the head pin over the pliers to a 90 degree angle. Grab the wire with the rounded pliers and again using your fingers wrap the wire around the pliers creating your loop. 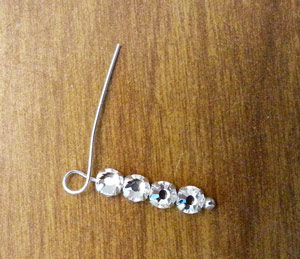 Holding the loop secure with the needle nose pliers, wrap the remaining wire around the bottom of the loop several times. Cut the remaining wire with your side cutters and tuck in the end of the wire.  Using a jump ring, attach the line of rhinestones to your ear wires. Another pair of beautiful sparkling earrings! Swarovski Crystal Rose Montees are available at: www.RhinestonesEtc.com Do you want to be notified of upcoming sales, new clearance, contests and giveaways? Would you like our free guide to rhinestoning? Subscribe to our newsletter by clicking here. I found this youtube video from Beaducation very helpful in showing how to make the loop: https://www.youtube.com/watch?v=bQO4tSoNaRc 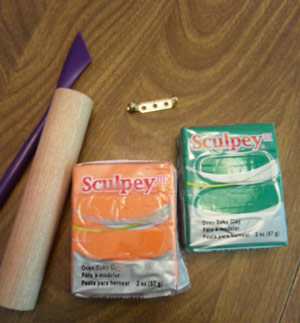 When I was in high school, I had a friend who crocheted. When a holiday rolled around, she always had a crocheted pin in the shape of something to do with that holiday. For example, for St. Patrick’s Day, she made me a shamrock. So in honor of my friend, I am introducing the holiday pin collection. For this craft you need: 19 Sun 12ss Swarovski Elements Rhinestones 4 Fern Green 12ss Swarovski Elements Rhinestones Orange Sculpey clay Green Sculpey clay Rolling pin Cutting tool Pin Sobo brand glue Cookie cutter or template in the shape of a pumpkin 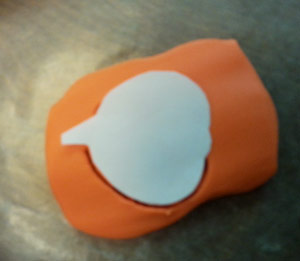 Roll the orange clay out to ¼ of an inch thickness. Using the cookie cutter or template, cut out a pumpkin. Roll out the green clay also to ¼ of an inch thickness and cut out a stem and leaf shape. Press the stem onto the pumpkin and place on a sheet of white paper on a cookie sheet. Bake in a preheated 275 degree oven for 15 minutes. Allow to cool. 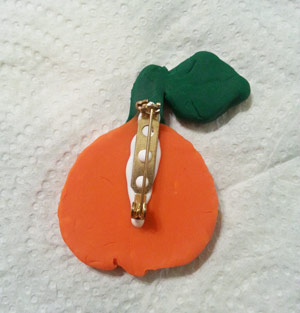 When cool, glue the fern green and sun rhinestones onto the front of the pumpkin pin and then glue the pin onto the back using the Sobo glue. Allow to dry. 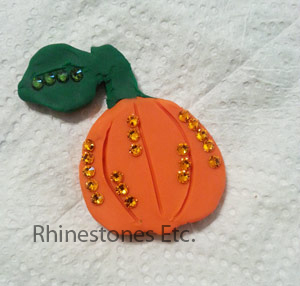 A gorgeous, sparkly pumpkin to celebrate the fall season is now yours to wear!
Swarovski Rhinestones are available from : www.Rhinestones Etc.com Do you want to be notified of upcoming sales, new clearance, contests and giveaways? Would you like our free guide to rhinestoning? Subscribe to our newsletter by clicking here.  Who doesn’t love sparkly, dangling earrings? These are simple earrings to make for a beginner because I was able to make them and I know very little about jewelry making. For this project you need: Flexible jewelry wire (I used silver 7 strand) 4 Crystal 16ss Swarovski Elements Rose Montees 2 silver crimp beads 2 silver fish hook earrings Wire cutters Crimping tool 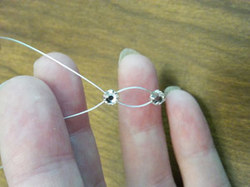 Rose Montees are rhinestones with channels in the back for stringing. Begin by cutting a piece of wire about 6 inches long. Thread one end of the wire through one of the channels then take the other end of the wire and thread it through the cross channel so that your wire crosses and looks like the picture above. Pull the wire ends through until you can no longer see the bottom loop and the wire fits flush with the rose montee. Take another rose montee and thread it through following the same method stopping about ¾ of an inch from the bottom rose montee so that there is a small loop showing between both rose montees. 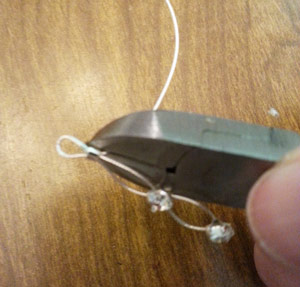 Thread a crimping bead through both wires and then your fish hook earring. Thread your wire back through your crimping bead and pull these 2 wire ends until your loop and fish hook are about ¾ of an inch from the middle rose montee. Crimp your bead and cut off the excess wire. Repeat these steps with the other earring.  When you are finished, you have a light, sparkly pair of earrings for everyday or that special occasion!
Swarovski Rose Montees are available at: www.RhinestonesEtc.com Do you want to be notified of upcoming sales, new clearance, contests and giveaways? Would you like our free guide to rhinestoning? Subscribe to our newsletter by clicking here. |
KarenI have been adding bling for over 20 years. Through my projects, I hope you find inspiration. Categories
All
Archives
February 2024
|

 RSS Feed
Home About Policies Return Shipping
Contact Us Size Chart Privacy Products Reviews
Copyright 2024 Rhinestones Etc. All rights reserved.
Contact Us Size Chart Privacy Products Reviews
Copyright 2024 Rhinestones Etc. All rights reserved.