|
Some people in your life make gift giving very difficult. You know how it is, you walk from store to store and still come up empty handed. You want something showing how much you appreciate that special person without spending a lot of money. This personalized blinged out coffee mug is easy to make and is perfect for that one person on your list. The Best Reason to Give A Personalized Gift Generally, any gift is a thoughtful expression, but a personalized one expresses so much more. Here are our top reasons for giving a personalized keepsake. 1. Strengthens the Connection with Your Recipient Who doesn’t love a personalized, handmade gift? Moreover, your recipient will feel special and loved when something has their name or initial on it. 2. Your Gift Is Unique Personalization adds uniqueness to the item. Your gift will become a treasured keepsake. 3. Suites Any Occasion You can give a personalized gift to anyone for any occasion. They make the perfect universal present. Rhinestones Are Perfect for Personalization Rhinestones add a touch of luxury and glamor to whatever item you choose to bling out. Plus, you can glue rhinestones to virtually any item. Clothing, coffee mugs, shoes, pocketbooks, and sunglasses are just a few of the many things you can bling. Typically, smaller rhinestone sizes work better for making initials. You may want to try using rhinestone sizes from 6ss to 12ss. If you’re not used to working with rhinestones, you probably should use the larger 12ss size. Sometimes, beginners find tiny rhinestones harder to glue. Instructions to Make a Blinged Out Coffee Mug Generally, creating a blinged out coffee mug is an easy process. As with any rhinestone project, the secret is in the gluing method. Always check your adhesive to make sure it’s suitable for creating a strong bond to your material. Many crafters don’t like to use E6000 because of the potential toxicity of breathing in fumes when gluing. However, when used correctly, this glue is strong enough to keep rhinestones in place through repeated washings. You may want to try a 2-part epoxy instead. Finally, this type of rhinestone project requires hand washing only to keep the rhinestones intact. For this project I used: 1 coffee mug 12ss Crystal Rhinestones Gem Tac Wax tipped tool Chalk 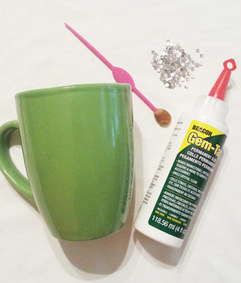
I usually find it easier to keep to my pattern with guidelines. Thus, I like to use chalk to create my framework because you can easily remove it. Plus, you can easily change the size or font when using erasable guidelines. So, begin by drawing the letter on your mug with a ruler and a piece of chalk. . 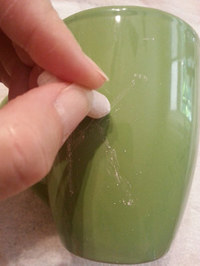
After you’ve chalked in your letter you are ready to start gluing. Place a drop of glue about the size of the rhinestone on your chalk guideline. Pick up a rhinestone using the wax tipped tool and gently press down into the glue drop. A very small amount of glue should seep from the edge of the rhinestone. This creates a seal to keep the embellishment from peeling off when washing. 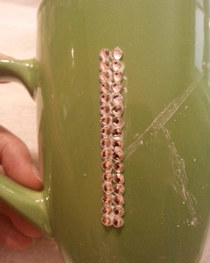
Then, continue gluing in this manner until the letter is complete. When you’re finished, let your project dry for 24 hours. 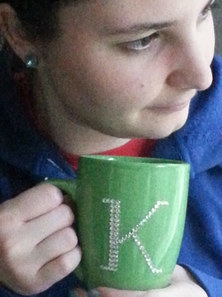
Discover Discount Rhinestone Prices
Expensive looking and personalized, a blinged out coffee mug makes the perfect gift. However, purchasing rhinestones may not seem so easy. You’ll find many online stores selling many types of rhinestones at different prices. At Rhinestones Etc. we can help you sort through the different types of rhinestones. We’ve been selling quality embellishments since 2011. With discount pricing, fast shipping, and great customer service, we want to be your source for rhinestones.
1 Comment
You know that feeling you get when your favorite pair of jeans gets a hole in the knee? Never fear! You can still use them by turning them into your new favorite pair of shorts. Why wait? Have a new pair of jeans that you love? You can do this with a new pair of jeans for a unique look that you’ll love even more. For this project I used: A pair of old jeans cut to short length Black lace Scissors Gem Tac Wax tipped tool or tweezers 4 mm silver round metal trim 12ss Crystal Rhinestones 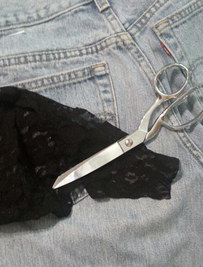 I began by cutting my jeans above the knee down to short length. Then I traced the back pocket size on a white piece of paper. I cut this out and used this as a pattern to cut the correct size of black lace to cover my pocket. 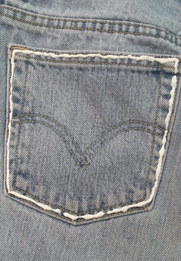 Using Gem Tac, I applied a line of glue around the edges of the back pocket of my jeans. Laying the black lace on the pocket, I gently pressed down the edges to adhere to the jeans and allowed to dry flat for 24 hours.  Using the pocket pattern, I cut a design out to have a template to use as a guide to glue on my metal trim and rhinestones. I began gluing the metal trim on the out most edges of the pocket following my guide. Although the metal trim is hot fix, I prefer to use Gem Tac to adhere to thick material like denim. 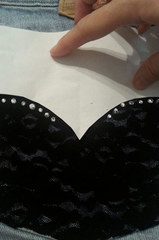 I alternated between the metal trim and rhinestones leaving about ¼ of an inch between embellishments. Place a drop of glue about the same size as your embellishment and pick up either a rhinestone or piece of metal trim using the wax tipped tool. Gently press it into the drop of glue. Continue gluing until your pattern is finished. When finished gluing, allow to dry flat for 24 hours. 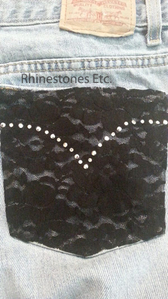 The silver metal trim and crystal “pop” on the black lace and turn these shorts into something special! 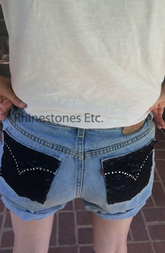 Rhinestones, metal trim and wax tipped tool are available from:
www.RhinestonesEtc.com Do you want to be notified of upcoming sales, new clearance, and new products? Would you like our guide to Gluing Rhinestones Without Panic? Subscribe to our newsletter by clicking here. Warm weather is just around the corner and it would not be summer without flip flops. But why settle for plain boring flip flops when you can sparkle in the sunshine? Rhinestone flip flops would even be great for beach weddings. For this project I used: 1 pair of flip flops 30ss and 12ss crystal rhinestones E6000 Wax tipped tool  After deciding on your pattern, place a drop of glue on the band on the flip flops. E6000 tends to be a bit gloppy. So I like to squeeze some glue over a paper plate and use a toothpick to place the glue. Us a drop of glue slightly smaller than the rhinestone. Using the wax tipped tool, pick up a rhinestone and gently press it into the glue. 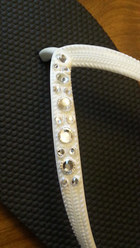 My pattern is 1- 30ss, 2- 12ss side by side, 1-30ss and so on. Continue gluing in this manner. I stopped about 2 inches from the bottom of the strap. Allow to dry for 24 hours. 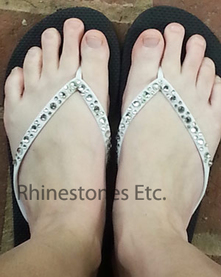 Wow! You will certainly attract attention with every step you take!
Rhinestones and wax tipped tool are available from www. RhinestonesEtc.com Do you want to be notified of upcoming sales, new clearance, contests and giveaways? Would you like our guide to Gluing Rhinestones Without Panic? Subscribe to our newsletter by clicking here. Your daughter is your princess and you want her bedroom to reflect that. One way to do that is to decorate her room with a sparkly personalized initial. For this project I used: 5 inch wooden pre-painted white wooden letter Mod Podge Sponge brush Stickers 12ss crystal rhinestones Gem tac Wax tipped tool or tweezers Begin by applying the stickers to the letter. After applying stickers, apply a coat of Mod Podge using the sponge brush and allow to dry completely. Mod Podge will seal the stickers as well as providing a finish. Apply several coats according to your preference, allowing to dry completely between coats. 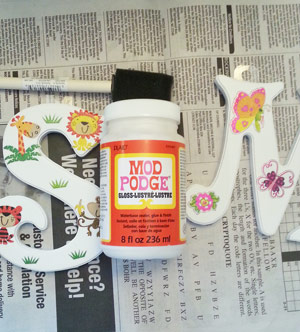 Once you have finished applying Mod Podge, you can lay out your rhinestones to decide how you want to accentuate the letters. I like the look of a line of rhinestones along one side of the letter. Apply a drop of glue on the letter about the same size as the rhinestone and using your wax tipped tool, pick up the rhinestone and place it in the glue, gently pressing it down. Continue gluing rhinestones until your letter is embellished. Allow to dry flat for 24 hours. 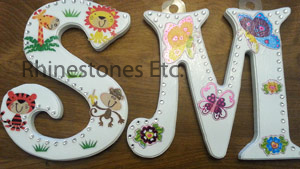 A beautiful, personalized letter that your daughter will love!
Rhinestones and wax tipped too are available from: www.RhinestonesEtc.com Do you want to be notified of upcoming sales, new clearance, contests and giveaways? Would you like our guide to Gluing Rhinestones Without Panic? Subscribe to our newsletter by clicking here. My college attending daughter was in need of a dress for a solo in an upcoming concert. We headed over to Goodwill where we found an elegant but plain black velvet floor length gown (with the tags still on!) for $5. After some discussing several design ideas, we decided on a scatter pattern accentuating the keyhole in the bodice. For this project I used: Black dress 30ss Crystal Rhinestones flat back (approximately 15 pieces) 12ss Crystal Rhinestones flat back (approximately 5 gross) Gem-Tac adhesive Wax tipped tool or tweezers 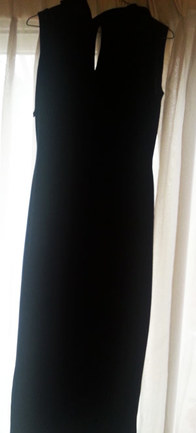 Begin by washing the dress to remove any chemical finish. When dry, lay dress as flat as possible on your work space. Pre-laying rhinestones out on the dress helps to determine the pattern. I began with outlining the keyhole and worked out from there. 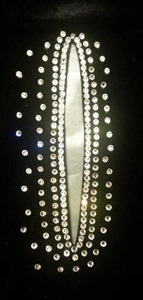 Place a drop of glue on the dress about the same size as the rhinestone. Using your wax tipped tool, pick up a rhinestone and place it in the center of the glue drop, gently pressing down. The glue should seep out a little covering the bottom sides of the rhinestone. Continue gluing in this manner until your pattern is complete. 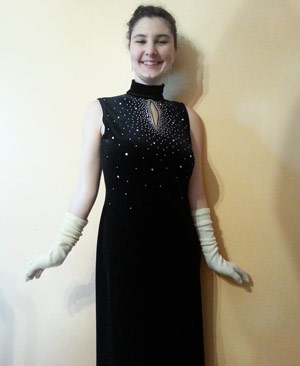 From plain to spectacular you too can change any dress into a sparkling extravaganza! Feel free to send me pictures of your own masterpieces at rhinestonesandmore@gmail.com. I’d love to see them! Rhinestones are available from: www.RhinestonesEtc.com Do you want to be notified of upcoming sales, new clearance, contests and giveaways? Would you like our free guide to rhinestones? Subscribe to our newsletter by clicking here.   Snowflakes are a miracle of nature: frozen bits of water vapor crystallized into a perfect work of art. Although not as intricate as Mother Nature, you can have you own snowflakes sparkle on a wintery day. The snowflakes on these gloves won’t melt but they will sparkle. For this project I used: 1 pair of black gloves Wax paper 58 - 12ss Crystal Rhinestones Wax tipped tool or tweezers Gem Tac  Begin by placing a piece of wax paper inside the gloves to keep the glue from seeping through and gluing both sides together. Lay the design on the top side of the glove in a snowflake pattern. Once you are satisfied with the layout, remove one of the rhinestones using the tweezers or wax tipped tool. Place a drop of glue about the same size as the rhinestone and gently press the rhinestones into the glue drop so that the glue covers the edges of the rhinestone.  Continue gluing rhinestones in this manner until both gloves are done. Allow to dry flat for 24 hours. When completely dry, remove the wax paper from inside the gloves. 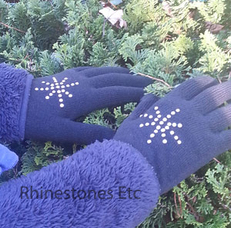 You now have a fun accessory that not only keeps your hands warm but sparkles as well.
Rhinestones are available from: www.RhinetonesEtc.com Do you want to be notified of upcoming sales, new clearance, contests and giveaways? Would you like our free guide to rhinestoning? Subscribe to our newsletter by clicking here. 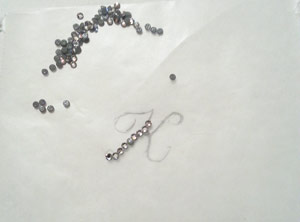 You’ve seen them in the craft store: those simple iron on transfers that are so expensive. You can create your own simple design or something more elaborate. I will show you the technique using a simple 1 inch crystal initial design. You will need: Rhinestone hot fix transfer paper Crystal 6ss Hot fix rhinestones Wax paper 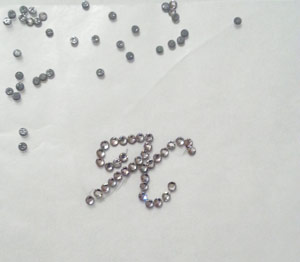 I always like to begin with a guide or template. I used a embroidery design initial. First, I placed a piece of wax paper over the drawing of the initial (make sure your letter is facing the correct way). Following the lines of the template, I positioned the rhinestones to form the letter. Once your rhinestones are positioned correctly, you will need your rhinestone transfer paper. Rhinestones transfer paper is made up of a top sticky clear piece and a bottom opaque non sticking piece. Separate the rhinestone transfer paper and gently press the sticky side down on top of the rhinestone letter. Peel off the wax paper. If you are planning on using this another day, replace the non sticky piece of rhinestone transfer paper to the sticky side. 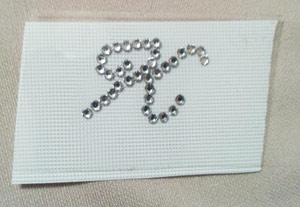 If you want to embellish you garment now, heat your iron to its highest setting without steam. Peel the white backing off your iron on initial. Position your iron on initial on your garment, sticky side down and rhinestone facets up. Place a piece of white paper over iron on initial to prevent scorching the garment. When the iron is hot, press down on the iron on initial for 15-20 seconds. Do not slide iron over the design as this may move your rhinestones. Remove iron and allow iron on to cool completely. Remove white paper and peel off clear plastic. 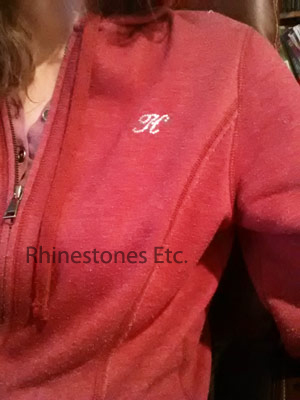 A plain jacket turned into a sparkly personalized statement!
Swarovski hot fix rhinestones are available from: www.Rhinestones Etc.com Rhinestone hot fix transfer paper available at many online retailers. Do you want to be notified of upcoming sales, new clearance, contests and giveaways? Would you like our free guide to rhinestoning? Subscribe to our newsletter by clicking here.  I often look for inspiration in nature. My imagination was sparked when I was looking through a book on space and saw a picture of the Milky Way Galaxy. For this project you need: tank 36 – Gold 4mm round metal studs 19 - Gold 8 mm star metal studs Hot fix tool or iron 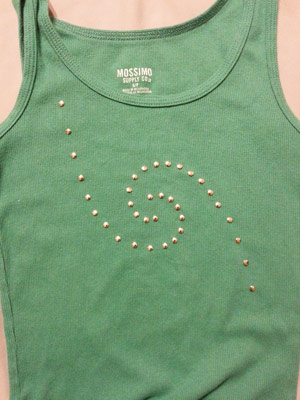 Always prewash your garment before starting to remove any chemical finish. If the material your shirt is made from is thin, place a piece of wax paper between the layers of the garment to prevent glue from seeping through to the backside. Begin by laying out the round metal studs in a spiral shape. The center of the spiral has the metal studs slightly closer together and further apart as you go out from the center. After checking the spacing and layout, place the star metal studs randomly in between the spiral shape. 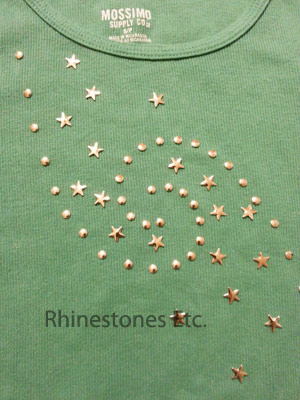 If using an iron to adhere, place a sheet of white paper over the design to prevent scorching. Using the highest setting without steam, gently press down for 10-15 seconds. Do not slide iron over the design as this may move your studs but pick iron straight up and place on another part of the design, gently pressing and holding for 10-15 seconds. Repeat until the entire design is done.
Beautiful and easy! Wash on a low temperature and line dry. Metal studs are available from: www.RhinestonesEtc.com Do you want to be notified of upcoming sales, new clearance, contests and giveaways? Would you like our free guide to rhinestoning? Subscribe to our newsletter by clicking here. 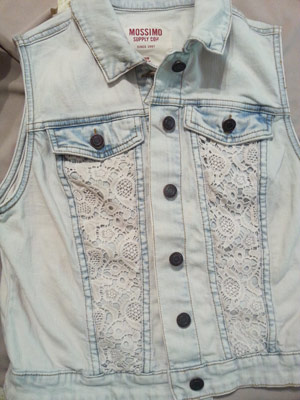 Using Nailheads on Denim I love a great bargain and was very excited when I snagged this denim vest for less than $6 at Target. Although already decorated with lace inserts, I still wanted more bling. For this project you need: 6 - 34ss Fuchsia Rose Pins 6 - 8.5 mm silver star nailheads 8 - 8.54 mm silver pearl nailheads Pair of scissors  Rose Pins feature a Swarovski Elements Rhinestone attached to a stainless steel nailhead back. They work great with thicker denim material. I decided upon a simple straight line design and drew a chalk line as a guide to keep the embellishments on an even line. Then simply take a nailhead and press the prongs through the material so that the prongs are on the inside of your garment. Using the flat blade of a pair of scissors, bend the prongs towards the center of the nailhead.  Continue adding rose pins and nailheads until your design is completed. This is how my vest looks. How would you have embellished it? Drop me a line and tell me what you did. Nailheads and rose pins are available at: www.RhinestonesEtc.com Do you want to be notified of upcoming sales, new clearance, contests and giveaways? Would you like our free guide to rhinestoning? Subscribe to our newsletter by clicking here. 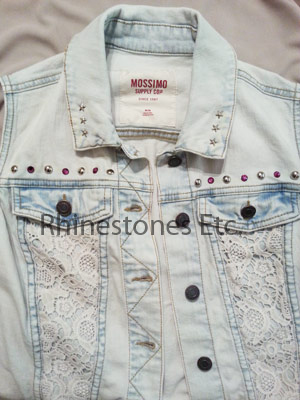 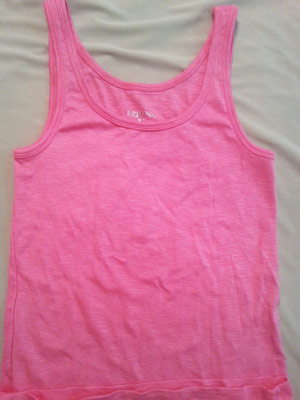 Want to go from plain to jazzy for under $10? I took this Target brand tank top on sale for $6 and added 6 crystal size 12ss rhinestones,4 silver 7mm square metal studs and 44 silver round 4mm metal studs. Total cost of embellishments: $1.00 First, I decided on a design and laid it out on the tank top. Once I was satisfied with my layout, I took my hot fix tool with the metal studs attachment, and adhered each metal stud (you can also use a iron) to the shirt. Finally, using Gem Tac (any fabric glue that works with embellishments will do), I glued on the flat back crystals. And viola! A special top for your next night on the town. Metal studs and rhinestones are available from: www.RhinestonesEtc.com Do you want to be notified of upcoming sales, new clearance, contests and giveaways? Would you like our free guide to rhinestoning? Subscribe to our newsletter by clicking here. 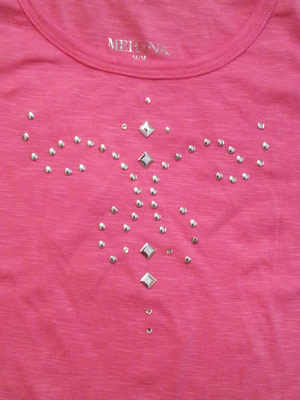 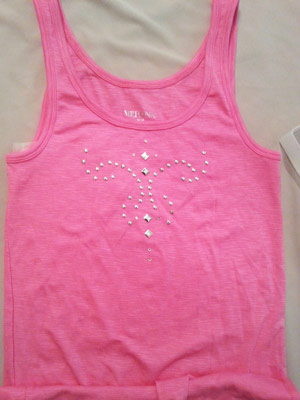 |
KarenI have been adding bling for over 20 years. Through my projects, I hope you find inspiration. Categories
All
Archives
February 2024
|

 RSS Feed
Home About Policies Return Shipping
Contact Us Size Chart Privacy Products Reviews
Copyright 2024 Rhinestones Etc. All rights reserved.
Contact Us Size Chart Privacy Products Reviews
Copyright 2024 Rhinestones Etc. All rights reserved.