|
Staying abreast with all the latest fashion trends is costly. You want to look fresh and trendy while staying within your budget. That's where DIY comes in handy. With an embellished t-shirt, you can be fashionable without going over budget. For this project I used: 1 plain t shirt (an inexpensive craft store t shirt) Sewing machine Silver star metal studs Hot fix tool or iron 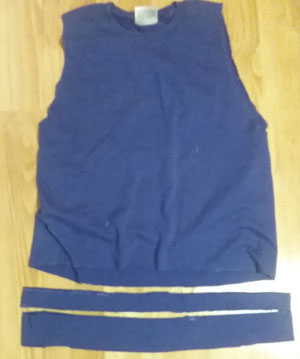 How to make an embellished t shirt. Begin by cutting the sleeves off at the seam. Cut the seam off the bottom of the shirt and then cut 2 pieces off the bottom 1 inch wide. You can adjust how short you want the shirt to be by cutting more or less of the bottom off. Cut 2 inches off the short end one of the strips and then sew the ends together (you are making the loop smaller). Cut the other strip in half. Take the 2 smaller strips and fold them in half and mark the middle. Stitch the 2 shorter ends together forming a loop. Using a medium length zig zag stitch or serger, stitch one of these strips, right sides together, to the armhole stretching to so that the halfway mark matches the shoulder seam and back to the starting point. You are tightening up the armhole as you sew the facing on. 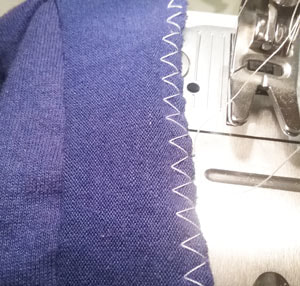 Do the same for the other armhole. Take the longer strip and again mark the middle. Beginning at the side, use the same zig zag stitch sew to the bottom of the shirt, stretching to match the middle with the other side of the shirt and back to the starting point. Here you are tightening up the waist. Press all seams towards the outside edges. 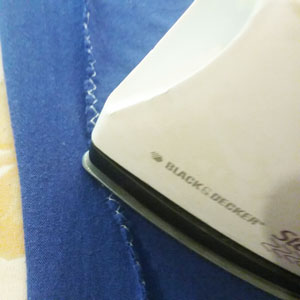 Fold the raw edge of the facing to the inside of the shirt. Using a double needle (which allows for stretch in the material), topstitch the facing. Do the same for the bottom of the shirt. 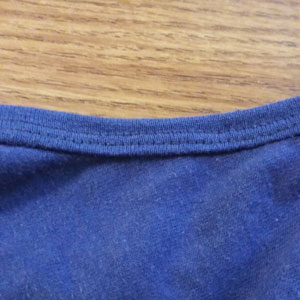 For this shirt, we chose to go with an initial for the design. I laid out silver metal studs in the form of the letter “S”. Using a hot fix tool or hot iron without steam, press down on the metal studs for 12-15 seconds. If your shirt is thin, you may want to place a piece of wax paper in the inside of the shirt to prevent the glue from adhering the sides together. Allow to cool. 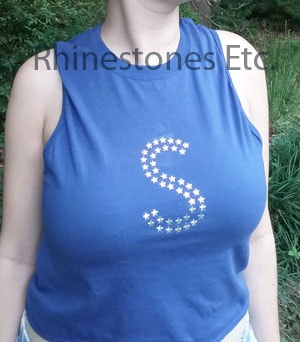 Inexpensive but easy to make. An embellished t-shirt is an easy way to stay trendy while keeping your wallet happy.
Hot fix metal studs are available from: www.RhnestonesEtc.com
0 Comments
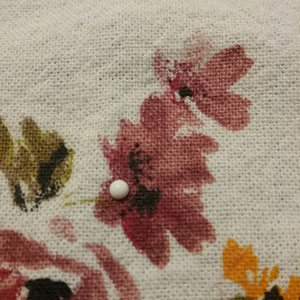
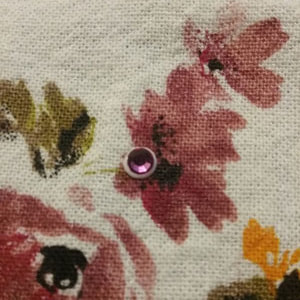
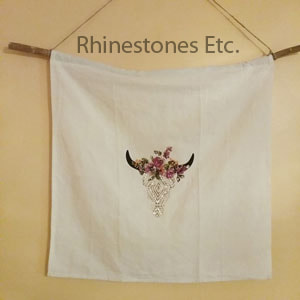
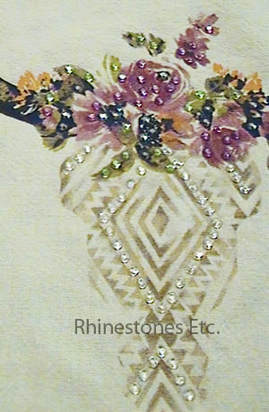
I love to go bargain shopping and leave no clearance bin unchecked. There is no better feeling than finding the perfect item and the perfect price! A few weeks ago, I was out searching for a birthday present for my mom. Outside in a bargain bin was this cotton cloth with a western motif (I think it was a napkin). I didn’t know what I would do with it, but it was only $1, so I couldn’t pass it up. Gluing rhinestones to fabric is simple and the perfect project to make with my new $1 napkin. For this project I used: My bargain cotton fabric with western motif Assorted 12ss rhinestones Wax tipped tool or tweezers Gem tac Branch Sandpaper Sewing machine/needle and thread Jute string 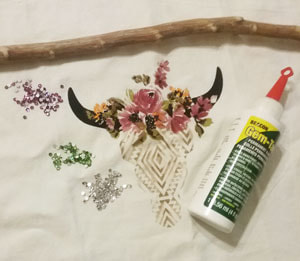 Cut a branch about 4 inches longer than the width of your material. I liked the branch of a crepe myrtle, so I cut off a branch about ½ inch in diameter. Sand the entire branch including the edges until smooth. 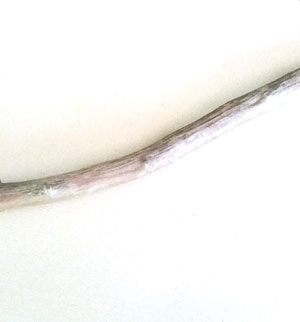 The cloth was too long, so I cut about 1/3 of it off. To prevent the cloth from fraying, I serged the edge and then hemmed it (you can double hem it). Fold this edge down about one inch to make a sleeve to put the branch through. 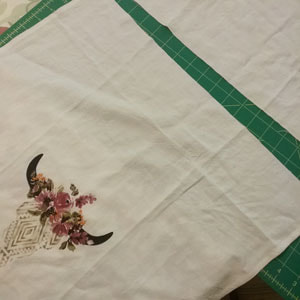 Gluing rhinestones to fabric is easy. I used assorted rhinestone colors to accent the western motif design. Place a drop of glue slightly smaller than the glue drop on the linen. Using a wax tipped tool or tweezers, pick up a rhinestone and gently press it into the glue drop. The glue should seep out slightly from the edges to form a seal and prevent the rhinestone from peeling off. Gem Tac is my favorite fabric glue because it is easy to apply, dries clear and is washable. Continue gluing rhinestones, accentuating different areas.
Allow to dry flat for 24 hours. When dry, slip the branch into the top sleeve. Cut a piece of jute sting about 24 inches long. Tie each end to the end of the end of the branch.
Simple yet enticing. By gluing rhinestones to fabric it’s easy to take something ordinary and turn it into something extraordinary. This hanging will catch eyes with its simple sparkle and rustic design. Use it to brighten any space! The possibilities are endless!
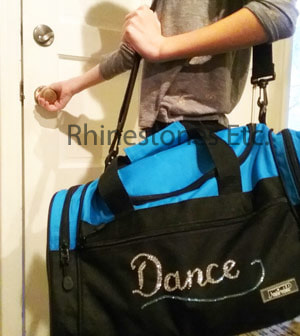
Rhinestones and wax tipped tool are available from: www.RhinestonesEtc.com Your daughter loves to dance but has outgrown the first dance bag you bought her when she was 4. However, you can take an ordinary duffle bag and bling it out to turn it into something special. Use our rhinestone template and follow our step-by-step instructions to create a bag to match her personality. Using A Rhinestone Template Makes Blinging Easier Blinging out an item by spelling out a word can seem intimidating. Some fonts like script can be especially challenging. For example, it can be difficult to keep all the letters the same size and arrayed in a straight line. However, using a rhinestone template can save you time and produce satisfying results. Many people invest in professional tools like software and cutting machines. If you plan on selling bedazzled clothing, this may be the route to go. Yet, if you only need to bling out one item, this can be an expensive project. Instead, you can create a template using a few simple tools. Supplies Needed For this rhinestone project I used:
Generally, beginners have questions about the best rhinestone and glue for a project. Usually, the amount of sparkle you want will usually dictate the type of rhinestone. Some manufacturers make rhinestones from acrylic, others from glass or crystal. Consequently, each material has a different amount of brilliance. Ultimately, the best glue for your rhinestone project depends on the surface of the item you’re blinging. Typically, a fabric with a rougher surface will create a stronger bond than a smooth material. Furthermore, manufacturers use a variety of fabrics to construct duffel bags including leather, canvas, and nylon. Thus, check the rhinestone glue manufacturer’s recommendations for suitable fabrics. Typically, you want a glue that dries clear, is washable, and is good for rhinestones. 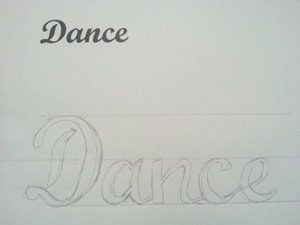
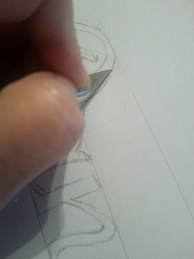
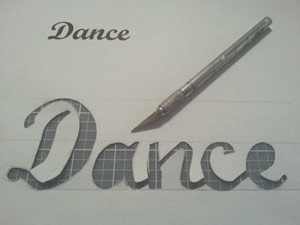
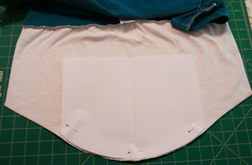
Instructions To Bling Out A Dance Bag Start by downloading the rhinestone template. You may need to adjust the size of the lettering depending on the size of the bag you’re blinging. I created a template spelling out the word “Dance”. The word measures 8.5 inches in length with the capital letter 2.875 inches, and lowercase letters 1.25 inches in width. Cut out the darkened areas of the template using scissors and/or an X-Acto knife and cutting mat.
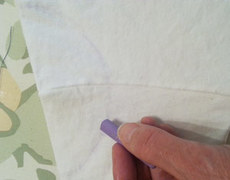
Next, lay the duffel bag on your work surface, getting it as flat as possible. Using a ruler, mark the side of the bag with chalk both horizontally and vertically. With these marks, position the template in the center of the side of the bag. Then, using the chalk, trace the word “Dance” and the swirl underneath. Once you remove the template, check your markings to ensure you have it centered. 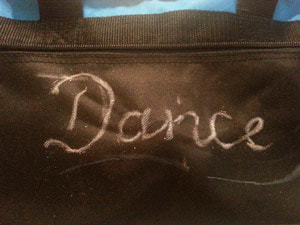
Beginning with the capital letter, place a drop of glue slightly smaller than the rhinestone on the chalk mark. Then, using your wax-tipped tool, pick up a rhinestone and gently press it into the glue. Some of the glue should seep out from the sides to prevent the rhinestones from peeling off. Gem-Tac dries clear so don’t worry if you accidentally use too much. Continue gluing using the chalk marks and the smaller word “Dance” as a guide. Allow to dry for 24 hours. Once the glue has cured, you can use a little bit of water to remove the chalk guideline marks. 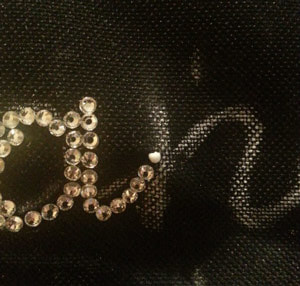
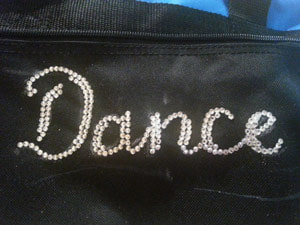
Typically, dance bags like these are costly, but you can make yours for a small fraction of the cost. Your daughter will love her new dance bag and you will love how easy it was to make.
Best Place to Buy Rhinestones
Since 2011, Rhinestones Etc. has been selling quality embellishments. We have excellent customer service and fast processing times. Plus, we have a huge inventory of rhinestones in every color imaginable. We want to be your source for bling! Browse our online store to find your color!
Click to set custom H
TML
Putting on a pair of rhinestone jeans makes you feel fabulous, but they’re also very pricey. Additionally, all too often, many manufacturers of rhinestone jeans use lower-quality rhinestones. However, you can easily DIY rhinestone jeans that look expensive for a lot less money. A Few Ideas for DIY Rhinestone Jeans Search online and you can find different ideas to embellish your rhinestone jeans:
However, if this is your first-time gluing rhinestones to fabric, you may want to choose something simple. Using fabric paint on jeans is easy and accenting with rhinestones gives your clothing a nice sparkle. Plus, you can create a template to paint your element making the process even easier. Often, you can find patterns for natural elements, letters, and numbers in embroidery books. When you find one you like, use your printer to copy the design onto card stock. Then, using an X-ACTO® knife, cut out your design to create your template. 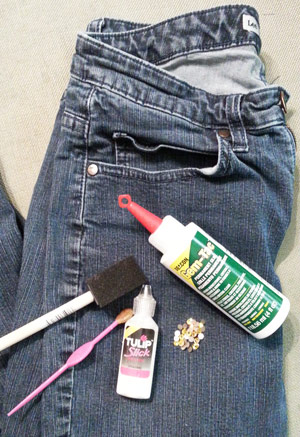
Instructions For DIY Rhinestone Jeans
For this project, I choose a multi-media approach of using fabric paint and rhinestones. To recreate the design on your jeans you’ll need:
Gather your supplies together. You’ll find many brands of fabric paint and anyone will do. When choosing your rhinestone glue, make sure it’s washable, dried clear, and applicable for rhinestones. 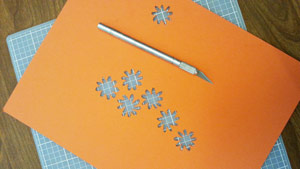
If your jeans are brand-new, you’ll need to wash them before you begin. Then, lay out your clothing on your work surface as flat as possible.
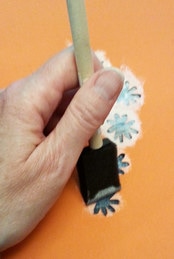
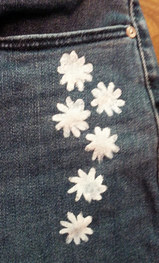
Begin by squeezing your white fabric paint into a shallow paint dish. Lay the template flat along one side of the jeans. With your brush, dab white paint on the jeans. I painted six daisies on one side and one daisy on the other side. If you like more daisies, move the template lower along the pant leg and paint more.
Allow 24 hours to dry completely before gluing on your rhinestones. Once the paint is completely dry, you’re ready to glue on your rhinestones. Place a drop of glue slightly smaller than the rhinestone in the middle of a white daisy. With a wax-tipped tool, pick up a rhinestone and gently press it into the glue. Some of the glue should seep out from the sides. This forms a seal and keeps the rhinestones from peeling off during washing. 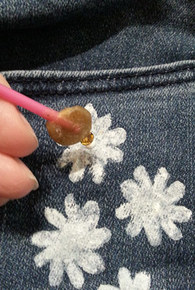
Repeat for all the other daisies. Once again, allow to dry flat for 24 hours. 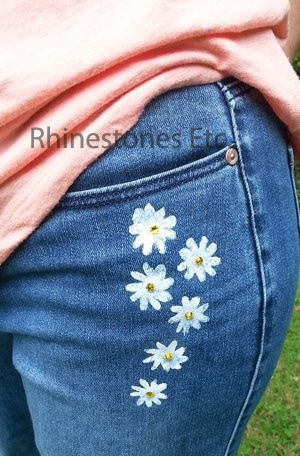
Sassy yet, stylish, you’ll love your new jeans! Plus, once you see how easy it is to DIY rhinestone jeans, you’ll want to do every pair you own.
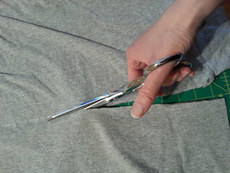
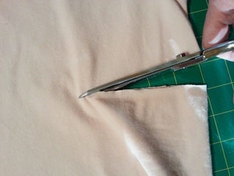
Rhinestones Etc. has been selling quality rhinestones since 2011. With a huge inventory of rhinestones, you’re sure to find the perfect color. We have great customer service, fast processing times, and competitive pricing. How to make a Jazzy Top My college daughter needed a quick yet sophisticated costume to wear over leggings for a duet for a Spring Dance Recital. Keep reading to see what I did with some tee shirts from the craft store with rhinestones and hot fix metal trim. For this project I used: Craft store tee shirts in contrasting colors – the top one tight fitting and the bottom one larger Scissors Sewing machine 12ss crystal rhinestones 4 mm silver hot fix metal trim Gem Tac adhesive Hot fix wand (or iron) Wax tipped tool 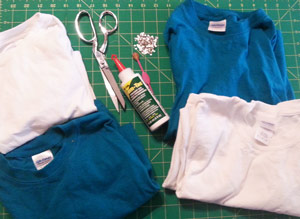 Begin by deciding how long you want the top piece, measure and cut the bottom off. My shirt measures about 16 inches from the shoulder. Decide how much you want to add to the bottom, measure the contrasting tee shirt and cut. The white piece I added to the bottom measured about 11 inches. On the tee shirt piece for the bottom (the white piece), sew gathering stitches along the top edge. Gather to fit the top, pin and then using a medium zigzag stitch or serger, sew top and bottom together.  Using an oval shaped template, mark the bottom of the top with chalk and cut. Using an oval template, cut out an oval shape at the top of the shoulders. Cut the seams around the neckline and bottom sleeve edges.
I used an ½ inch distance between the rhinestones and ½ distance between the metal trim. Place a drop of glue slightly smaller than the rhinestone on the neckline and using a wax tipped tool or tweezers, pick up a rhinestone and gently press it into the glue. Continue along the neckline and also along the oval cut out on top of the shoulders. Allow to dry flat for 24 hours. The metal trim is hot fix, so lay out your metal studs offset from the rhinestones and heat your hot fix tool. When the tool is hot, gently press down on the metal trim using the flat tip and hold for 12-15 seconds to activate the glue. You can also use an iron on the highest setting without steam. You may want to place a piece of white paper between the iron and shirt to prevent scorching. Gently press down holding for 12-15 seconds. Do not slide the iron as this may move the metal trim.  Simple, yet jazzy, my daughter was thrilled with her costume and I was happy with how easy it was to make.
Rhinestones, hot fix metal trim and wax tipped tool are available from: www.RhinestonesEtc.com Hot Fix Metal Trim Embellished Leggings Comfortable and fashionable – leggings are the hot in item. And while they are a great fashion statement, you don’t want to look like everyone else. A great way to customize your leggings and have you stand out is to add metal studs. For this project I used: I pair of black leggings 14 - Square 7 mm silver hot fix metal studs 28 - Round 6 mm silver hot fix metal studs Hot fix tool 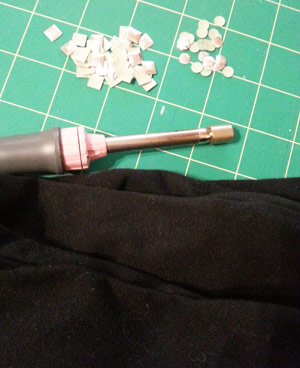 Prewash your leggings before you start. If you leggings are made of a thinner material, place a piece of wax paper between layers to prevent gluing both sides of the legs together. Fold the bottom part of the legs in half so that the outside part of the legging, the part by your ankle, makes a fold. Use a piece of white chalk to mark the edge. This will serve as a guide line to keep your design straight. 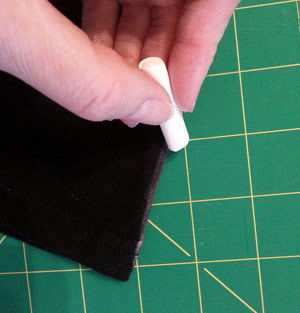 Unfold the legs and lay flat. Using the chalk lines as guides, lay out the metal studs to the design of your choice. 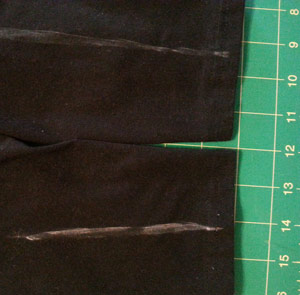 I like just a little bit of bling so I embellished the bottom 3 inches. When you are happy with your layout, heat your hot fix tool. 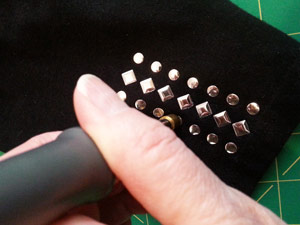 Gently press down on the metal studs for 12-15 seconds. Repeat process. If you are using an iron, set iron to the hottest setting without steam. Place a piece of white paper over design to prevent scorching. Gently press down for 10-15 seconds. DO NOT SLIDE the iron as this may move your metal studs. Allow to cool. 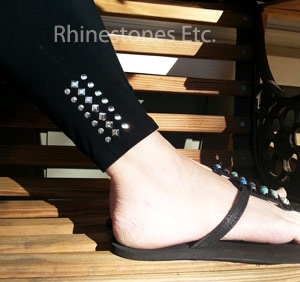 Stunning eye catching leggings to wear at your next event and will guarantee that you to stand out.
Hot fix metal studs are available from: www.RhinestonesEtc.com DIY Fashion Shirt You are out shopping for new clothes but the prices overwhelm you, when suddenly you find a good deal for a t-shirt. The only problem is the shirt is way too plain. With the help of another shirt and some metal studs, you can transform the shirt into something fabulous. For this project I used: 2 tee shirts (the gray one purchase at local craft store) Scissors pins sewing machine hot fix wand or iron 4 mm silver round hot fix metal studs 6 mm silver round hot fix metal studs 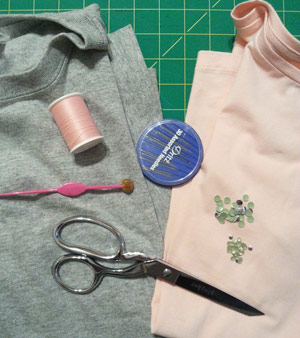 I used 2 tee shirts for this project. The pink one is the size I wear that I picked up on clearance, and the gray one is larger purchased at the local craft store. Prewash both shirts before starting. Lay the gray tee shirt on a flat surface and cut straight across just below the arm hole. Place the bottom piece aside and discard the top. Lay the pink tee shirt out flat and cut straight across about 3 1/2 inches below the arm hole. Place the top piece aside and discard the bottom.
Sew a gathering stitch ½ inch from the top edge of the gray piece. Gather to fit the width of the pink shirt. Pin right sides together spreading the gathers along the edge of the shirt. 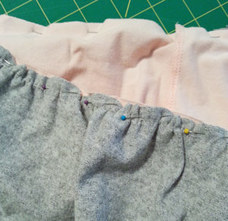 Using a ½ inch seam allowance, sew together using a medium zigzag stitch or serger. 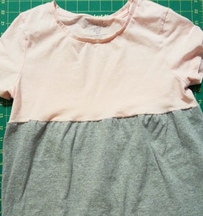 What I really like about using hot fix embellishments is that once you lay out your design, you can just press the hot fix wand on the embellishment to adhere. If the shirts are thin, you can place a piece of wax paper between layers to prevent gluing through the back. I spaced 4 mm silver round hot fix metal studs along the seam of the two shirts spacing about ½ inches apart. I spaced the 6 mm silver round hot fix metal studs above the line of 4 mm studs in between these smaller studs. If you are using a hot fix wand, use the flat head for metal studs. Heat the wand and when hot, gently press on the metal stud for 12-15 seconds. Repeat until all the studs are adhered. You can also use an iron. Heat iron to the highest setting without steam. Place a white piece of paper over design to prevent scorching and gently press down for 12-15 seconds. DO NOT slide iron as this may move your metal studs. 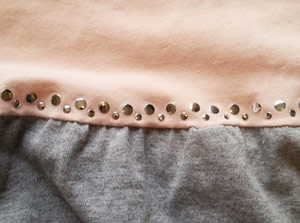 Casual yet chic, this will be your new favorite shirt.  How to rhinestone a dress I had given up all hope of finding the perfect dress and that’s when it caught my eye. I liked this dress but I wanted to turn it into something that I would love. For this project I used: 1 black and gold dress 20ss Dorado rhinestones 20ss Jet rhinestones Gem tac Wax tipped tool Wax paper 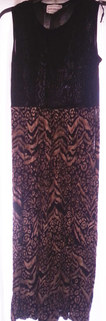 Prewash your garment before starting. Since the top of this dress was on the thin side, I placed a sheet of wax paper inside to prevent the back and front from gluing together. I also like to lay out the rhinestones before gluing to get an idea of how it will look. I wanted to incorporate the colors and designs of the bottom on the top so I chose to use the colors Dorado and Jet. The Jet blends in with the black top so that they are not as noticeable, but will give off shimmers of light when you move. I started by copying the circular pattern around the neckline. 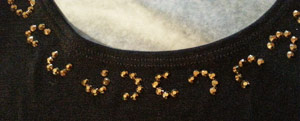 In the middle of these circular designs, I placed a Jet rhinestone. I also incorporated the wavy pattern so that my neckline looked like this: 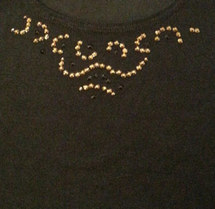 From this picture, you can barely see the Jet rhinestones placed in among the gold, but they add additional sparkle. Once you are happy with your design, remove a rhinestone at a time and place a drop of glue about the size of the rhinestone in its place. The glue should seep slightly out at the sides to create a seal to prevent the rhinestones from peeling off. If you accidentally use too much glue, the glue dries clear and cannot be seen at a distance. Continue gluing and allow to dry flat for 24 hours.  And just like that any ordinary dress can be turned into something special that you will wear for years to come.
Rhinestones and wax tipped tool are available from: www.RhinestonesEtc.com How to rhinestone a dress My oldest daughter bought a dress for her first company Christmas party. It had some bling on it – a few rhinestones and sequins on the waistband; however, the dress needed something else. “More bling, please,“ she asked. I wanted the skirt to enhance the waistband- not detract from it. The result is a subtle hint of sparkle on the skirt. For this project I used: Crystal 12ss PriceLess Rhinestones Light Siam 12ss PricesLess Rhinestones Gem Tac Wax paper Wax tipped tool 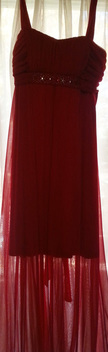 Prewash and dry the garment before you start gluing to remove any chemical finish. Lay the garment as flat as possible. The skirt on this dress is mesh so I placed a piece of wax paper between the layers of the skirt to prevent the glue from seeping through and gluing the layers together.  I glued a few Crystal rhinestones scattered on the skirt with many more Light Siam rhinestones. My ratio was about 3 Light Siam rhinestones for each Crystal rhinestone. The Light Siam matches the color of the skirt so the stones are not obvious until the light hits them and sends out showers of sparkle. Begin by placing a drop of glue about the size of the rhinestone on the garment. You want the glue to seep out slightly from the sides of the rhinestone to create a seal and prevent the rhinestone from peeling off.  Allow to dry flat for 24 hours. And just like that a pretty dress turns into a stunning dress. My daughter will attend the Christmas party knowing that this dress is sure to turn heads.
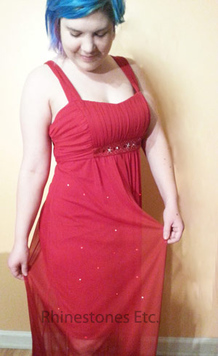
Your daughter needs a formal dress and you want her to feel fabulous in it but finances are tight. What to do? Although your daughter might cringe at the idea of wearing a dress from Goodwill, once you add sparkle to it, she will love it. Total cost including the dress, glue and rhinestones was under $35.00. For this project I used: 1 blue dress 12ss Sapphire Price Less Rhinestones (about 3 1/2 gross) 12ss Crystal Price Less Rhinestones ( 50 rhinestones) 30ss Crystal Price Less Rhinestones (22 rhinestones) Gem Tac Wax tipped tool 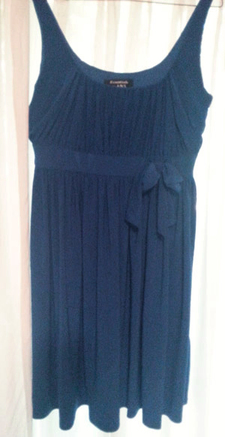 Please note: the pictures were taken under different lighting conditions, so the color appears different but it is the same dress. I began by gluing the 30ss Crystal rhinestones randomly on the sash. Place a drop of glue about the size of the rhinestones on the dress. Using the wax tipped tool, pick up a rhinestone and gently press it into the glue drop. 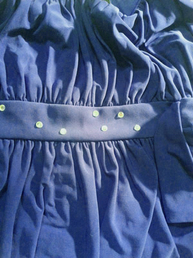 Once I decided on the placement of the 30ss Crystal Rhinestones, I added the 12ss sapphire rhinestones accentuating with the 12ss crystal rhinestones. When you are done gluing, allow to dry flat for 24 hours. 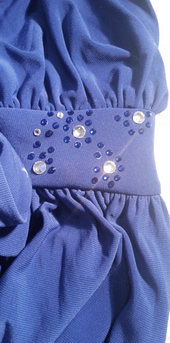 Beautiful and unique! Now your daughter is happy and so is your wallet!  |
KarenI have been adding bling for over 20 years. Through my projects, I hope you find inspiration. Categories
All
Archives
February 2024
|

 RSS Feed
Home About Policies Return Shipping
Contact Us Size Chart Privacy Products Reviews
Copyright 2024 Rhinestones Etc. All rights reserved.
Contact Us Size Chart Privacy Products Reviews
Copyright 2024 Rhinestones Etc. All rights reserved.