|
Sometimes the simplest materials can make the most beautiful things. For example, you can take discarded magazines and turn them into colorful paper beads. This craft of making paper beads is old, possibly dating back to Victorian England when women used scraps of wallpaper. Today, artisans continue the tradition with modern twists creating beautiful jewelry. You can make your own paper bead earrings with rhinestones following our simple directions. For This project I used: Scrap paper White glue Modge Podge 12ss rhinestones Small beads head pins 4 mm Jump ring Earring wire Wooden skewer/knitting needle Jewelry pliers: round and flat nose 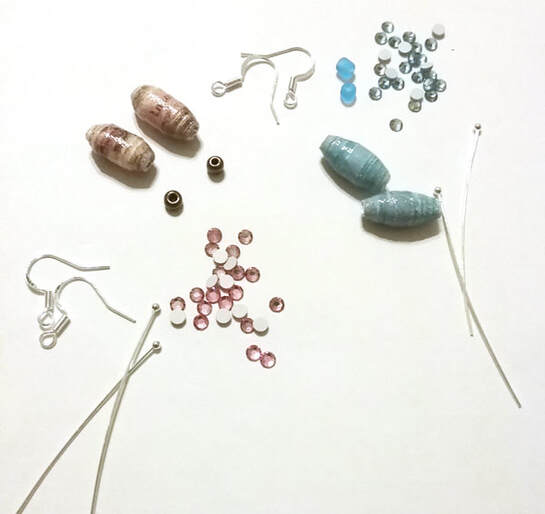 How to Make Paper Beads There are a few different bead shapes you can make which depend on the shape of the paper you cut. A rectangle piece of paper will make a tubular bead while a triangle will make a cone bead. Variations in these shapes will lead to interesting variation differences shape. I used a long triangle shape with a base of ¾ of an inch and sides 8 inches long. Cut out the desired shape from your paper. Place the printed side (the side you want facing outward) face down. Starting about ¼ of an inch from the base, spread your glue thinly starting at the wider end. Set your skewer/knitting needle on the unglued base. Begin to roll your skewer rolling the paper with it to form the bead. When you reach the end, slide the bead off and allow to dry. Next, you’ll need to seal your bead to protect it from the elements. I sealed my beads with several coats of Modge Podge, letting each coat dry thoroughly. 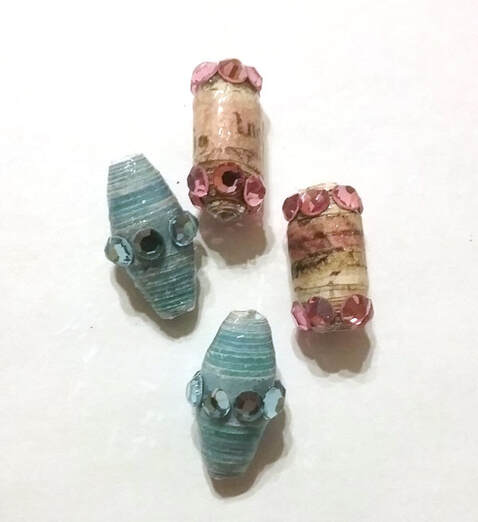 How to Make the Paper Bead Earrings Once the last coat of Modge Podge is thoroughly dry, your ready to glue rhinestones onto your paper bead. I do like to use E6000 on my jewelry projects because of the strength of the bond. Typically, I squeeze a small amount on a paper plate and apply with a toothpick. Always use in a well ventilated area and follow the manufacturer’s instructions. 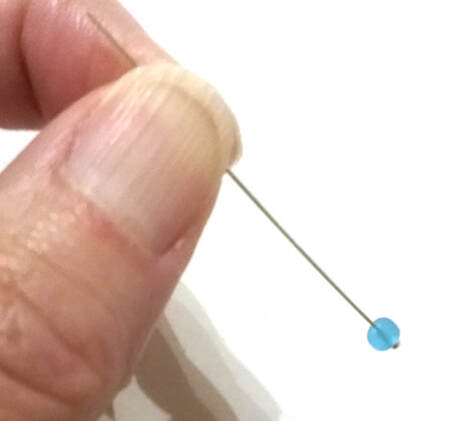 To begin, slide a small bead onto your head pin and then slide a on one of your a paper beads. The next step is to make a loop at the top of the head pin. This can be a little challenging and takes a little practice. You’ll need your round nose and flat nose pliers. Place the round nose just above the top of the paper bead. Then bend the head pin around the nose of the pliers. Continue bending until you have a circle. Remove the round nose pliers. Finally, holding the circle with the flat nose pliers, bend the remaining wire tightly under the loop.  Repeat this process for the other beads. Open a 4mm jumg ring, inserting it in the loop you just made and an earring wire. Close the jump ring. Do this for all the beads. 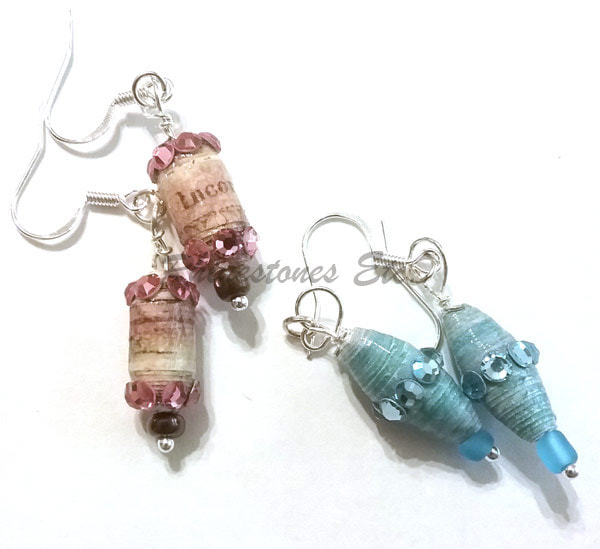 Unique and sparkly, our paper bead earrings with rhinestones are also super easy to make. Plus, the earrings look expensive and artisan made. Make yourself several in different colors to match outfits. And if you need some rhinestones, check out the inventory at Rhinestones Etc. Selling rhinestones online for 10 years, we have fast processing times and excellent customer service.
2 Comments
7/23/2022 01:59:06 am
These earring are looking so pretty. I love this cool DIY and give it a try. Thanks for sharing.
Karen Kepins
7/23/2022 08:59:40 am
Thank you for commenting and I'm glad your enjoyed our tutorial! These earrings super easy to make and look great. Your comment will be posted after it is approved.
Leave a Reply. |
KarenI have been adding bling for over 20 years. Through my projects, I hope you find inspiration. Categories
All
Archives
July 2024
|

 RSS Feed
Home About Policies Return Shipping
Contact Us Size Chart Privacy Products Reviews
Copyright 2024 Rhinestones Etc. All rights reserved.
Contact Us Size Chart Privacy Products Reviews
Copyright 2024 Rhinestones Etc. All rights reserved.