|
You want to make your own blinged out shirt but you never blinged anything before. While straight lines and scatter patterns don’t seem too difficult, they’re much too boring to do. Besides, you were hoping for something more. But you’re not artsy and you can’t draw even draw anything better than a stick figure. You’ve looked in the craft stores. However, their rhinestone transfer designs are expensive, and they use cheaper rhinestones. Where do you begin? Do you have a design in mind? Rhinestone templates are a great place to begin. A template gives you the number of rhinestones, what sizes used and the placement of rhinestones. Even if you are a newbie, pictures are easy to make with rhinestones. Plus, you can follow the rhinestone template exactly or you can experiment with different rhinestone sizes and colors. There are two different ways to apply the rhinestones: hot fix rhinestones and transfer paper or glue on. 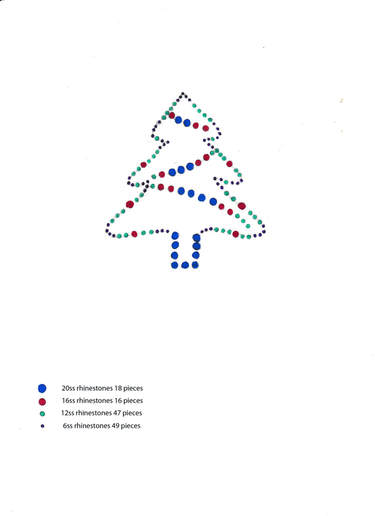 Hot fix Rhinestone Transfers The easiest way to affix a rhinestone picture to a shirt is with the use of hot fix rhinestones. Hot fix rhinestones have glue on them. When they are heated, the glue is activated. After the glue cools, a permanent bond forms. Using hot fix transfer paper makes rhinestone transfers super easy. This paper is made of 2 parts, a non-sticky and a sticky sheet. First, lay the template on a flat surface. Separate the transfer paper, laying the clear sticky piece on top of the template, sticky side up. Then simply place the rhinestones in the correct positions, facet side down and glue side up, following the template. Now you are ready to apply your transfer. Heat your iron up so that It reaches a temperature of 250°F to 340°F without steam. Position your hot fix transfer and press down with the iron for 12-15 seconds. Do not slide the iron as this may dislodge and move the rhinestones. Continue picking up the iron and pressing down until the glue on all the rhinestones has been activated. Glue on method Gluing rhinestones with an adhesive is a little harder. I usually lay the design out with the rhinestones on the shirt following the template. This way you can see the spacing and placement before gluing. Once you are satisfied with the design, pick up one rhinestone with a wax tipped tool from the shirt. Place a drop of glue slightly smaller than the rhinestone on the shirt. Gently press the rhinestone into the glue drop. Keep on gluing in the manner until all the rhinestones are glue in place. Let dry flat for 24 hours.  And with Christmas just around the corner, you will love our new Christmas template. Simply go to our website: www.Rhinestones.com and click on the top tap templates. Available for download is our template of a Christmas tree. If you have any questions about starting this project, feel free to contact us with any questions. Need rhinestones to get started on your project? Rhinestones Etc. has a large stock of rhinestones.
0 Comments
Your comment will be posted after it is approved.
Leave a Reply. |
KarenI have been adding bling for over 20 years. Through my projects, I hope you find inspiration. Categories
All
Archives
July 2024
|

 RSS Feed
Home About Policies Return Shipping
Contact Us Size Chart Privacy Products Reviews
Copyright 2024 Rhinestones Etc. All rights reserved.
Contact Us Size Chart Privacy Products Reviews
Copyright 2024 Rhinestones Etc. All rights reserved.