|
Embellished shirts are expensive but cheap plain shirts tend to be boring. However, for most of us, our budget says buy the boring plain shirt. After you learn how easy and cheaper it is to bedazzle a shirt, you’ll be happy buying that ordinary solid color shirt. The t-shirt used in this project was one I found on clearance for $4.00 and the stencil I found at the dollar store. For this project I used: 1 t shirt Stencil Gold metallic fabric paint Paint brush Black diamond 12ss rhinestones (about 170 rhinestones) Gem Tac Wax tipped tool or tweezers 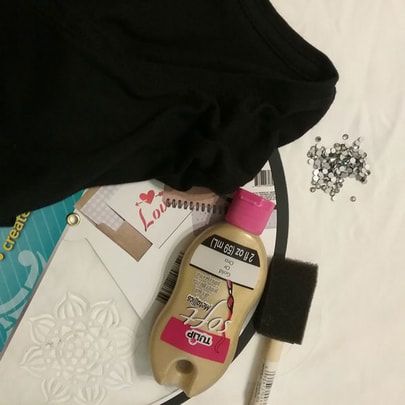 Easy Steps to Bedazzle a Shirt Wash and dry your shirt. Because I like my designs to be somewhat symmetrical, I like to mark with chalk the position of the designs. Chalk works great because you can brush off your marks if you need to make a change and it easily washes out. 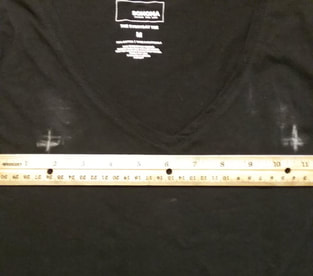 Once I marked out the position of my design, I was ready to paint. You can use a shirt board If you have one; place it on the inside of the shirt. Usually, I just use a piece of thick cardboard I have laying around. Using the chalk marks, position your stencil and apply the fabric paint using a paint brush. Either a foam brush or a regular paint brush works fine. 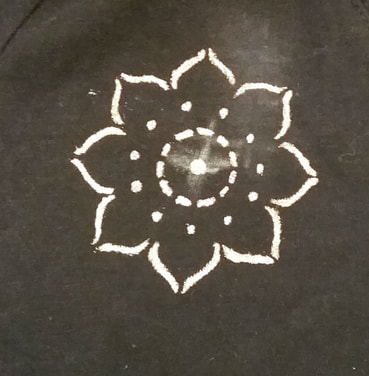 Remove the stencil and clean it off before repositioning it. When you are done painting, allow to dry completely. I chose the rhinestone color of black diamond because I liked how it reflected off the black of the shirt and yet didn’t overpower the gold color of the stencil designs. Again, I marked with chalk the design of the rhinestones. 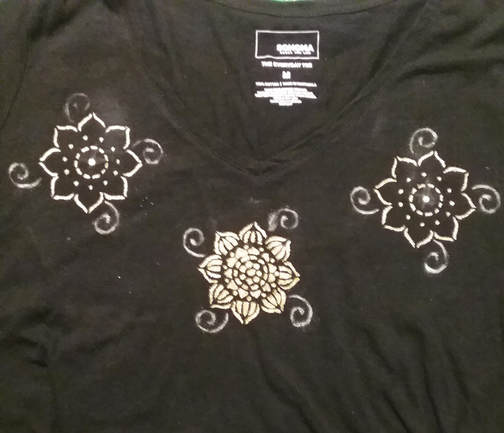 If the material to the t-shirt is thin, you may want to leave the shirt board in place when gluing or place a piece of wax paper on the inside of the shirt. To glue your rhinestones, place a drop of glue slightly smaller than the rhinestone on the shirt. Then, using your wax tipped tool or tweezers, pick up a rhinestone and gently press it into the glue drop. Continue gluing until your design is complete. Allow to dry flat for 24 hours. 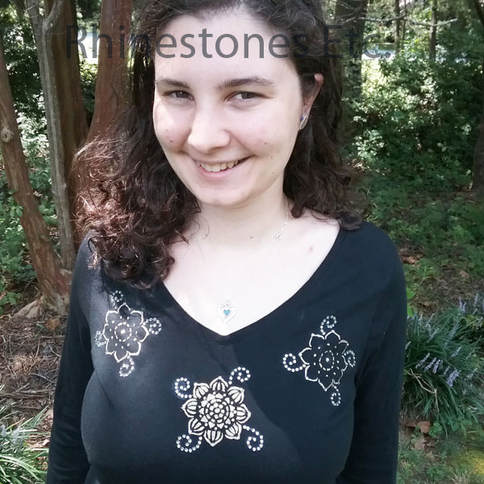 How much do you think you’d pay in retail for this shirt? At least $25. But by doing it yourself, you can bedazzle a shirt for $10-$15 depending on the brand of rhinestones you choose to use. You’ll feel trendy and stylish while keeping to your budget.
0 Comments
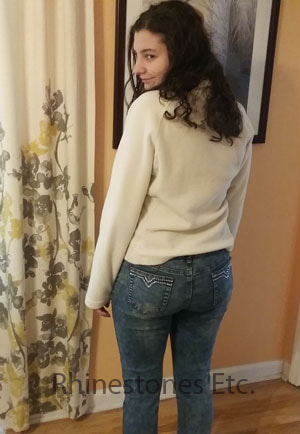
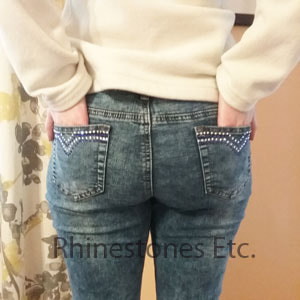
How to Glue Rhinestones to Jeans Are you tired of your same old boring jeans? Want to take your favorite pair and dazzle them up? Now’s your chance! Rhinestone jeans are easy to do, and the possibilities are endless! Create your initials, line the pockets or chose your favorite design. It’s up to you! For this project I used: A pair of jeans 12ss Crystal and Sapphire rhinestones Wax tipped tool Gem Tac 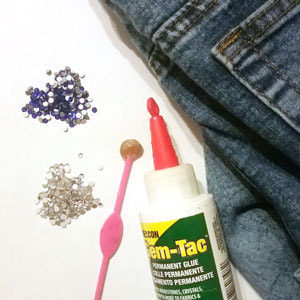 If you are using a brand-new pair of jeans, be sure to wash and dry them before embellishing them. Pick out a design. Even a simple straight-line design can really dress up a pair of jeans. My favorite glue for fabrics is Gem-Tac because it is water proof, dries clear and it easy to control the flow of glue. I planned on gluing 4 lines of rhinestones with a “v” in the middle across the back pocket. Using a piece of chalk, I marked the middle of the pocket to make sure I kept the design symmetrical. Lay the jeans as flat as possible. Squeeze a drop of glue slightly smaller than the rhinestone. 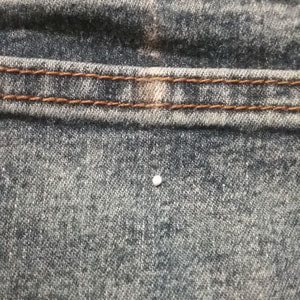 Using the wax tipped tool, pick up a rhinestone and gently press it into the glue. The glue should ooze out slightly from the sides to form a seal which keeps the rhinestone from peeling off. The glue will dry clear and you will not be able to see it unless close up. 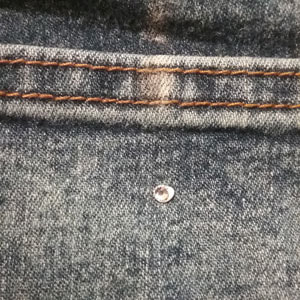 As you can see by the picture below, once the glue is dry, it is invisible. 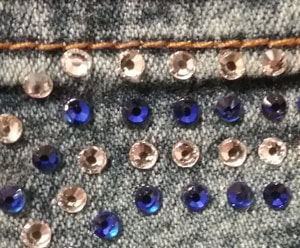 Continue gluing until your pattern is complete. Allow to dry flat for 24 hours.
Why spend lots money when you can easily create your own custom pair of jeans for a fraction of the price? With your new pair, you’re sure to turn heads.
Rhinestones and wax tipped tool are available from: www.RhinestonesEtc.com How to glue rhinestones to a formal dress New Year’s Eve is fast approaching but you still don’t have anything to wear! Also, you’re still broke from Christmas shopping and don’t have a lot of money to spend on a fabulous sparkling dress. With some flat back rhinestones and glue, you can begin the New Year in a glamorous new dress. 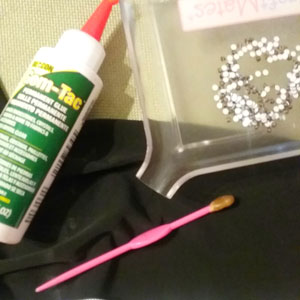 Prewash and dry your dress before you begin. Lay dress as flat as possible. For this dress, there was some beadwork with a few Jet Hematite rhinestones on the shoulders. I also used Jet Hematite rhinestones to keep with the consistency of color throughout.  The pattern of rhinestones is just a twist of a scatter pattern with some grouping along the lines of rhinestones. Spacing the rhinestones to about 1 inch apart, I started at the shoulders with 3 lines of rhinestones grouped in threes, keeping the outside lines along the armhole and neck line edges and the third line spaced equidistant from the other two. Between these lines, I made a line with a grouping of 2 rhinestones each and then between this, single rhinestones. 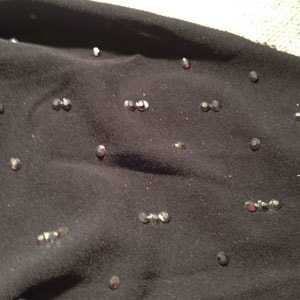 Place a drop of glue slightly smaller than the rhinestones and using the wax tipped tool, pick up a rhinestone and gently press it into the glue drop. The glue should seep out slightly from the sides to from a seal preventing the rhinestones from peeling off. Continue to glue until the pattern in complete and then allow to dry for 24 hours laying the dress as flat as possible.  3..2..1..you’re now ready to sparkle your way into the new year! This dress will leave you feeling fabulous without breaking the bank!
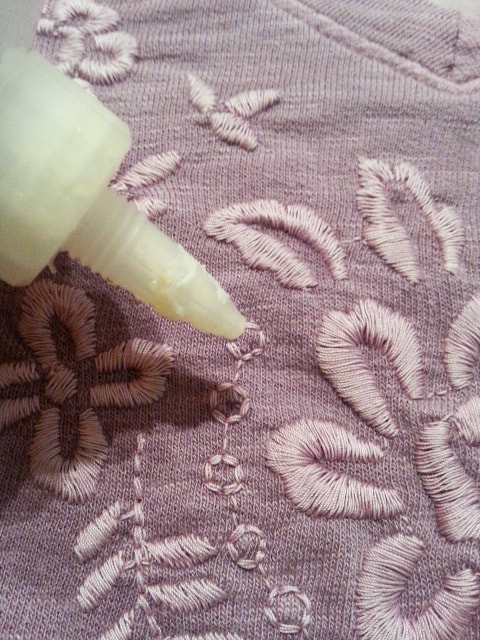
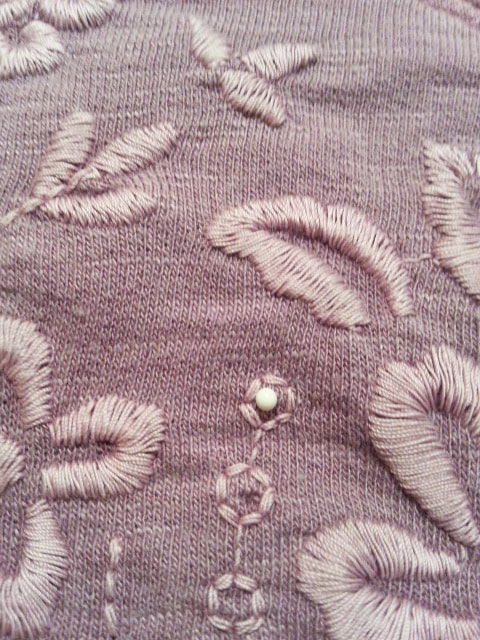
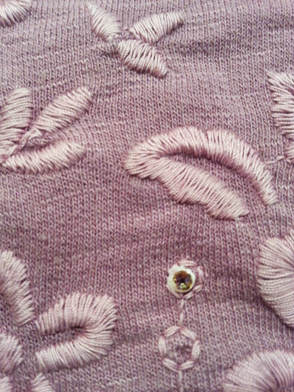
Rhinestones and wax tipped tool are available from: www.RhinestonesEtc.com How to glue rhinestones Want to feel beautiful and confident even if you buy clothes off the rack? Anything can be enhanced by adding rhinestones. Embellish an ordinary shirt off the rack, add your own style, and it will be uniquely you! For this project I used: 1 shirt 12ss Luminous Green rhinestones Gem Tac Wax tipped tool  The Luminous Green rhinestone is a pale green with underlying lavender so depending how the light hits the rhinestone it sparkles green or pale purple. The shirt I want to rhinestone is lavender with decorative embroidery. I want to add sparkle while highlighting certain areas of the shirt. The underlying lavender would blend with the color of the shirt while adding sparkle and the pale green would highlight the sections of embroidery I want to draw attention to. This is often how I choose what colors of rhinestones to use. Choosing a rhinestone the same color as your shirt will add sparkle while choosing a contrasting color adds highlight and sparkle. I also chose a smaller size rhinestone because I wanted to add just a small amount of sparkle.
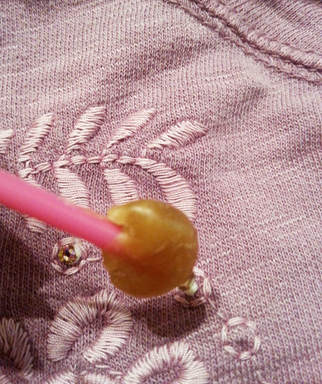
Pre-wash and dry your shirt before you begin. Lay your shirt on a flat surface. My shirt has small circles of embroidery that the rhinestone fits inside and this is where I chose to rhinestone. Place a drop of glue slightly smaller than the rhinestone on your shirt.
Using a wax tipped tool or tweezers, pick up a rhinestone and place it in the glue drop, gently pressing down. Some of the glue should seep out from the edges. This is perfectly fine as it creates a seal and helps prevent the rhinestone from peeling off. Continue gluing rhinestone and then allow to dry flat for 24 hours.
Just the perfect amount of sparkle and color to catch attention without overpowering. This shirt is great for everyday wear!
Rhinestones and wax tipped tool are available from: www.RhinestonesEtc.com
Click to set custom H
TML
Putting on a pair of rhinestone jeans makes you feel fabulous, but they’re also very pricey. Additionally, all too often, many manufacturers of rhinestone jeans use lower-quality rhinestones. However, you can easily DIY rhinestone jeans that look expensive for a lot less money. A Few Ideas for DIY Rhinestone Jeans Search online and you can find different ideas to embellish your rhinestone jeans:
However, if this is your first-time gluing rhinestones to fabric, you may want to choose something simple. Using fabric paint on jeans is easy and accenting with rhinestones gives your clothing a nice sparkle. Plus, you can create a template to paint your element making the process even easier. Often, you can find patterns for natural elements, letters, and numbers in embroidery books. When you find one you like, use your printer to copy the design onto card stock. Then, using an X-ACTO® knife, cut out your design to create your template. 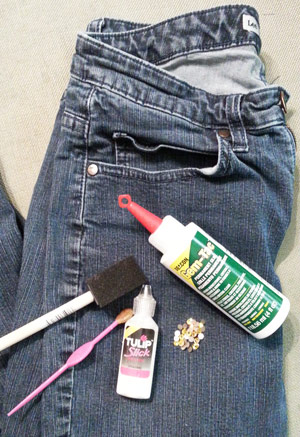
Instructions For DIY Rhinestone Jeans
For this project, I choose a multi-media approach of using fabric paint and rhinestones. To recreate the design on your jeans you’ll need:
Gather your supplies together. You’ll find many brands of fabric paint and anyone will do. When choosing your rhinestone glue, make sure it’s washable, dried clear, and applicable for rhinestones. 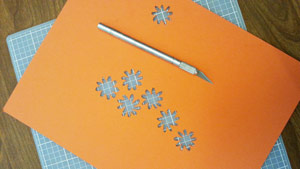
If your jeans are brand-new, you’ll need to wash them before you begin. Then, lay out your clothing on your work surface as flat as possible.
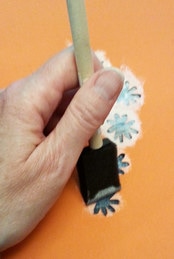
Begin by squeezing your white fabric paint into a shallow paint dish. Lay the template flat along one side of the jeans. With your brush, dab white paint on the jeans. I painted six daisies on one side and one daisy on the other side. If you like more daisies, move the template lower along the pant leg and paint more.
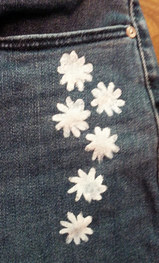
Allow 24 hours to dry completely before gluing on your rhinestones. Once the paint is completely dry, you’re ready to glue on your rhinestones. Place a drop of glue slightly smaller than the rhinestone in the middle of a white daisy. With a wax-tipped tool, pick up a rhinestone and gently press it into the glue. Some of the glue should seep out from the sides. This forms a seal and keeps the rhinestones from peeling off during washing. 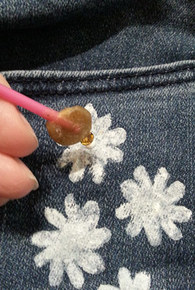
Repeat for all the other daisies. Once again, allow to dry flat for 24 hours. 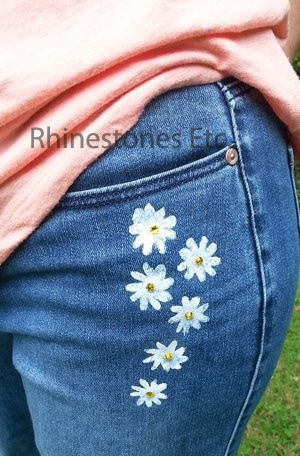
Sassy yet, stylish, you’ll love your new jeans! Plus, once you see how easy it is to DIY rhinestone jeans, you’ll want to do every pair you own.
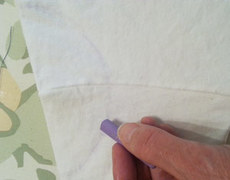
Rhinestones Etc. has been selling quality rhinestones since 2011. With a huge inventory of rhinestones, you’re sure to find the perfect color. We have great customer service, fast processing times, and competitive pricing. How to make a Jazzy Top My college daughter needed a quick yet sophisticated costume to wear over leggings for a duet for a Spring Dance Recital. Keep reading to see what I did with some tee shirts from the craft store with rhinestones and hot fix metal trim. For this project I used: Craft store tee shirts in contrasting colors – the top one tight fitting and the bottom one larger Scissors Sewing machine 12ss crystal rhinestones 4 mm silver hot fix metal trim Gem Tac adhesive Hot fix wand (or iron) Wax tipped tool 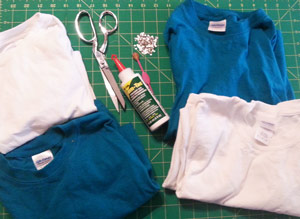 Begin by deciding how long you want the top piece, measure and cut the bottom off. My shirt measures about 16 inches from the shoulder. Decide how much you want to add to the bottom, measure the contrasting tee shirt and cut. The white piece I added to the bottom measured about 11 inches. On the tee shirt piece for the bottom (the white piece), sew gathering stitches along the top edge. Gather to fit the top, pin and then using a medium zigzag stitch or serger, sew top and bottom together.  Using an oval shaped template, mark the bottom of the top with chalk and cut. Using an oval template, cut out an oval shape at the top of the shoulders. Cut the seams around the neckline and bottom sleeve edges.
I used an ½ inch distance between the rhinestones and ½ distance between the metal trim. Place a drop of glue slightly smaller than the rhinestone on the neckline and using a wax tipped tool or tweezers, pick up a rhinestone and gently press it into the glue. Continue along the neckline and also along the oval cut out on top of the shoulders. Allow to dry flat for 24 hours. The metal trim is hot fix, so lay out your metal studs offset from the rhinestones and heat your hot fix tool. When the tool is hot, gently press down on the metal trim using the flat tip and hold for 12-15 seconds to activate the glue. You can also use an iron on the highest setting without steam. You may want to place a piece of white paper between the iron and shirt to prevent scorching. Gently press down holding for 12-15 seconds. Do not slide the iron as this may move the metal trim.  Simple, yet jazzy, my daughter was thrilled with her costume and I was happy with how easy it was to make.
Rhinestones, hot fix metal trim and wax tipped tool are available from: www.RhinestonesEtc.com You know that feeling you get when your favorite pair of jeans gets a hole in the knee? Never fear! You can still use them by turning them into your new favorite pair of shorts. Why wait? Have a new pair of jeans that you love? You can do this with a new pair of jeans for a unique look that you’ll love even more. For this project I used: A pair of old jeans cut to short length Black lace Scissors Gem Tac Wax tipped tool or tweezers 4 mm silver round metal trim 12ss Crystal Rhinestones 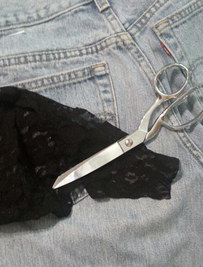 I began by cutting my jeans above the knee down to short length. Then I traced the back pocket size on a white piece of paper. I cut this out and used this as a pattern to cut the correct size of black lace to cover my pocket.  Using Gem Tac, I applied a line of glue around the edges of the back pocket of my jeans. Laying the black lace on the pocket, I gently pressed down the edges to adhere to the jeans and allowed to dry flat for 24 hours.  Using the pocket pattern, I cut a design out to have a template to use as a guide to glue on my metal trim and rhinestones. I began gluing the metal trim on the out most edges of the pocket following my guide. Although the metal trim is hot fix, I prefer to use Gem Tac to adhere to thick material like denim. 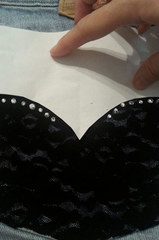 I alternated between the metal trim and rhinestones leaving about ¼ of an inch between embellishments. Place a drop of glue about the same size as your embellishment and pick up either a rhinestone or piece of metal trim using the wax tipped tool. Gently press it into the drop of glue. Continue gluing until your pattern is finished. When finished gluing, allow to dry flat for 24 hours. 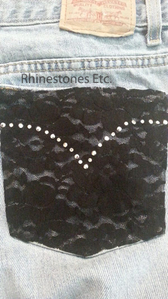 The silver metal trim and crystal “pop” on the black lace and turn these shorts into something special! 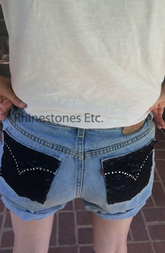 Rhinestones, metal trim and wax tipped tool are available from:
www.RhinestonesEtc.com Do you want to be notified of upcoming sales, new clearance, and new products? Would you like our guide to Gluing Rhinestones Without Panic? Subscribe to our newsletter by clicking here. |
KarenI have been adding bling for over 20 years. Through my projects, I hope you find inspiration. Categories
All
Archives
July 2024
|


 RSS Feed
Home About Policies Return Shipping
Contact Us Size Chart Privacy Products Reviews
Copyright 2024 Rhinestones Etc. All rights reserved.
Contact Us Size Chart Privacy Products Reviews
Copyright 2024 Rhinestones Etc. All rights reserved.