|
With the harvesting of pumpkins falling in the fall, this fruit has become an iconic image of autumn. Moreover, you can proclaim your love for pumpkins by blinging out a shirt during this season. Our pumpkin rhinestone template makes embellishing a shirt with rhinestones easy. 
Steps to Create A Bedazzled Shirt 1. Download Our Free Rhinestone Template First, download our rhinestone template. Our template shows the position, size, and quantity of the rhinestones you’ll need. You can use it exactly as is or experiment with different sizes or colors. 2. Prewash Your Garment Typically, clothing manufacturers treat garments with chemicals to protect them during transportation. Sometimes, these chemicals can prevent rhinestone glues from making a good bond. Additionally, some fibers tend to shrink when you wash them. Thus, it’s important you pre-wash and dry your shirt before you begin your bling project. 3. Choose Your Rhinestone Type Finally, pick the brand and what kind of rhinestone you want to use, hot fix or flat back. You’ll find many manufacturers making both kinds. Either are suitable although you use different techniques for each one. Hot fix rhinestones have glue already on them and need heat to activate the glue. Flat backs require an adhesive like Gem-Tac or E6000. 4. Lay Your Garment Flat Make sure you lay your garment as flat as possible on your work surface. If the shirt material is thin, you may want to put wax paper between the layers. This will keep the glue from seeping through layers and sticking together. 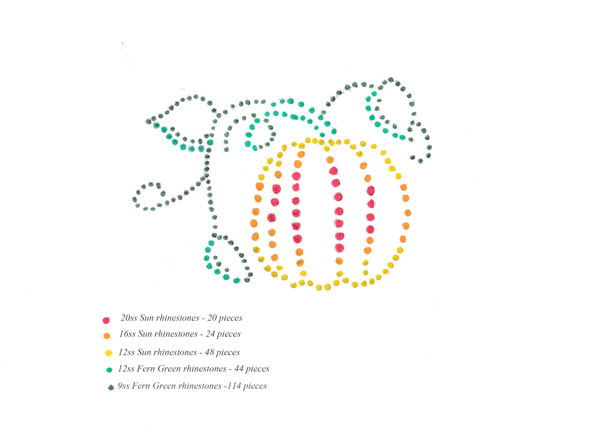
Hot Fix Rhinestones Probably the easiest way to bedazzle a shirt is to create a rhinestone iron on. In addition to our template, you’ll need transfer paper and hot fix rhinestones. Transfer paper has a clear sticky piece and an opaque non-sticky piece. After downloading the rhinestone template, position a piece of wax paper over the template before laying out the rhinestones. This step will keep the transfer paper from sticking to the template. Then, lay the rhinestones on the template as indicated, facet side up. Separate your transfer paper and lay the sticky side on top of the rhinestones. Gently press on the transfer paper to ensure all the rhinestones stick to it. Then, simply lift the sticky piece of transfer paper and you’ve created a rhinestone iron on. When you’re ready to embellish your shirt, heat an iron to its highest setting. Hot fix rhinestone manufacturers don’t recommend steam irons because the steam and the steam vents interfere with glue activation. Next, lay your shirt out flat and position your rhinestone transfer on your shirt. Press down with the iron and hold for about 12-18 seconds. Lift the iron straight up and repeat on another part of the transfer. Do not slide the iron as this may move the rhinestones. Once you’ve activated the glue on all the rhinestones, allow a few minutes for the rhinestones to cool. Then, simply peel off your transfer paper. Flat Back Rhinestones Alternatively, you can also use non-hot fix or flat back rhinestones. This type of embellishment requires an adhesive. Your local craft store will have different types of popular rhinestone glues:
Just make sure your adhesive dries clear, is washable, and is suitable for your type of embellishment. For example, a popular glue is E-6000. However, the manufacturer doesn’t recommend this adhesive for use with acrylic rhinestones. Moreover, this glue can be difficult to work with on fabric. First, download and print out the template. You can use an awl or punch set with a piece of wood to mark the placement of stones. Next, lay your shirt as flat as possible and position the template in the middle. Then, you can choose one of two methods. Either lay the stones in the holes or use chalk to mark the placement. Before gluing, you can adjust the rhinestone spacing to be closer or farther apart. When you’re ready to glue, place a glue drop slightly smaller than the rhinestone on the shirt. Gently press the embellishment into the glue. Some of the glue should seep out from the sides. This is very important as it forms a seal that helps prevent the rhinestone from peeling off. Once you’ve glued on all the rhinestones, allow them to dry flat for 24 hours. 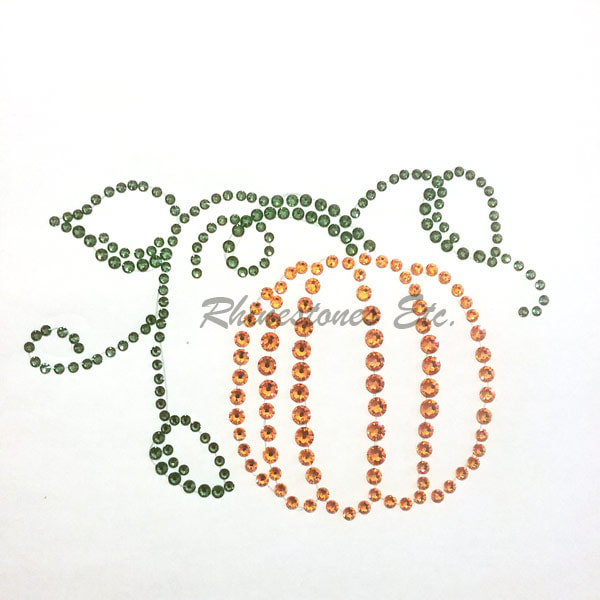
Download Our Pumpkin Rhinestones Template Creating your rhinestone design is easy with our downloadable free rhinestone template. Simply click here to begin your bling project. If you have any questions about how to use the template, you can contactus here. And if you’re looking for fast and friendly service on your rhinestone purchase, shop Rhinestones Etc. We have a huge selection of crystal rhinestones at competitive prices. Plus, most of our orders ship within 24 hours. Browse our online store to find your size and color!
0 Comments
Today, you’ll find plenty of rhinestone products made by many companies. Usually, you’ll find differences in the color selection of manufacturers’ offerings. Often, your project can help you choose a complementary rhinestone color. However, picking between glass or crystal rhinestones can be more difficult. Let’s look at the differences between these 2 materials. 
The Difference Between Glass and Crystal Modern crystal making began with Renaissance glassmakers. Typically, the glass of the day tended to cloud after several months, a process known as crizzling. The exact details of why one artisan added lead into the process are unknown. However, in 1674, King Charles II of England granted George Ravenscroft a patent for this new product. With the addition of lead, Ravenscroft’s glass became denser and clearer, with a higher refraction index. While Ravenscroft focused on glassware, a French jeweler was more interested in producing imitation gemstones. Typically, historians credit Georg Friedrich Strass with the invention of the first rhinestone. He added a foil backing to small pieces of crystal to produce an effect similar to diamonds. Today, you’ll find an abundance of rhinestone manufacturers and retailers. These companies use different materials and processes to create their product. Thus, not all rhinestones have the same sparkle. 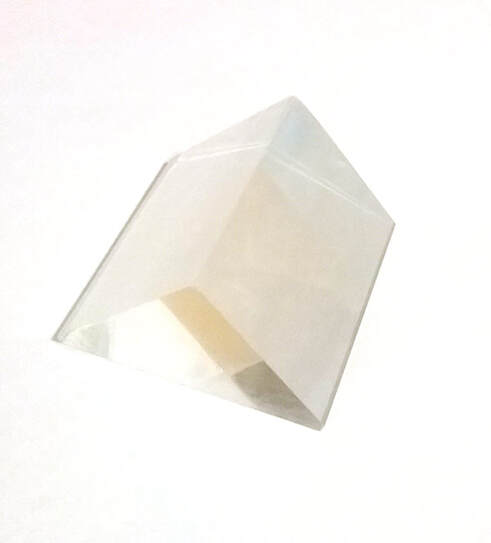
Top 4 Reasons to Choose Crystal Rhinestones Typically, all glass has reflective, refractive, and dispersion properties. Adding lead as an ingredient in glassmaking increased the refraction and dispersion indexes. Crystal is the highest quality rhinestone due to 4 important qualities: 1. Dispersion Properties Often called the prismatic effect, dispersion creates a rainbow by separating light into its component colors. Basically, the amount of dispersion depends on 2 properties of rhinestones: the material and facets. Due to its natural characteristics, crystal exhibits more dispersion ability than glass. Additionally, each little facet cut into the rhinestone acts like a prism to break up light. 2. Crystal Has a Higher Refractive Index Than Glass Transparent materials allow light to travel through them. However, as light passes from a less dense medium to a denser material, it slows down. As it slows, it also bends. Scientists call this property the refractive index. All transparent materials have a refractive index. The higher the index, the greater the sparkle and brilliance of the material. Moreover, as the refractive index increases, so does the amount of dispersion. Crystal, including lead-free products, has a higher refractive index than glass. 3. Crystal Is Stronger than Glass Although a form of glass, crystal is stronger, denser, and more malleable than traditional glass. This gives artisans the ability to cut more precise facets, and at different angles into the surface of the crystal. Both the number of facets and their arrangement help determine the rhinestone’s performance. 4. Crystal Always Has More Clarity Often, pure glass can have a certain cloudiness or tint to it. On the other hand, crystal is always clear. Of course, to create rhinestone colors, manufacturers use additional ingredients in their crystals. Sometimes, these ingredients can change the transparency of the rhinestone. 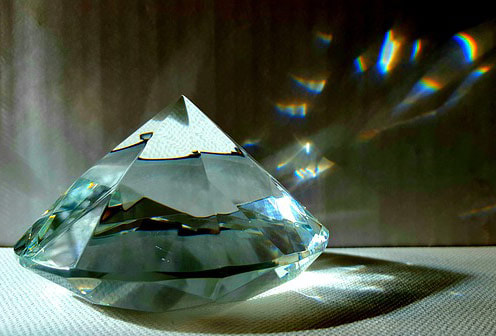
Where to Buy Crystal Rhinestones When it’s time to buy crystal rhinestones, how do you know you’re purchasing a good product? Of course, if you buy a name brand, like Preciosa, you know you’re getting an excellent rhinestone. However, lesser-known brands also produce quality products. Yet, descriptions of products can leave out details about the material and manufacturing process. Furthermore, retailers also call clear rhinestones “crystal”. One way to ensure you buy a quality product is to choose your vendor carefully. At Rhinestones Etc. we’ve been selling quality embellishments online since 2011. We offer super-fast processing times so you get your rhinestones quickly. Plus, we have a huge inventory of brand-name Preciosa crystal products. Moreover, we have excellent customer service and love to answer your questions. Browse our online store today to find your color! Sometimes the simplest materials can make the most beautiful things. For example, you can take discarded magazines and turn them into colorful paper beads. This craft of making paper beads is old, possibly dating back to Victorian England when women used scraps of wallpaper. Today, artisans continue the tradition with modern twists creating beautiful jewelry. You can make your own paper bead earrings with rhinestones following our simple directions. For This project I used: Scrap paper White glue Modge Podge 12ss rhinestones Small beads head pins 4 mm Jump ring Earring wire Wooden skewer/knitting needle Jewelry pliers: round and flat nose 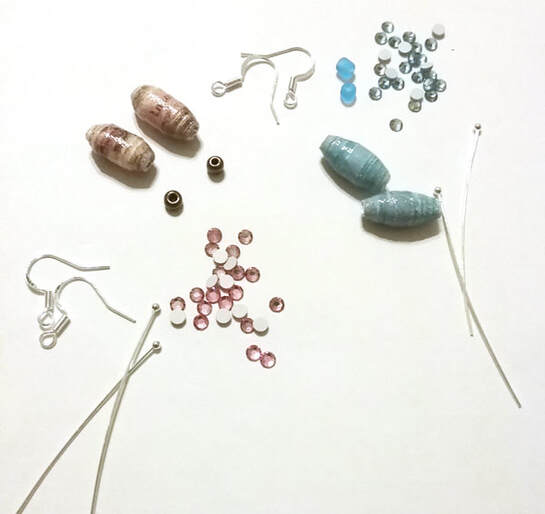 How to Make Paper Beads There are a few different bead shapes you can make which depend on the shape of the paper you cut. A rectangle piece of paper will make a tubular bead while a triangle will make a cone bead. Variations in these shapes will lead to interesting variation differences shape. I used a long triangle shape with a base of ¾ of an inch and sides 8 inches long. Cut out the desired shape from your paper. Place the printed side (the side you want facing outward) face down. Starting about ¼ of an inch from the base, spread your glue thinly starting at the wider end. Set your skewer/knitting needle on the unglued base. Begin to roll your skewer rolling the paper with it to form the bead. When you reach the end, slide the bead off and allow to dry. Next, you’ll need to seal your bead to protect it from the elements. I sealed my beads with several coats of Modge Podge, letting each coat dry thoroughly. 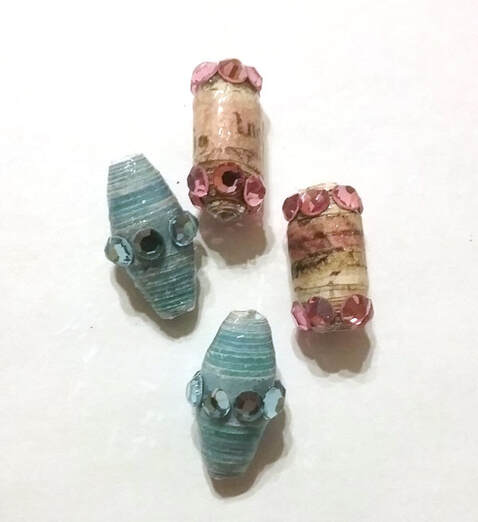 How to Make the Paper Bead Earrings Once the last coat of Modge Podge is thoroughly dry, your ready to glue rhinestones onto your paper bead. I do like to use E6000 on my jewelry projects because of the strength of the bond. Typically, I squeeze a small amount on a paper plate and apply with a toothpick. Always use in a well ventilated area and follow the manufacturer’s instructions. 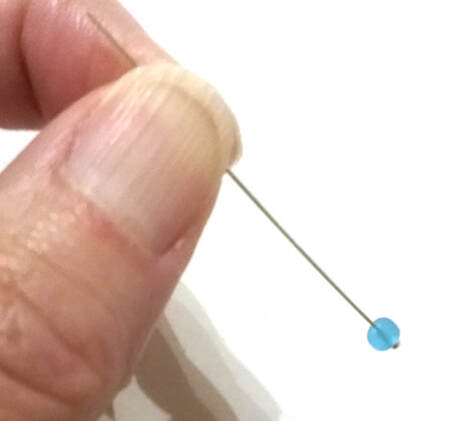 To begin, slide a small bead onto your head pin and then slide a on one of your a paper beads. The next step is to make a loop at the top of the head pin. This can be a little challenging and takes a little practice. You’ll need your round nose and flat nose pliers. Place the round nose just above the top of the paper bead. Then bend the head pin around the nose of the pliers. Continue bending until you have a circle. Remove the round nose pliers. Finally, holding the circle with the flat nose pliers, bend the remaining wire tightly under the loop.  Repeat this process for the other beads. Open a 4mm jumg ring, inserting it in the loop you just made and an earring wire. Close the jump ring. Do this for all the beads. 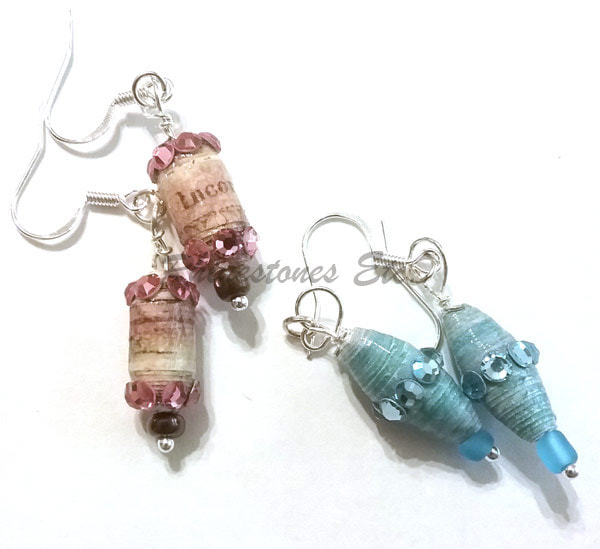 Unique and sparkly, our paper bead earrings with rhinestones are also super easy to make. Plus, the earrings look expensive and artisan made. Make yourself several in different colors to match outfits. And if you need some rhinestones, check out the inventory at Rhinestones Etc. Selling rhinestones online for 10 years, we have fast processing times and excellent customer service. From earliest times, sparkling gems have captivated our attention. Generally, it was only the nobility or very rich who could afford to have jewelry made from precious stones. So, jewelers sought out alternate cheaper sources to make sparkling jewelry at a lower cost. The discovery of natural rhinestones along the Rhine River provided a supply for a time. When this natural source became depleted, jewelers looked for a way to make them. In the early 1700’s a breakthrough came. A French jeweler by the name of Georg Friedrich Strass developed imitation gems later called rhinestones. He discovered that coating a piece of glass with metal powder created a shimmer in glass, similar to a gemstone. The novelty caught on although the imitations were still very expensive. Cutting each rhinestone by hand was labor intensive. Nonetheless, crafting rhinestones blossomed in Bohemia, now the Czech Republic. Individual skilled artisans honed their craft producing their version of rhinestones. One of these skilled craftsmen, Daniel Swarovski, patented an electric cutting machine. This new machine cut crystal more precisely and quickly than by hand. In 1895, he moved to Austria and opened his own manufacturing plant. Meanwhile, those individual companies in Bohemia eventually merged in 1948 to form the Preciosa brand. Today, there are many other manufacturers of rhinestones in a wide variety of shapes and colors. The Asian markets in particular, produce a large number of quality crystal rhinestones. While there are different brands of rhinestones, they all share some of the same characteristics.  Types of Rhinestones Typically, there are 3 main rhinestone types: crystal, glass or acrylic. Rhinestones manufactured from crystal are the most expensive rhinestones. Primarily, crystal is glass mixed with lead or other components which make it clearer and prismatic. The prismatic effect is the ability to take light and break it up similar to a prism. Because of the safety concerns with lead, Swarovski and Preciosa no longer use lead in making their crystal. Both companies have achieved this without losing any sparkle from the rhinestone. This means that both types of rhinestones are CPSIA compliant and are safe for use with children. Similar to crystal, glass rhinestones have a coating to produce a shimmer in the rhinestone as well as facets. However, glass rhinestones do not have the prismatic quality of crystal. Nevertheless, glass rhinestones typically are precision cut by machine. Occasionally, you may see rhinestones listed as DMC or MC. These rhinestones are Asian machine cut rhinestones and they may be either crystal or glass. Finally, there are the acrylic rhinestones, the most inexpensive of all. Formed from molds, acrylic rhinestones do have facets which produce some sparkle. Acrylic rhinestones are a great choice for children’s crafts because they’re lead-free and very inexpensive. Confused about some of the rhinestone choices? Rhinestones Etc. has a large selection of rhinestones at discount prices. We’ll be glad to answer any questions you have regarding rhinestones. You can contact us here. 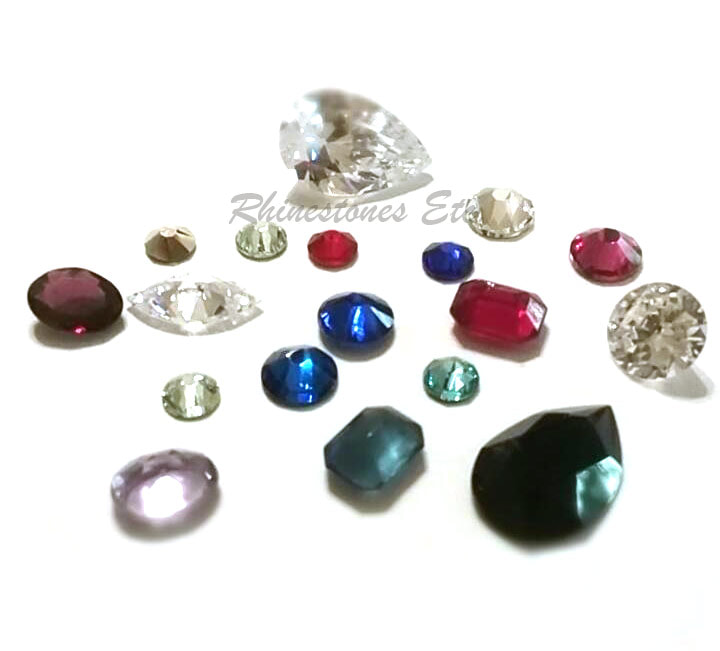 Rhinestones Quality is based on Color, Cut, Contour, and Clarity When shopping for expensive gems, jewelers recommend examining a specimen for the 4 C’s: color, cut, clarity, and carat. The grade of each of these components helps determine the gem’s value. Although slightly different, rhinestones also have 4 C’s: color, cut, clarity, contour. Chiefly, there are many different rhinestone colors and your color choice affects the price. Crystal or clear rhinestones are the least expensive. Aurum, a gold rhinestone with a thin coating of 14k gold is the most expensive. However, within each color, the hue, tone, and saturation must be the same for consistency. The trueness and intensity of color must be the replicated throughout. Variations in color are the mark of cheaper rhinestones. Next, cut refers to the facets. Facets are the small plane surfaces cut into the rhinestone that reflect the light. The more facets, the more light reflects and hence the rhinestone has more sparkle. Swarovski makes a rhinestone with the most facets, 16 arranged in a star shape pattern called the Xirius. Preciosa manufactures a rhinestone named Maxima with 15 facets. Other rhinestone manufacturers cut between 8 and 12 facets into their rhinestones. Generally, the more facets, the more expensive the rhinestone. Chiefly, clarity is the lucidity or clearness of the rhinestone. The rhinestone should be free from spots, streaks or bubbles. Any type of cloudiness in the rhinestone is the mark of an inexpensive brand. Finally, contour refers to the consistency of the shape of the rhinestone. Typically, the shape of the rhinestone also determines its price. Round rhinestones are generally the least expensive, while fancy shapes such as baguette, navette, and others more costly. Size also affects the pricing, with rhinestones increasing in price with the size. 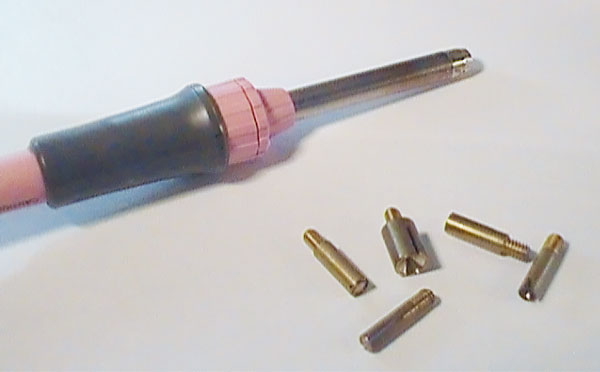 Hot Fix Rhinestones One type of rhinestone is the hot fix which has glue attached to the flat side. To adhere, you can use a hot fix tool, iron or heat press. Swarovski, a manufacturer of rhinestones, recommends a temperature range of 250 degrees F – 340 degrees F to activate the glue. If you choose to use an iron, you will need one without steam vents. Irons with vents don’t provide a flat surface and consequently inadequate pressure when applying rhinestones. Also, water and steam can negatively affect the hot fix application. Never slide the iron as this may move the rhinestones. Always press down the iron and lift straight up before applying heat elsewhere. Another way to attach hot fix rhinestones is with a hot fix tool. These tools come with different screw-on tips to accommodate different size rhinestones. To attach, you lay the rhinestones on a flat surface, facet side up. Heat up your tool, then place the tip over the top of the rhinestone. The rhinestone will stick in the cup of the tip. After about 15 seconds, the glue will begin to bubble. Tap the rhinestone onto the fabric and the rhinestone will stick. Don’t press too hard as this can cause the glue to spread and the rhinestone to stick in the cup. Allow the rhinestones to cool, which takes only a few minutes. Unfortunately, there are some fabrics that are just not suitable for hot fix application. These include very tightly woven textiles, smooth leather or smooth imitation leather, and thin fabrics like organza. To check to see if your fabric is suitable for hot fix rhinestones, apply several drops of water. If the fabric absorbs the water droplet quickly, you can use hot fix rhinestones on it. Alternately, if the water pearls, the fabric is not suitable for hot fix rhinestones. 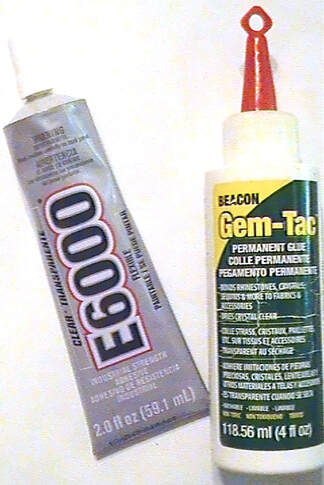 Flat Back Rhinestones Another type of rhinestone is the non-hot fix or commonly referred to flat back. One way to attach flat backs or non-hot fix rhinestones is by gluing. There are a variety of rhinestone glues on the market. Some provide a better bond on certain surfaces than others. Be sure to check the manufacturer’s instructions for recommendations. Additionally, some glue manufacturers do not recommend using their product on cheaper rhinestones like acrylics. For example, E6000 is an industrial strength glue that produces a strong bond to smooth surfaces. It works great on metal and glass. Alternately, Gem-Tac is a great fabric glue that’s easy to apply, dries clear and is washable. There are some other adhesives like Swarovski’s 2-part epoxy, Beacon’s Fabri-Tac and such. Just make sure whichever you use, its suitable for rhinestones, dries clear and if gluing to clothes, washable. One of the key components in gluing rhinestones to clothing is the method. Many people use too little glue causing the rhinestone to peel off. It’s very important that some of the glue seeps out the sides of the rhinestone. This forms a seal to keep the rhinestone in place. 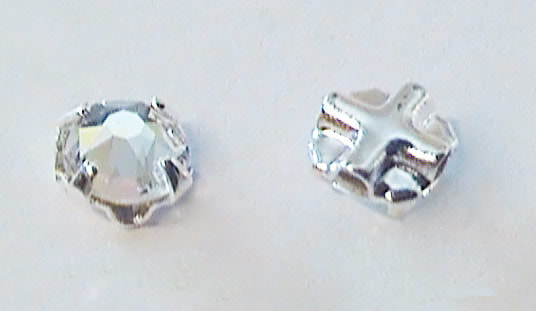 Other Methods of Attaching Rhinestones Generally, there are some other ways of attaching rhinestones to fabrics: metal settings and sew-on rhinestones. To begin with, there are 2 types of metal settings, Tiffany and rim. Their basic difference is one secures form the inside of the garment and the other from the outside. In particular, a rim setting surrounds the rhinestone on the right side of the fabric. The prongs pierce and bend on the inside of the garment to secure the rhinestone. Whereas Tiffany settings have metal prongs pierce through to the outside of the fabric to grab the rhinestone. These prongs bend around the rhinestone to hold it into place. Uniquely, sew-on rhinestones have pre-drilled holes in the crystal allowing a needle to pass through. Sew-0n rhinestones are available in a large variety of shapes. Similarly, a Rose Montee is a rhinestone set in a metal setting that has cross channels on the bottom. A needle easily passes through the cross channels thus, making them easy to sew on. Moreover, thin wire can pass through these channels as well, making Rose Montees ideal for jewelry making. 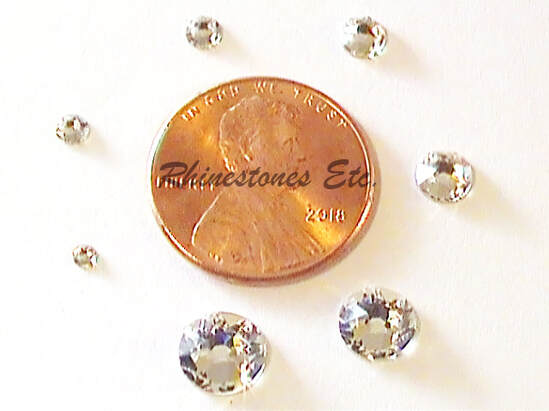 Sizing of Rhinestones Admittedly, the sizing of rhinestones is unique and different. The system goes back to when rhinestones were a natural resource of sparkling quartz. Finders of these sparkling quartz stones grouped them according to their size by dropping them into different size holes. This gave the sparkling quartz a number “stone size“ or “ss”. Larger size sparkling quartz had larger numbers and smaller sized quartz smaller. Even though this natural resource no longer exists, rhinestone manufacturers still use this system of measurement. Usually, retailers of rhinestones will give the equivalent millimeter size adjacent to the “ss” size so you can compare. Sometimes, too, retailers will have a sizing chart with a picture of the size of that particular rhinestone. You can view our millimeter/ss size chart here. When trying to figure out how many rhinestones you need for a project will depend on the size you choose. This is especially true when you’re covering an item with rhinestones. For example, size 20ss is 4.7mm and you need about 29 rhinestones to cover 1 square inch. Compare this to size 12ss which is 3.1mm requiring 67 rhinestones to cover 1 square inch. Of course, the type of project you’re working on may influence your choice of size as well. For instance, you probably want smaller stones for rhinestones your nails yet larger rhinestones for embellishing your wedding dress. Still confused about the right choice of rhinestone for your project? Rhinestones Etc. would love to help! We’ve been selling rhinestones for over 10 years. Drop us a line here, and we’ll get back to you quickly with an answer.
Moreover, we have a huge selection of Preciosa Maxima Rhinestones. Browse our online store to find your color. While your wedding day is a big event to plan, you also have some smaller events to organize. There’s the bridesmaid luncheon, bachelorette party, and rehearsal dinner. And for each of these events, you need something to wear. What better way to announce to the world the upcoming event than by wearing a blinged-out “bride” shirt. Perhaps you’ve seen these shirts in major retailers. Generally, they are expensive and made with cheaper rhinestones without much sparkle. However, you can make your own using our rhinestone template and your choice of rhinestones. 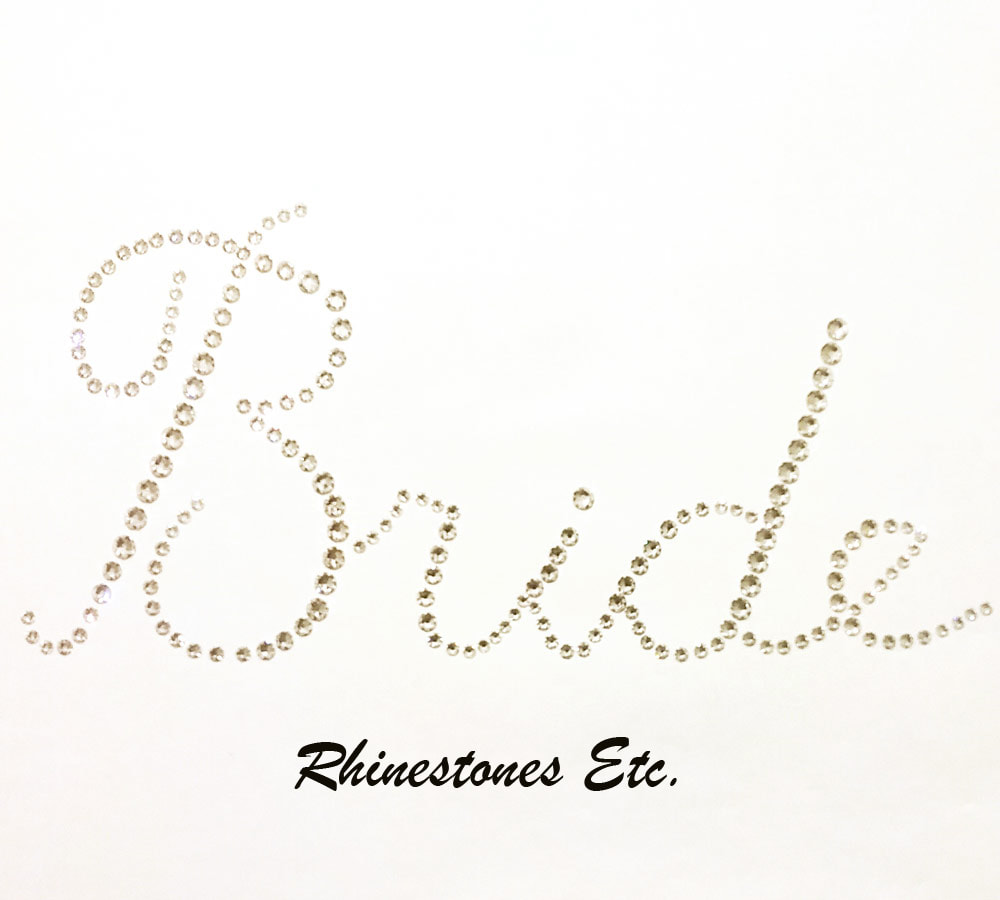 How to Use Our Rhinestone Template Simply go to our website and download the template. Our design has all the size rhinestones listed so you know exactly what you need and how many. Moreover, you can experiment by using all the same size or different sizes. Generally, these bride shirts use crystal rhinestones, but you can choose any color you want. Next, decide on whether you want to use hot fix or flat back (glue-on) rhinestones. Hot fix rhinestones have glue already on them while flat backs require glue. Both of these types of rhinestones work great for this type of project. Even if you’ve never undertaken this type of project before, you can do this easily with our instructions. Finally, always make sure to pre-wash your garment before adding rhinestones. Using Hot Fix Rhinestones To start with, you’ll need some transfer paper if you’re going to use hot fix rhinestones. Peel the opaque piece off of the transfer paper and put it aside. Lay the clear paper, sticky side up on top of the template. Now lay the rhinestones, facet side down, on the sticky paper, placing the rhinestones as indicated. Once you have all the rhinestones placed, you can iron it on to your t-shirt. Heat your iron to the hottest setting without steam. Lay your shirt flat on the ironing boards. Position the rhinestone transfer on the shirt, the flat side of the rhinestone touching the shirt. With the iron, press down on rhinestone transfer, holding for 12-17 seconds. Lift the iron up and if necessary, press down on another part of the transfer. DO NOT slide the iron as this may dislodge and move the rhinestones. Once you’ve done this for the entire transfer, allow to cool completely. Then peel off the clear sticky part and you have your finished shirt.  Flat Back Rhinestones On the other hand, flat back rhinestones require an adhesive. You can find several at your local craft store. My favorite fabric glue for rhinestones is Gem-Tac. It dries clear, is washable and is easy to apply. The technique for flat back rhinestones is different. First, lay the shirt as flat as possible on your work surface. Using the template as a guide, lay all the rhinestones on the shirt. Then, one at a time, pick up a rhinestone placing a drop of glue in its place. Next, gently press the rhinestone into the glue drop, allowing some of the glue to seep out the sides. This “extra” glue forms a seal which helps protect the rhinestones from peeling off. Continue removing one rhinestone at a time and gluing into place until your design is complete. Allow to dry flat for 24 hours. 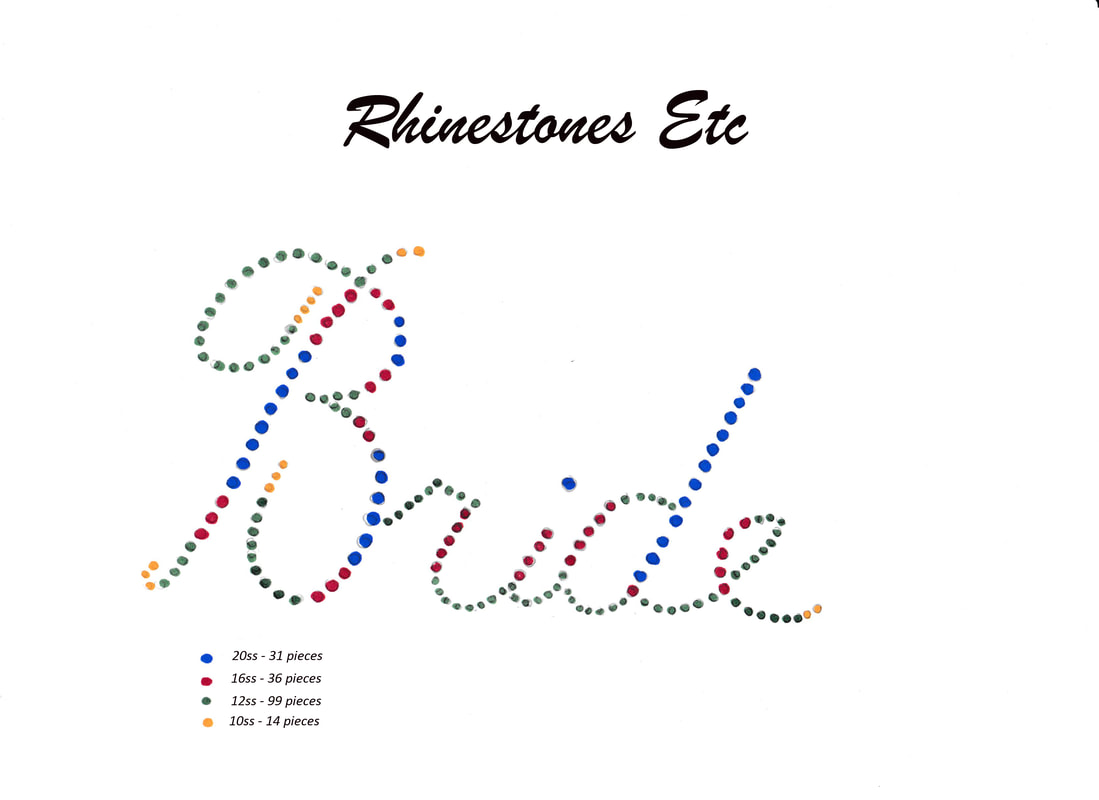 You’ve just saved yourself some money by making your own blinged-out bride shirt. Best of all, our rhinestone template is free! And if you need rhinestones, check out Rhinestones Etc. competitive pricing on rhinestones! We have excellent customer service and want your complete satisfaction with each purchase. Browse our online store to find your color! Have you ever purchased a blinged out item and was disappointed at the amount of sparkle? The truth is, many companies use the cheapest rhinestones possible. Typically, different rhinestone brands produce varying amounts of sparkle. Different raw materials and the number of facets will affect the embellishment’s glittering brilliance. 
The Two Big Rhinestone Brands
Rhinestone manufacturing has its roots in the glassmaking region of Bohemia. It was artisans from this area who received the first patent for cut crystal stone in 1715. As time passed, these “pierres de Strass” or rhinestones became increasingly popular. In the late 1800s, one particular glassmaker, Daniel Swarovski, invented an electric crystal-cutting machine. He moved to Austria and began his own company. Always on the cutting edge of innovation, Swarovski developed new shades and cuts of rhinestones. While rhinestone making continued in Bohemia, the craftsmen continued to work independently until 1948. At this time, 25 crystal making factories merged into one national company under the name of Preciosa. Both companies produce high-quality lead-free crystal components. Swarovski’s Xirius rhinestone has 16 facets arranged in a star-shaped pattern. Plus, the company offers over 100 vibrant colors and effects in different shapes and sizes. Preciosa offers 2 different lines, the Viva 12 with 12 facets and the Maxima with 15 facets. Moreover, you’ll also find a huge selection of colors, effects, sizes, and shapes from Preciosa. (Ed. Note: Due to increased pressure from other manufacturers, Swarovski removed itself from the resale market late in 2021. Today these rhinestones are only available to luxury brands). 
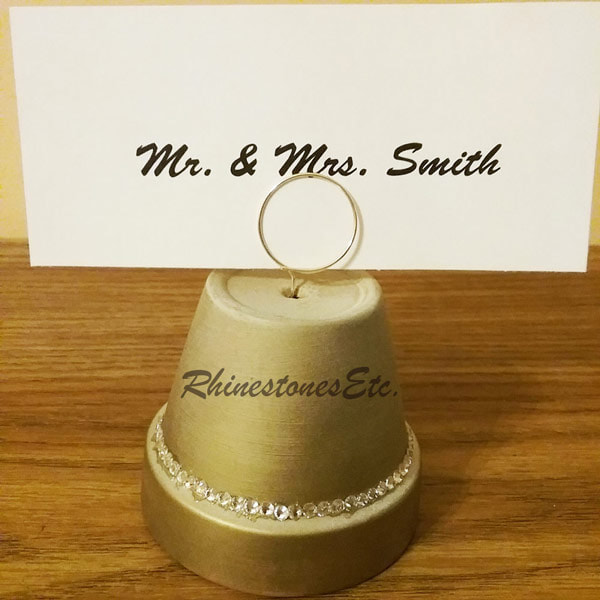
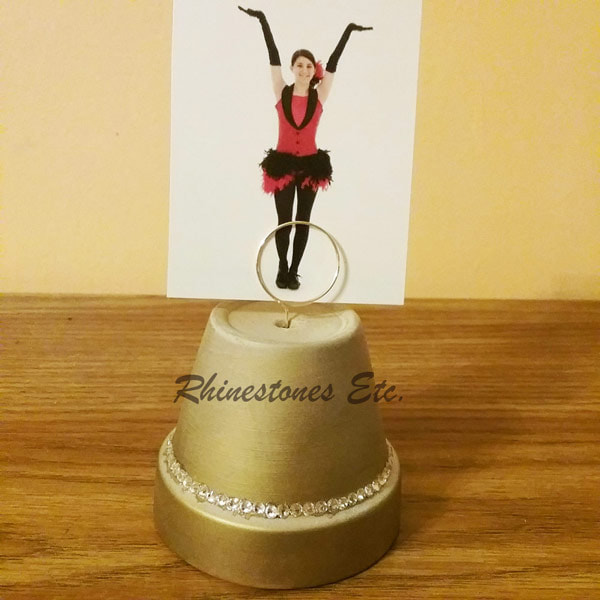
Other Rhinestone Manufacturers Although Swarovski and Preciosa and the highest-quality rhinestone brands available, many other manufacturers exist. Some of these companies also use crystal to make rhinestones while others use glass or plastic. Generally, these materials have differences in 4 important characteristics: 1. Refractive Index As light passes through a transparent material, it slows and bends. The greater the degree the light bends, the more light redirects back to your eyes. Hence, materials with a higher refractive index, like crystal, exhibit a greater brilliance. 2. Dispersion Directly tied to the refractive index is dispersion. This is the ability of a material to break light into separate colors. As the light enters the material and slows, colors bend at different angles exiting as a rainbow. 3. Strength Facets are those small plane surfaces that catch and reflect light. For the even distribution of light, facets must be uniform and symmetrical. Additionally, the greater the number of facets, the more sparkle to the rhinestone. Generally, acrylic manufacturers must mold their products because cutting may melt the product. However, glass and crystal manufacturers rely on machines to cut precise facets. Yet, crystal is denser and harder than glass allowing the manufacturer to cut more facets into a single rhinestone. 4. Clarity Manufacturers use different processes to produce their products. Sometimes, during the manufacturing process, tiny air bubbles can become trapped within the material. Any type of inclusion, like trapped air bubbles, will interfere with the flow of light. Thus, the rhinestone will appear cloudy. Often, certain materials will naturally accumulate fewer inclusions during the manufacturing process. For example, crystal has more clarity than glass. Choosing from Among the Rhinestone Brands Usually, when you can see a bedazzled item in person you can see the quality of the rhinestones. The sparkle and clarity are evident. However, online shopping doesn’t allow you to inspect the embellishments. Unless the retailer specifies the rhinestone brand, it’s probably a lesser quality than a trademarked name. Yet, some manufacturers do produce quality rhinestones with a much lower price point. While some of these products have slightly less sparkle, from a distance, there’s little to no visible difference. So, if you’re planning a DIY bling project, how do you know you’re purchasing a quality product? Make sure you buy your rhinestones from an established, respected retailer. Rhinestones Etc. has been selling quality embellishments since 2011. Currently, we carry both Preciosa Maxima and PriceLess Asian crystal rhinestones. We offer great customer service, fast processing times, and competitive pricing. Browse our online catalog to find your color and size. If you’ve recently gotten engaged, you’ll soon begin planning for your wedding. And although it may seem like it’s so far off into the distance, time has a way of moving fast. Thus, it’s never to early to start working on ideas to make your day special. Typically, weddings are expensive, and many brides and grooms make some things themselves to save on costs. There are a ton of websites and blogs dedicated to the DIYer planning a wedding. You can make your own decorations, favors, and table settings. My DIY place card holders are simple to make and can double as picture holders. For this project I used: A terra cotta pot about 2.75 inches in diameter Metallic gold spray paint Clear acrylic sealer Gold wire (use a smaller gauge for a sturdier, thicker wire - I used 18 gauge) 12ss crystal rhinestones Gem-tac or E6000 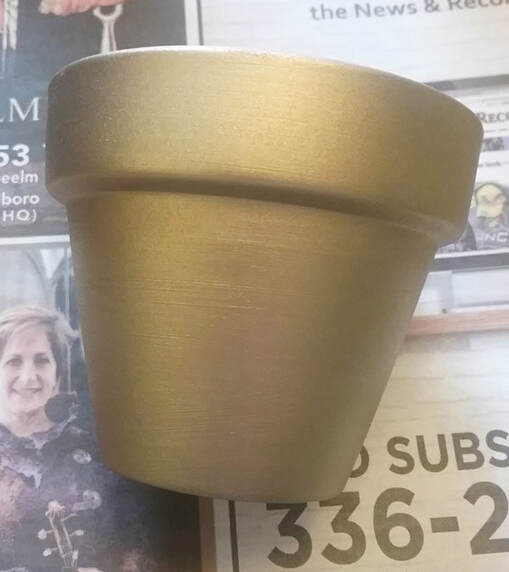 How to make a DIY Place Card Holder Begin by spray painting the terra cotta pot with metallic gold paint. Be sure to paint in a well-ventilated area. Once it is completely dry, spray it with a coat of clear acrylic sealant. Allow the sealant to dry completely as well. Measure and cut a piece of gold wire about 16 inches long. Bend one end into a circle about 1 inch in diameter. 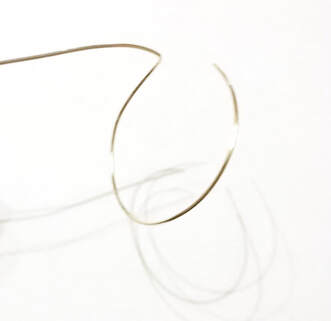 This will go on the inside and help to keep the wire standing upright. Place this in the hole of the pot with the unbent end sticking out. 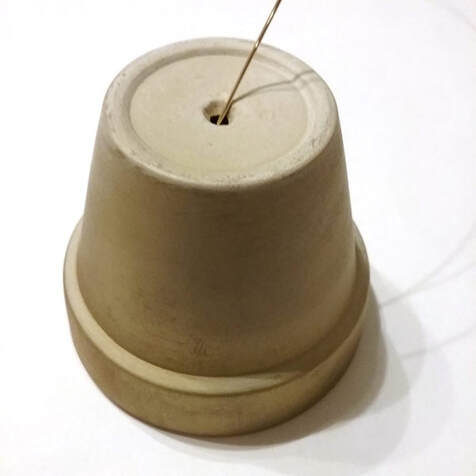 Now take a highlighter or some other household item about ¾ of an inch in diameter. Bend the top part of the wire around the highlighter to achieve a loop. Continue bending the wire around the highlighter several times until you run out of wire. 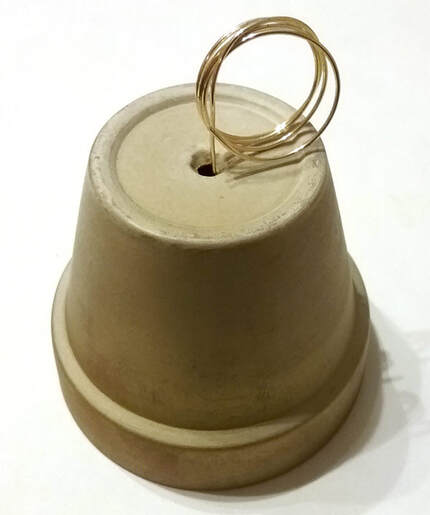 Which Glues are Best to Use? Next, we’re going to glue crystal 12ss rhinestones around the pot to add some sparkle. You can use either Gem-Tac or E6000. I prefer E6000 for this type of project because I can use less glue and still create a secure bond. However, many crafters do not like E6000 because of the toxicity warnings. Always use in a well-ventilated area and follow the manufacturer’s instructions. Gem-Tac is safe to use and works equally well. With this said, it can sometimes leave glue blobs on this type of project. There are other glue alternatives you can use, but I have not tested them. Just make sure the glue is safe for the type of rhinestone you are using. For example, some glues are not for use with acrylic rhinestones. Next, make sure the glue dries clear. Finally, make sure it creates a good bond to the surface you are gluing. Nothing is worse than having rhinestones peel off from your project. I chose to glue rhinestones around the bottom ledge of the pot. This makes it easy to keep a nice even line. Once you’ve glued rhinestones around completely, leave to dry for 24 hours.
Simple and Easy to Make DIY Place Card Holders Now that you’ve got the basic idea, you can personalize this DIY place card holder to match your wedding colors. You can change the color of the paint or rhinestones to compliment the table setting. Then again, you may want to try using smaller terra cotta pots. Finally, if you need to buy rhinestones to make this project, come by and visit Rhinestones Etc. We have a large selection of rhinestones at competitive prices. Browse our online store to find your color! Since Czech glass makers began hand-crafting rhinestones, jewelry makers and designers have used them in their creations. Today, blinging out items continues to be very popular and fashionable. Yet, buying clothes already rhinestoned is expensive. By learning how to attach rhinestones to fabric you can save yourself a bundle and still look great. Best Ways to Attach Rhinestones To Fabric Fundamentally, it seems the list of items you can bling out is endless: handbags, shoes, key fobs, and sunglasses. Usually, to attach rhinestones to accessories, you’ll need to use an adhesive. Yet, you’ll find 4 primary ways to attach rhinestones to fabric: 1. Sew on Rhinestones Generally, a sew on rhinestone has two pre-drilled holes in the crystal. Sew on rhinestones usually offer a wide variety of shapes including navette, triangle, square, and round. Often, these rhinestones are available in different colors including the popular crystal and crystal AB. Another type of sew on rhinestone is the rose montee. These rhinestones lay in a metal setting that has cross channels underneath. A needle can easily pass through the enclosed grooves to secure it to the fabric. Additionally, a thin wire can pass through the channels to create stunning jewelry.  2. Metal Settings For Rhinestones For round rhinestones, you'll find two basic types of metal settings, Tiffany and rim. Both settings have prongs that pierce through the fabric while holding the rhinestone in place. The difference between them is how they secure the rhinestone. Tiffany settings attach from the inside of the garment. The prongs pierce through to the outside of the fabric to grab the rhinestone. You then bend the prongs to hold the rhinestone in place. On the other hand, rim settings attach from the outside of the fabric. A rim surrounds the rhinestone on the outside of the material. Then you bend the prongs on the inside of the garment to secure the crystal.  3. Hotfix Rhinestones Another type of round rhinestone is the hotfix. These have glue applied to the back side of the stone. By applying heat, you melt or activate the glue. When it cools, it becomes solid again firmly attaching to the fabric. Usually, it takes about 5 minutes for the glue to cool. However, the glue requires 24 hours to completely cure. Generally, you can apply heat using one of the following methods:
Most hotfix rhinestone manufacturers recommend a temperature range of 250 degrees F – 340 degrees F to activate the glue. Moreover, not all fabrics will allow penetration of the glue for adequate bonding. For example, you’ll need to avoid materials pre-treated with stain resistors, softeners, or Teflon. Typically, it’s always advisable to do a water pearl test first to determine if the material will absorb the glue. Place a drop of water on the fabric. If the water pearls, the fabric isn’t suitable for hotfix rhinestones. However, if the material readily absorbs the water droplet, hotfix rhinestones will bond to it. 4. Flat Back Rhinestones Undoubtedly, the most popular form of attaching rhinestones to fabric is with the use of glue. When choosing your adhesive, check with the manufacturer to see that it is good for rhinestones, washable, and dries clear. Above all, the most important thing to remember when learning how to attach rhinestones to fabric is the gluing technique. Use a drop of glue slightly smaller than the rhinestone. When you gently press the rhinestone into the glue drop, some glue should ooze out from the sides. This is very important as it helps to create a seal that prevents the rhinestone from peeling off. If your rhinestones fall off it is most likely due to using too little glue. Most glues are multi-purpose, allowing you to glue rhinestones sunglasses, tumblers, and other accessories. However, some adhesives create a stronger bond on some surfaces. For example, glass or metal is very smooth and requires a stronger glue such as E6000. Fabric or paper is porous and you can use glue such as Gem-Tac. Again, before you begin your project, check with the manufacturer to ensure the adhesive will create a strong bond.  FAQs About How to Attach Rhinestones To Fabric Do you still have questions about how to attach rhinestones to fabric? Below, we answer a few of our most commonly asked questions. If you have others, please contact us here. Is One Way of Attaching Rhinestones To Fabric Better than Others? Any method you choose will securely attach your rhinestones and usually, it’s just a matter of preference. However, sometimes, you may find certain shapes only in sew on. Can You Attach Rhinestones to Sheer Fabrics? Yes. We recommend that you place a piece of wax paper underneath the fabric to avoid gluing layers together. Once the glue has cured, simply peel off the wax paper. Where Can I Buy Rhinestones? Rhinestones Etc. wants to be your source for all your bling supplies. We offer fast shipping, competitive pricing, and great customer service. Browse our online store to find the perfect color and size rhinestone for your project. July 4th is just around the corner with the promise of picnics and fireworks. A celebration of the United States independence, we take pride in draping red, white and blue bunting across our porch. Why not show your pride for your country with a blinged-out rhinestone design t-shirt? You can wear your American pride on a t-shirt using our free rhinestone template download of the American Flag. Rhinestone templates make it easy to rhinestone, even if you have never rhinestoned anything before. Just copy the pattern onto your favorite shirt. Of course, the best thing is that our rhinestone template is free! 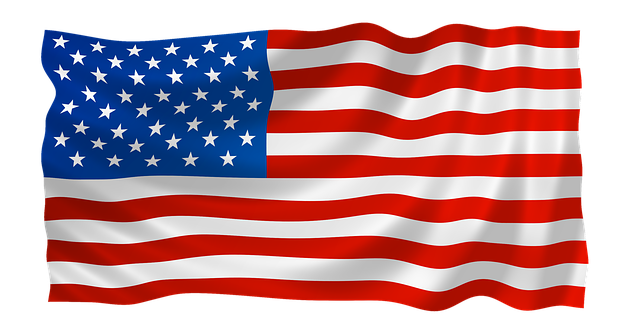 History of the American Flag Legend has it that Betsy Ross sewed the first American Flag. Back in 1776, she received a visit from George Washington regarding the design of the flag. He presented her with the basic layout but, Betsy allegedly finalized the design. She argued for stars with five points because they were easier to cut out with a single snip. But what you might not know is that it wasn’t until 1912 that the specific layout was determined by law. Consequently, flags made before this time show different arrangements of the stars and stripes. In fact, an Act passed in 1794 allowed for 15 stripes rather than the current 13. 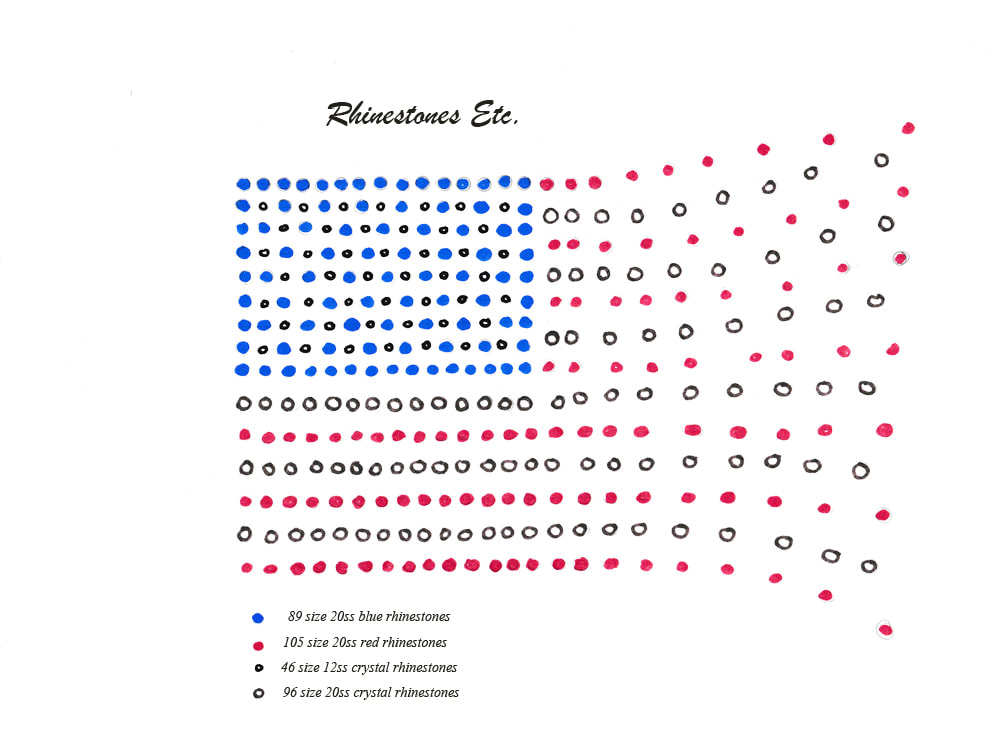 How to use our Rhinestones Template Download First, download our free rhinestone template here. As you can see, the template gives the size and quantity of the rhinestones used. However, feel free to experiment with the rhinestone design and substitute different sizes or spacing. Next, pre-wash your garment before you start to rhinestone. Once washed and dry, lay the shirt on a flat surface to work on. Using our template as a guide, lay out the rhinestones on the shirt. Once you are satisfied with the arrangement of rhinestones, you can start gluing. My favorite glue for fabrics is Gem-Tac for its ease of use. Pick up one of the rhinestones off your design and put a drop of glue in its place. You want to use a drop slightly smaller than the rhinestone. When you gently press the rhinestone into the glue drop, some of the glue should ooze from the sides. The creates a seal which helps prevent the rhinestone from peeling off. Continue gluing in this manner until your design is complete. You can also use hot fix rhinestones and transfer paper if you prefer. Simply lay out the design on the sticky side of the transfer paper, facet side down. Once you finished laying your design out, iron it on to your shirt. Either way, our free rhinestone template download makes it so easy! 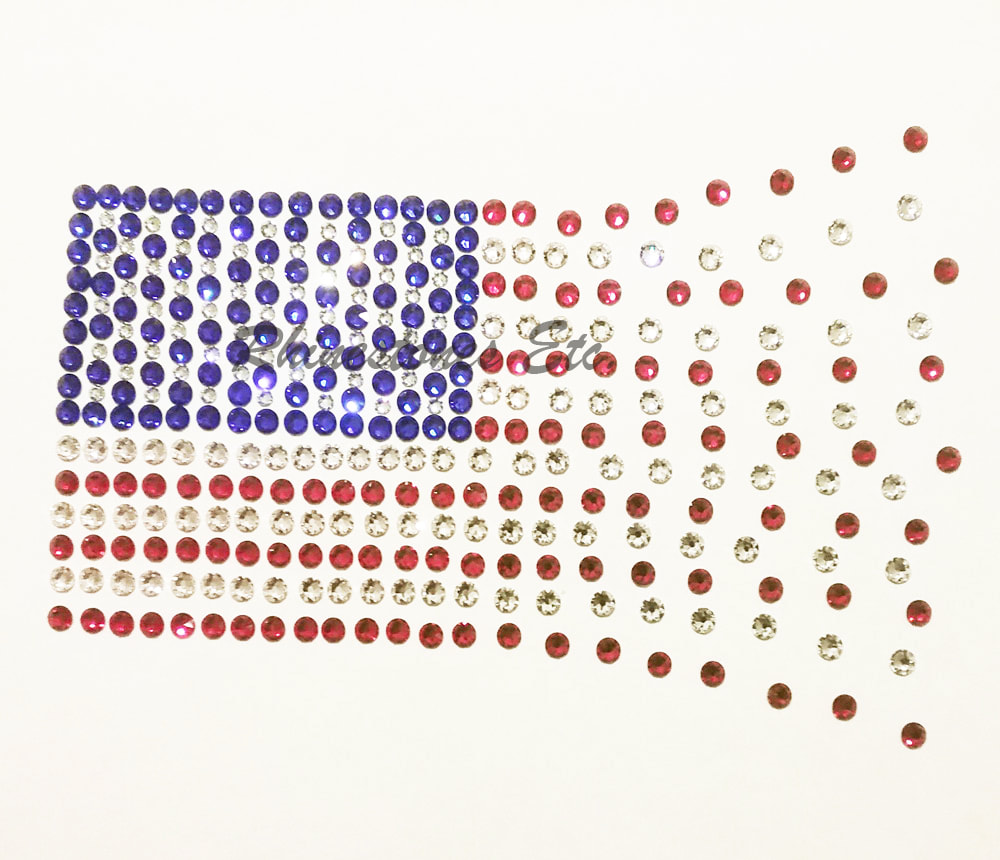 Where to Buy Rhinestones to Use with your Free Rhinestone Template Need some rhinestones to get you started? Rhinestones Etc. has been selling Rhinestones online for over 10 years. With fast processing times, we get your embellishments to your door quickly. Are you new to creating blinged out projects? If so, you may have noticed that rhinestones have a unique unit of measurement. You may have seen sizes listed as 6ss, 12ss, 20ss, or 30ss. While you are familiar with inches and millimeters, “ss” is an unfamiliar unit of measurement. Since you don’t understand this term, you have no idea whether the rhinestone is large or small. Is there a way to translate rhinestone sizes into something recognizable? 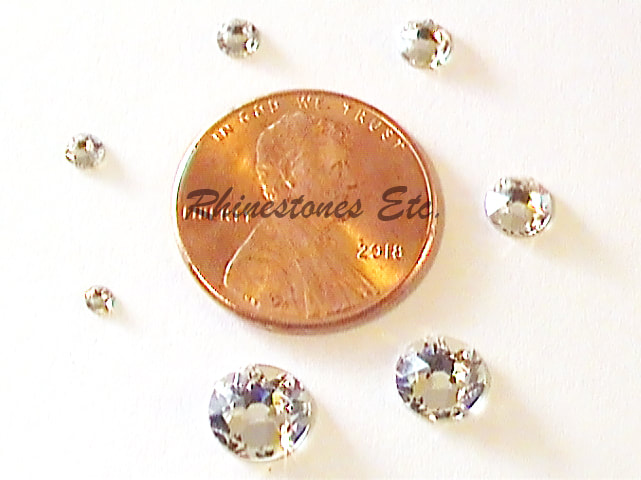
The History of Rhinestone Sizes To understand the term “ss”, we must go back in history to when rhinestones were a natural resource. Originally, gem hunters collected a unique type of quartz found only along the banks of the Rhine River. During formation, lead mixed with silicon and oxygen to give this type of quartz glittering properties. Finders of these sparkling stones grouped them by dropping them into different size holes. These gem hunters assigned a number to each hole with smaller stones having smaller numbers. So, whichever hole number the quartz fit into became the stone size. Later, stone size became abbreviated to “ss” As years passed, this natural resource became depleted and manufacturers developed processes to replicate this glittering quartz. Today, rhinestone manufacturers continue to use stone size as the unit of measurement to describe rhinestone sizes 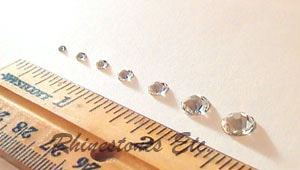
Choosing the Perfect Rhinestone Size Typically, most rhinestone retailers offer a rhinestone size chart with the accompanying millimeter length. This enables you to check the stone size against a ruler. Generally, the larger the number, the bigger the rhinestone. So, a 6ss embellishment will be much smaller than a 34ss one. Sometimes, your bling project can help guide you in choosing a size. For example, you’ll probably choose a smaller rhinestone when gluing rhinestones on fingernails. Some manufacturers offer tiny rhinestone sizes like 5ss, perfect for adding a bit of sparkle. On the other hand, you may want to use a large size for a dance costume. Generally, popular sizes include 16ss, 20ss, and 30ss. Yet, choosing a rhinestone is a personal preference and there are no wrong choices. Furthermore, you don’t have to stick with only one size. Scatter patterns are a trendy and stylish way to use rhinestones on clothing, especially for skating and dance costumes. Additionally, if your design has curves or lettering, you may find using several sizes work better. Rhinestone Size and Sparkle Will a bigger rhinestone sparkle more than a smaller one? Generally, the material, the number of facets, and their arrangement affect sparkle the most. Typically, rhinestones made from crystal sparkle more than both acrylic and glass rhinestones. Additionally, manufacturers cut facets at different angles. This determines how light penetrates and exits the rhinestone to create scintillation and sparkle. Of course, larger rhinestones will also have larger facets to reflect light to the viewer. Usually, higher quality rhinestone manufacturers use crystal. Generally, crystal is a form of glass with an additional ingredient. In the past, manufacturers used lead oxide. With health concerns, today many rhinestone companies use barium, zinc, or potassium oxide instead. Crystal is stronger and denser than glass allowing greater precision in facet cutting. Buying High Quality Crystal Rhinestones Today, crafters bling out many types of objects including clothing, shoes, sunglasses, purses, and tumblers. By adding rhinestones, you create visual interest with texture, sparkle, and color. Once you understand the unit of measurement, it’s easier to choose the perfect size for your project. When shopping for high quality crystal rhinestones, trust Rhinestones Etc. Since 2011. We offer competitive pricing, fast processing times, and great customer service. Browse our online store to find the right color and size rhinestones for your bling project. |
KarenI have been adding bling for over 20 years. Through my projects, I hope you find inspiration. Categories
All
Archives
February 2024
|

 RSS Feed
Home About Policies Return Shipping
Contact Us Size Chart Privacy Products Reviews
Copyright 2024 Rhinestones Etc. All rights reserved.
Contact Us Size Chart Privacy Products Reviews
Copyright 2024 Rhinestones Etc. All rights reserved.